Assignments > HW2. REST API + Database
Due on Wed, 04/21 @ 11:59PM. 15 Points.
Collaboration and Code Sharing Policy
Same as Homework 1
Part 1: Background Information
Readings
Here are some recommended background readings to familiarize yourself with some of the concepts used in this lab:
In Homework 1, we built a stateful web app, where the server itself stores data and information about previous requests that are used to interact with the client. However, this is not good practice for real web applications. In real systems, there are often lots of different identical servers that a user can make requests to. If data is stored on the server, the system must route each user to the same server each time they make a request to keep their information consistent, which becomes a logistical nightmare (CS 310 and 345 cover scalable system architecture in more depth). Additionally, if a stateful application goes down (say, if the computer crashes), all the data that was stored on the server instance is lost forever.
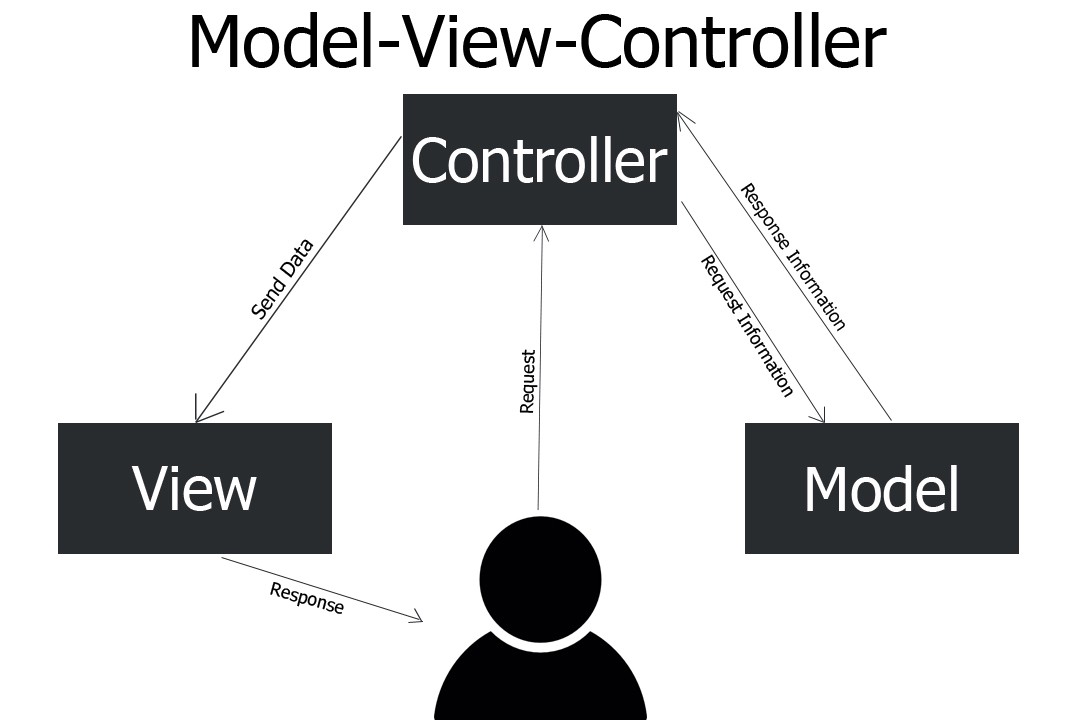
To avoid these problems, we can create a stateless application, in which no state is stored in the server. The solution to this problem is to use a database, which is a persistent data store that exists outside of the server. Web applications using REST typically use the Model-view-controller (MVC) design pattern, in which the user requests something from the controller (the server), which gets data from the model (the database), which is sent back to the controller and used to update the view (what you see on a web page).
The goal of this assignment is to turn the server you wrote in HW1 into a stateless app, replacing the components that relied on the data object with database accesses.
By handling the storage of all data in the database, rather than in a server instance, we can ensure that our API is stateless. The listed readings will help introduce you to:
- The MVC design pattern and how it applies to web programming. For now, we will just be focusing on the Model and Controller aspects of the application; We will start discussing the View next week in class.
- Promises, a common JS paradigm for asynchronous programming. For now, put the most focus on the sections on how to use Promises, rather than how to create them (the introduction and the “Consumers: then, catch, finally” sections may prove useful).
- How to query documents from a MongoDB database using the Mongoose library.
We recommend that you read through these resources somewhat thoroughly; Otherwise, this assignment could prove challenging. All Mongoose queries behave like Promises, so you should know how to use .then() to retrieve their results once executed.
Part 2: Set Up Your Files
Important Note
Many of the
hw02-cs396files have changed since you completed Lab 2, namely:
- All the files and subdirectories in the
configdirectory- All the files and subdirectories in the
srcdirectory- All the files and subdirectories in the
testdirectorypackage.json
Get the new files
Given the aforementioned file changes, please re-download hw02-cs396.zip file (below) and unzip it.
Then, pick one of the two options below (either integrate the new files into your existing hw02-cs396 folder or replace your hw02-cs396 with the files you just downloaded):
1. Replace some files / directories in the hw02-cs396 folder you set up in Lab 2
- Open the
hw02-cs396folder you made during Lab 2 and delete the following:- The
config,srcandtestdirectories - The
package.jsonfile
- The
- Then, copy
config,src,test, andpackage.jsonfrom the folder you just downloaded into thehw02-cs396folder you made during Lab 2 - When you’re done, delete the folder you just downloaded (to avoid confusion later).
2. Start over (but make sure you keep the .env file)
Alternatively, you could also just start over. This would involve:
- Copying your
.envfile into thehw02-cs396folder you just downloaded and unzipped - Deleting and recreating your private
hw02-cs396git repository
Verify your installation
After you’ve set up your files again:
- Run
npm installagain to install the node dependencies. - Run the database populate script again to ensure that your databse has been populated:
npm run populate. This will run a script that will reset your database and fill it with the necessary data. - Finally, run your web server:
npm start
To verify that you have successfully configured your web server:
1. Check the /doctors and /companions endpoints
With your local web server running (don’t forget to type npm start), please click on the following two links:
- Open http://localhost:8081/doctors
It should show you doctors (but with different _ids) - Open http://localhost:8081/companions
It should show you companions (but with different _ids)
2. Run the tests
Also with your local web server running, run the tests in a new command prompt / Terminal window: npm test. You should see feedback similar to the output below, with two tests passing (the /doctors and /companions GET endpoints) and 29 tests failing:
vanwars-macbook:hw02-cs396 vanwars$ npm test

> cs396@1.0.0 test
> cross-env NODE_ENV=development mocha --exit

  /doctors
    GET
      ✓ should return a list of all Doctors (94ms)
    POST
      1) should create a new Doctor object
      2) should create throw an error if missing data

  /doctors/:id
    GET
      3) should find the Doctor object with the specified id
      4) should return a 404 error for a non-existent id
    PATCH
      5) should update only the specified fields of the given doctor
      6) should update the given doctor with the specified information
    DELETE
      7) should delete the specified doctor from the database

  /doctors/:id/companions
    GET
      8) should return a list of all doctors (D4: Tom Baker)
      9) should return a list of all doctors (D11: Matt Smith)
      10) Invalid doctor throws 404

  /doctors/:id/goodparent
    GET
      11) Bad parent detected (D4: Tom Baker)
      12) Bad parent detected (D11: Matt Smith)
      13) Good parent detected (D9: Christopher Eccelson)
      14) Invalid parent throws 404

  /companions
    GET
      ✓ should return a list of all Companions (55ms)
    POST
      15) should create a new Companion object
      16) should create throw an error if missing data

  /companions/:id
    GET
      17) should find the Companion object with the specified id
      18) Should return a 404 error for a non-existent id
    PATCH
      19) should update only the specified fields of the given companion
      20) should update the given companion with the specified information
      21) Should return a 404 error for a non-existent id
    DELETE
      22) should delete the specified companion from the database
      23) Should return a 404 error for a non-existent id

  /companions/:id/doctors
    GET
      24) should return all of the doctors of a particular companion
      25) Should return a 404 error for a non-existent id

  /companions/:id/friends
    GET
      26) should return all of the friends of the main companion
      27) should return all of the friends of companion 'Sarah Sutton'
      28) should return a 404 error for a non-existent id

  /companions/crossover
    GET
      29) should show all companions that travelled with two or more doctors.


  2 passing (5s)
  29 failing
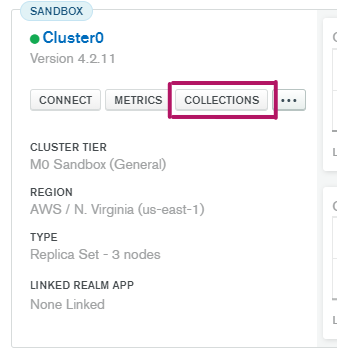
3. Take a look at your MongoDB cloud database
We also recommend that you take a look at your database using the MongoDB cluster on mongodb.com. You can view your data in the collections tab of the cluster:
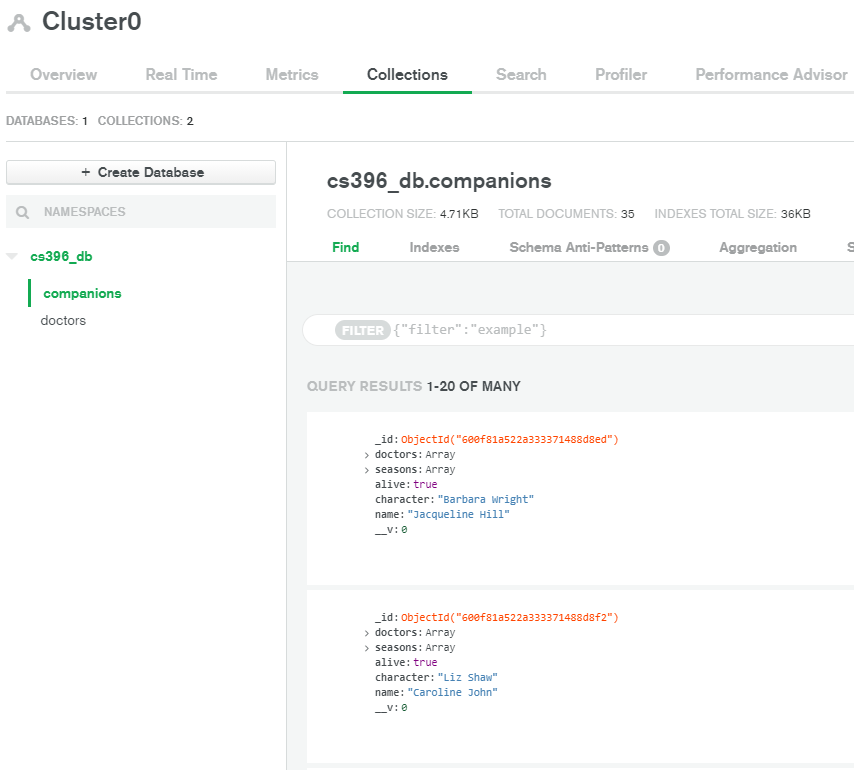
We have 2 collections in our database, one each for Doctor and Companion objects. Note that each object has a 24-character _id; These ids are generated automatically by MongoDB, so you don’t need to create them for POST requests like in HW1 (in fact, you should never manually create or modify them for any reason).
4. Commit and push to GitHub
When these steps pass, add your new files to git, commit them, and push them (just to have a stable version that you can revert back to if need be):
git add .
git commit -am 'Incorporated new HW02 files'
git push origin main
A note on tests this time around
There are a few important differences / notes regarding the mocha test suite this time around:
- There are no longer endpoint dependencies.
- In other words, you should be able to test any endpoint independently without also having to implement any other endpoints.
- Your tests will be interacting with your live database.
- In “the real world,” automated tests should (a) make a copy of your database, (b) test everything using a copy of your DB, and then (c) destroy the copy after the tests run. However, in CS396, your tests will actually be doing create, read, update, and delete operations on your actual database.
- Your tests will only work on your web server.
- Because the tests are now interacting with your own database (versus the static data.json file from hw01), your tests will only work on your local web server and your Heroku web server (because they both access the same database).
- Ask your peer mentor if you have any questions about this.
Part 3: Your Assignment (13 Points)
Implement the Doctor Who API using the data located in your MongoDB cluster. Use the provided Doctor and Companion schema to query the database.
Let’s walk through the first example together (you can test it using Postman the same way we did in Homework 1):
router.route("/doctors")
    .get((req, res) => {
        console.log(`GET /doctors/${req.params.id}`);
        Doctor.find({})
            .then(data => {
                res.status(200).send(data);
            })
            .catch(err => {
                res.status(404).send(err);
            });
    })
In this example, we query the database for all Doctor documents and send them back to the client, sending an error instead if the query failed.
Doctor.find({})performs a query for Doctor objects. The argument to.findis a JSON object containing search queries for objects you want to find. Since we pass in an empty object, all documents are returned..then(data => { ... })follows the Promise syntax described in reading 2; For Mongoose queries, the callback passed to.then()takes adataobject, which is a list of objects returned by the query.res.status(200).send(data);sends back the data to the client with a status code indicating that the GET request succeeded.res.status(404).send(err);is called if there is an error while querying MongoDB (e.g. if the connection is broken). In this case, we send back an error message with a status code indicating that the requested resource couldn’t be found.
We went over some different ways of formulating MongoDB queries in Lecture 5, which may be useful to you (see code samples, including the samples.js file and the answers folder). You should use Mongoose’s query operators to only query the data you need, rather than pull a large amount of data and filter it on your server.
Also note that the specifications for the API routes are the same as in HW1, but should use and modify database data (instead of a local JavaScript Object). If your API works correctly, you should see the same responses as you did in Homework 1 (except different _id values and a new __v property).
1. Implement the following GET routes (8 Points)
The links included below point to a deployment of the hw02 solutions.
| Method/Route | Response data Value |
Response data Type |
Points |
|---|---|---|---|
| GET /doctors | A list of all Doctor objects. Demo: | Array<Object> | 0.5 |
| GET /doctors/:id |
The Doctor object with the specified id. Demo:
|
Object | 1 |
| GET /doctors/:id/companions | A list of the companions that travelled with the doctor with the specified id. Demo: | Array<Object> | 1 |
| GET /doctors/:id/goodparent | true if every companion who travelled with this doctor is alive; Otherwise, false. Demo: | boolean | 1 |
| GET /companions | A list of all companion objects. Demo: | Array<Object> | 0.5 |
| GET /companions/:id |
The companion object with the specified id. Demo:
|
Object | 1 |
| GET /companions/:id/doctors | A list of the Doctors with whom this companion travelled. Demo: | Array<Object> | 1 |
| GET /companions/:id/friends | A list of the companions who appeared on at least one of the same seasons as this companion. Demo: | Array<Object> | 1 |
| GET /companions/crossover | A list of the companions who travelled with multiple doctors. Demo: | Array<Object> | 1 |
2. Implement POST, PATCH, and DELETE routes (5 Points)
Similar to the above, you will re-implement the POST, PATCH, and DELETE routes from HW1 so that they interact with your database.
| Method/Route | Effect | Request Body | Response data Value |
Response data Type |
Points |
|---|---|---|---|---|---|
| POST /doctors | Create a new Doctor object and store it. The database will auto-generate an id, so you don't have to do this part manually (see example from Lecture 5). | { name: string, seasons: Array<number> } | The new Doctor (including the _id) | Object | 1 |
| POST /companions | Create a new companion object and store it. | { name: string, character: string, doctors: Array<number>, seasons: Array<number>, alive: boolean } | The new Companion (including the _id) | Object | 1 |
| PATCH /doctors/:id | Update the fields of the Doctor object with the specified id to match the fields in the request body. If a field is not present in the request body, leave it untouched in the Doctor object. | { name: string, seasons: Array<number> } | The updated Doctor | Object | 1 |
| PATCH /companions/:id | Update the fields of the companion object with the specified id to match the fields in the request body. If a field is not present in the request body, leave it untouched in the companion object. | { name: string, character: string, doctors: Array<number>, seasons: Array<number>, alive: boolean } | The updated Companion | Object | 1 |
| DELETE /doctors/:id | Delete the entry for the Doctor with the specified id from the database. | N/A | null | null | 0.5 |
| DELETE /companions/:id | Delete the entry for the companion with the specified id from the database. | N/A | null | null | 0.5 |
3. [Optional] Do the extra credit (Up to 3 points)
If you have the time (or need to make up a missing lab or something), you can earn extra credit by setting up a favorites system in which a user can save their favorite Doctors and companions to find again later. For this extra credit, please use the FavoriteDoctor and FavoriteCompanion schemas to store your favorites in your database.
- If you decide to implement the extra credit, there are tests! Just uncomment all of the tests in the
test_extra_credit.jsfile. - If a doctor or companion gets deleted, you don’t have to also delete it from your favorites (although you certainly can).
| Method/Route | Effect | Request Body | Response data Value |
Response data Type |
Points |
|---|---|---|---|---|---|
| GET /doctors/favorites | Return a list of saved Doctor objects. | N/A | A list of saved Doctor objects. | Array<Object> | 0.5 |
| GET /companions/favorites | Return a list of saved companion objects. | N/A | A list of saved companion objects. | Array<Object> | 0.5 |
| POST /doctors/favorites | Add the Doctor with the specified id to the user's favorites. | { id: Number } | The corresponding Doctor | Object | 0.5 |
| POST /companions/favorites | Add the companion with the specified id to the user's favorites. | { id: Number } | The Companion who was just added to favorites | Object | 0.5 |
| DELETE /doctors/favorites/:id | Delete the Doctor with the specified id from the user's favorites. | N/A | null | null | 0.5 |
| DELETE /companions/favorites/:id | Delete the companion with the specified id from the user's favorites. | N/A | null | null | 0.5 |
Regarding extra credit: If you are working in a group and opt to complete the extra credit, the extra credit points will be divided among the (n) members of the group. So, the individual extra credit you earn will be:
ec_points_individual = ec_total_points / n;
Part 4: Deploy your app to Heroku (2 Points)
You will deploy your app to Heroku in the same way as you did in HW1. This includes:
- Making a new GitHub repo (see Lab1 instructions)
- Committing all of your HW2 files to your new GitHub repo
- Deploying your app to Heroku (see HW1 instructions)
Since we’re now using a cloud database (on the MongoDB server), there is also one additional step:
Setting up your database connection on Heroku
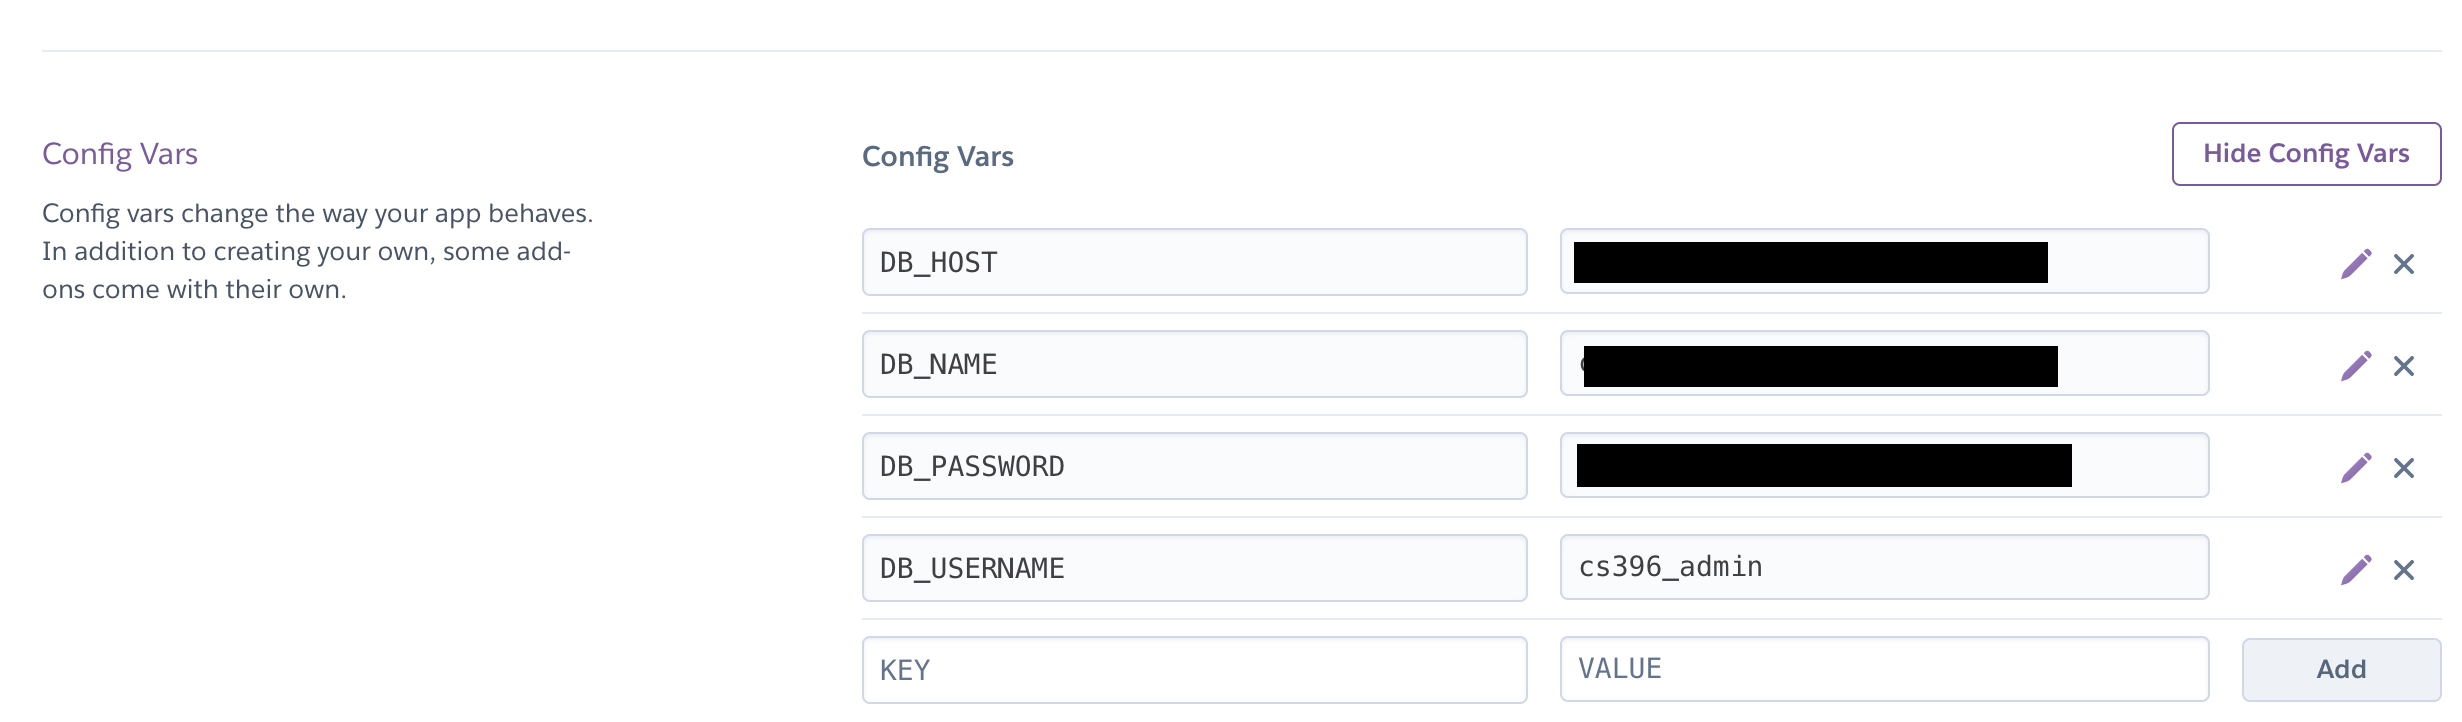
Since .env is not tracked by Git (because it’s in the .gitignore file), we have to let Heroku know the values of our environment variables so the app will work once deployed.
To do this, open your Heroku dashboard and navigate to the Settings tab. Click “Reveal Config Vars” and add in the key-value pairs for each of the variables in your .env file.
Once you’re done adding your environment variables, test that your endpoints work on your Heroku instance.
What to Turn In
We have provided a testing script for you to use to debug your program, which is the same script we will be using to grade your code. To run the tests, open a second terminal window to the hw02-cs396 directory while your server is running and type npm test.
We will also be checking to make sure that all your routes query MongoDB; using the data object instead of the database will result in 0 points for that question.
Before you submit, please make sure you’ve completed the steps listed:
- [13 points] You have implemented all of the required API endpoints listed in Part 3.
- You have created a private repository and checked in all of your code to main.
- [2 points] You have deployed your code to Heroku.
- You have verified that all of the tests pass with the Heroku instance of your code (recommended). To verify this:
- Open the
test/util/testUtil.jsfolder - Edit the endpoint so that instead of pointing to
http://localhost:8081it points to your Heroku instance. - run the Mocha tests:
npm test
- Open the
When you’re done, you should submit the following to Canvas:
- A zip file that contains only your completed routes.js file (since Canvas does not allow users to upload a raw .js file). Please name it
routes.js.zip - A link to your live Heroku web server (just paste the link in as a comment on Canvas).
- A list of your collaborators, if applicable (just list them in the comments section of Canvas).
- Also, tell us if you attempted the extra credit (totally optional).