Assignments > HW1. Writing a Web API
Due on Tue, 04/13 @ 11:59PM. 15 Points.
Collaboration and Code Sharing Policy: Read Carefully
For HW1 and HW2, you are welcome to work in groups of 2-3 (optional). You must still turn in your own version of your
routes.jsfile, and deploy your own Heroku web server (individually), but you can collaborate on code and discuss code and strategies. If you collaborate, you’ll just list your collaborators in the comments section of Canvas.We will be running MOSS on all assignments to ensure that everyone is doing their own work in good faith. For those who are collaborating, this is a way to be transparent about collaboration ahead of time (so if you happen get a code similarity flag via MOSS, we will ignore it). That said, please do not (a) “free ride” on your teammates or (b) enable free riders. Everyone in your group should understand every line of code they submit.
Regarding extra credit: If you are working in a group and opt to complete the extra credit, the extra credit points will be divided among the (n) members of the group. So, the individual extra credit you earn will be:
ec_points_individual = ec_total_points / n;
In this assignment, you will create and deploy a web service which can be used to search for information about the hit BBC show Doctor Who. When a user asks for this information, your API will process their request and send back the specified data. The user will also be able to add and remove information to and from the service, as well as (optionally) save lists of their favorite characters.

Part 1: Setup
1. Download hw01-cs396.zip
Download hw01-cs396.zip, unzip it, and move the resulting hw01-cs396 folder somewhere sensible (i.e. keep your files organized). Important: you will eventually be converting this folder to its own, new git repo. Given this, take care not to save this folder inside a folder that is already a git repo.
The hw01-cs396 files are similar to the files from Lab 1, but there are also significant differences, so use the new, hw01-cs396.zip files (not the old ones).
2. Install npm packages and start your server
- Open
hw01-cs396in VSCode usingFile -> Open Folder. - Select
Terminal -> New Terminalto open a new terminal window in VSCode and typenpm install.- Alternatively, you could also navigate to your
hw01-cs396folder on the Terminal (Mac, Ubuntu) or command prompt (Windows) and typenpm installIf this works, anode_modulesfolder should be created in thehw01-cs396directory.
- Alternatively, you could also navigate to your
You should now be able to run the program by typing npm start into your terminal window (if you get the message Application listening on PORT: 8081, it’s working):
$ npm start
Application listening on PORT: 8081
Visit http://localhost:8081 in a browser window; you should see a message that the app is running.
3. Configure a new git / GitHub Repository
Log into GitHub and create a new private GitHub repository (consider naming it hw1-cs396). Please make it private so that others cannot see your code (for academic integrity considerations). Then, from within your hw1-cs396 on your command line, type the following:
git init
git add .   # asks git to track all of the files in your folder
git commit -am "first commit"  # commit all of your files
git branch -M main  # create a new branch called main (moving away from "master" terminology in CS)
git remote add origin <address-of-repo-on-github>
git push -u origin main
NOTE: The above code sets up your initial repository. For any additional code changes:
- Use
git statusto see all the files that your git repo is tracking, and which files have changed since you last committed. Note that the files listed in your .gitignore file are ignored by git. - Use
git add .to ask git to track any new code files you create. - Use
git commit -am "my message"to commit changes to your repository. - Use
git push origin mainto push changes to GitHub
4. Deploying to Heroku
For the first few assignments in this class, we will be using Heroku, a lightweight hosting service, to deploy our applications to the cloud. Heroku is generally meant for smaller prototype applications, and as such is not acceptable for building large-scale applications (see AWS and friends for that). However, it’s perfect for our use case.
Create a Heroku App
Sign up for a Heroku account and indicate your primary development language as Node.js.
Click “Create a new app” and give the app a name on the Heroku website. You will be brought to a dashboard where you can manage your application.
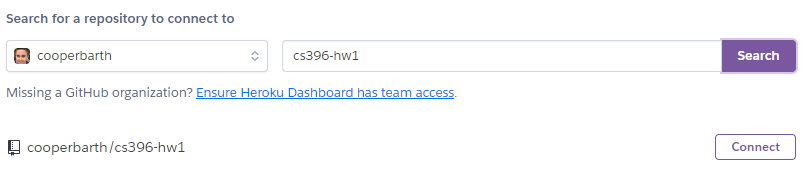
Connect Heroku to GitHub
In the “Deploy” tab of your Heroku dashboard, switch your app’s deployment method from the Heroku CLI to GitHub. Then, click the “Connect to Github” button and search for the repository you created earlier. Press the “connect” button to have Heroku track changes on the main branch of your repository.
Now, all you have to do to deploy your app is to hit the “Deploy Branch” button with “main” selected. Now, if you open your Heroku app, you should see a message indicating that your app is running! You should also be able to access your routes through Postman using the link to your app rather than localhost.
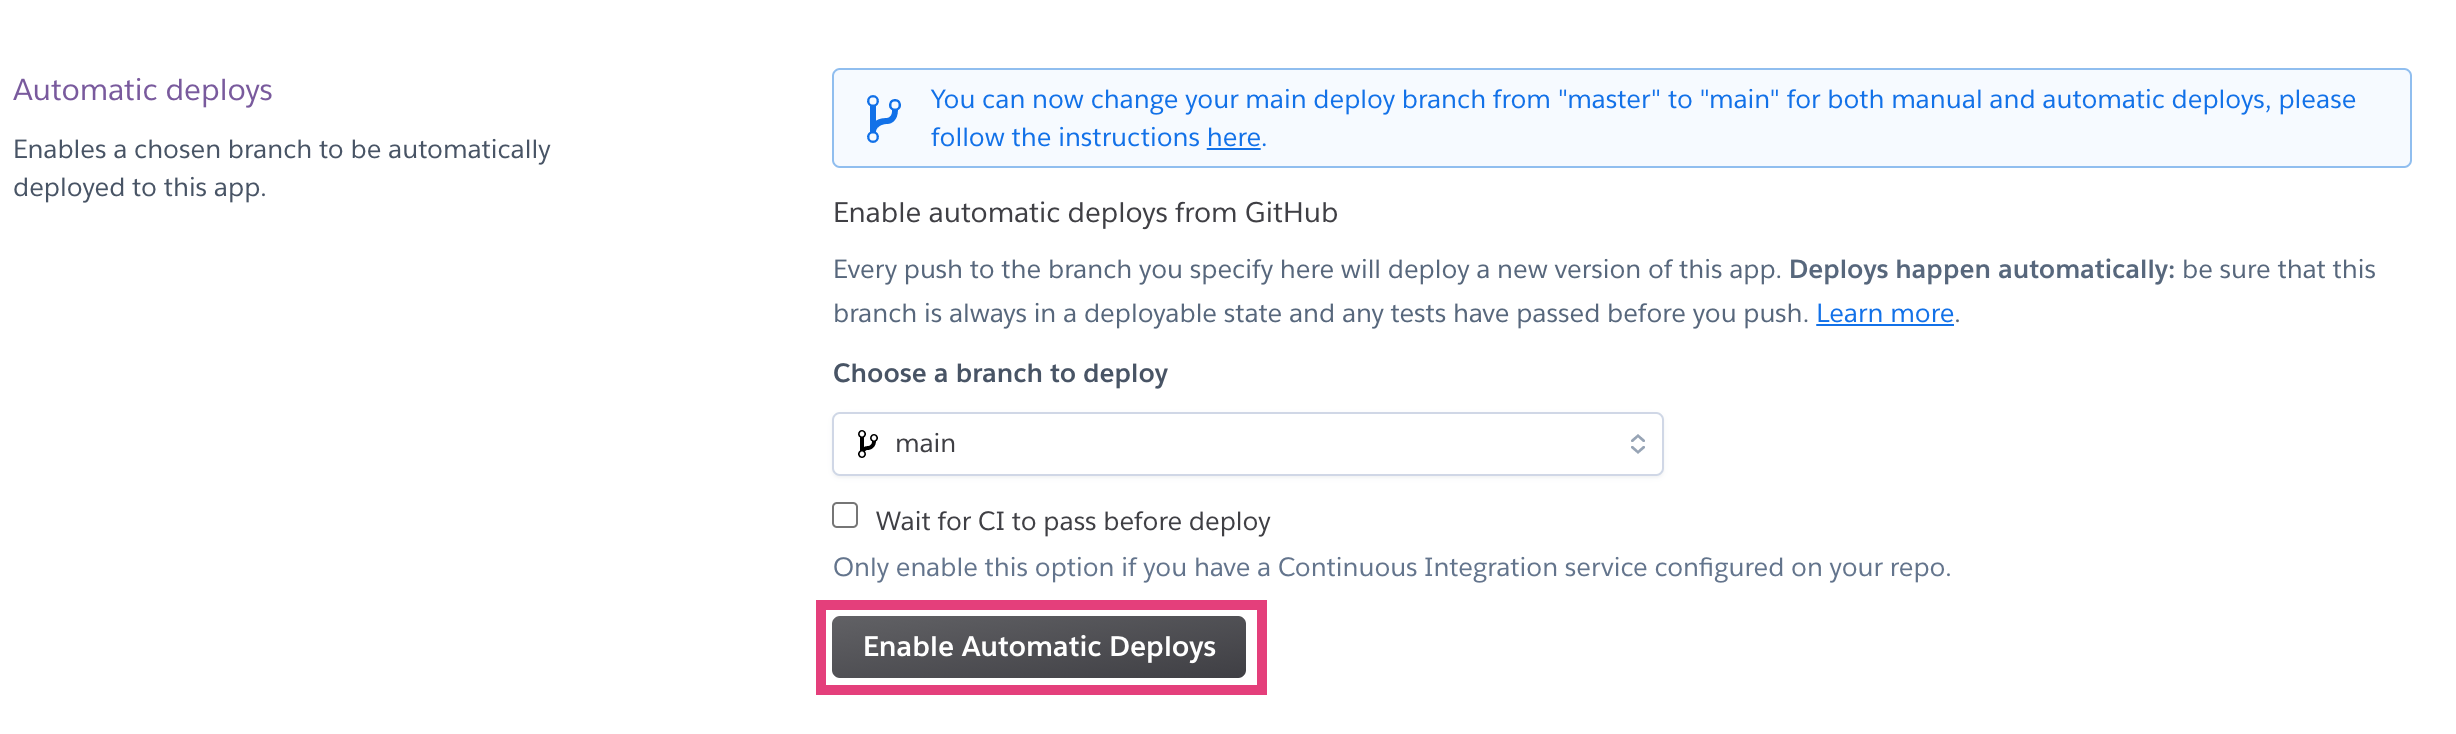
We also recommend that you “Enable Automatic Deploys” so that every time you push a change to GitHub, it will automatically deploy your changes on your Heroku server.
When you’re done, you can test that your deployment worked by clicking on your new Heroku app link. Mine is: https://cs396-hw1.herokuapp.com. Yours will be something different.
Part 2: Code Walkthrough & Background Concepts
Intro to Services with Express
Depending on your background, most of the code you’ve written for previous courses took the form of a program, which runs once and then terminates. In this homework, we will be writing a service, which runs indefinitely and provides utilities that can be called on by other programs.
You will be using the Express framework to build your service.
To test our API, we’re going to be using two tools:
1. Postman (GUI)
Postman is a GUI that lets us send HTTP requests to a specified endpoint. Download Postman, open it up, and put http://localhost:8081 in the “Enter request URL” bar. Make sure GET is selected in the dropdown and click Send; you should see the response from the request as below:
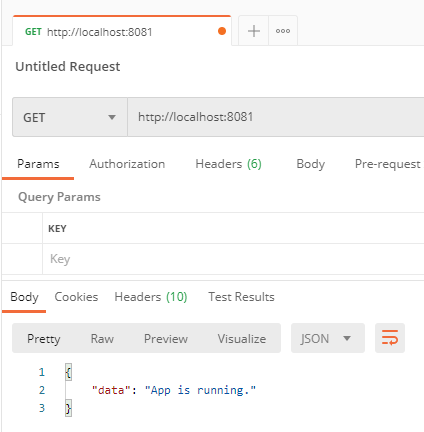
You can use Postman similarly to debug all the routes we will be writing in this assignment.
2. The Mocha Test Framework
In addition to Postman, we have also written some automated tests – using the Mocha test framework – to help you know when you’re done. To run the test suite, type npm test on the command line / Terminal (from within your hw01-cs396 directory) while your web service (http://localhost:8081) is running.
Currently, all of the tests should be failing. When you’re done, all of the tests should pass and your output should look like this:
Sarahs-MacBook-Pro-4:cs396_api vanwars$ npm test

> cs396@1.0.0 test
> mocha


  /doctors
    GET
      ✓ should return a list of all Doctors (39ms)
    POST
      ✓ should create a new Doctor object (47ms)
      ✓ should create throw an error if missing data

  /doctors/:id
    GET
      ✓ should find the Doctor object with the specified id
      ✓ should return a 404 error for a non-existent id
    PATCH
      ✓ should update only the specified fields of the given doctor
      ✓ should update the given doctor with the specified information
    DELETE
      ✓ should delete the specified doctor from the data object

  /doctors/:id/companions
    GET
      ✓ should retrieve all companions of the given doctor

  /doctors/:id/goodparent
    GET
      ✓ D4 Bad Parent
      ✓ D13 Bad Parent
      ✓ D1221 Bad Parent

  /companions
    GET
      ✓ should return a list of all companions
    POST
      ✓ should create a new Companion object
      ✓ should create throw an error if missing data

  /companions/:id
    GET
      ✓ should find the companion object with the specified id
      ✓ should return a 404 error for a non-existent id
    PATCH
      ✓ should update only the specified fields of the given companion
      ✓ should update the given doctor with the specified information
    DELETE
      ✓ should delete the specified companion from the data object

  /companions/:id/doctors
    GET
      ✓ should return all of the doctors of a particular companion
      ✓ should return a 404 error for a non-existent id

  /companions/:id/friends
    GET
      ✓ should return all of the friends of a particular companion
      ✓ should return a 404 error for a non-existent id

  /companions/crossover
    GET
      ✓ should show all companions that travelled with two or more doctors.


  25 passing (355ms)
Note: we have an even more comprehensive test suite that will be used to grade you (so that you don’t hardcode the responses), but if you get these tests to pass and you didn’t hardcode your answers, you’ll be in great shape.
Express Routes
Open routes.js and examine the first route. All HTTP routes consist of 3 components:
- The path, which will be appended to the host route to be accessed by the front-end application
- The HTTP method, in this case GET, which describes the type of information transfer that should take place
- The request handler, which processes incoming information and sends back a JSON response
router.route("/")                               // Path
    .get((_req, res) => {                       // HTTP Method
        console.log("GET /");
        res.status(200).send({                  // Handler
            data: "App is running."
        });
    });
This first route simply sends the receiver a response with a message saying “App is running”. Instead of a normal function, which uses return to output a value, an API uses the .send() method to send a value back to the system requesting it (in this case, Postman). Messages between the server and client are sent via JSON, which is a standardized notation for structured data. Routes can respond to a request by sending any kind of data. In this example, it sends back a string with the message “App is running”.
In addition to transmitting data, data can also be sent to the server as part of the request that is sent to the handler. There are several techniques for doing this:
1. url path parameters
Path parameters are embedded within the URL string, which take the form of colon-prefixed variables in the route path. For example, in the path "/doctors/:n", n is a parameter that can be accessed within the handler using req.params["n"]. Therefore, if I issued the request /doctors/d4, then req.params["n"] would evaluate to the string d4.
2. the request body
A second way of transmitting data to a server is through the request body. On the Node.js side (server side), you can access this object using req.body, which takes the form of a JSON object. On the client side, there are several different approaches to encode data in a client request (we’ll go over this in class). NOTE: Passing data in the request body is typically done for POST, PUT, and PATCH requests. It cannot be done for GET requests.
3. url query string parameters
You will not be using query string parameters in HW1 but we’ve included this information here for your reference:
Query string parameters are appended to the end of a URL using the question mark ? delimiter, and are primarily used for GET requests that require additional filtering. For example, if you decided to support the ability to query for companions across several seasons and/or whether the companion lives or dies, you could express that query as follows:
"/companions/?seasons=3,4,5&alive=true"
In this configuration:
- The
?indicates the end of the URL and the beginning of the query parameters - The
seasons=3,4,5indicates that I’m interested the companions from seasons 3, 4, and 5, - The
&separates the parameter-argument pairs, and - the
alive=trueindicates that I only want to return companions that do not die.
Query string parameters can be accessed within the handler using req.query["param_name"].
Status Codes
All HTTP responses have an attached status code, which represents additional information about the request. A list of all valid HTTP status codes can be found here. For this assignment, all routes should return a 200 status code for a valid request unless POST is used, in which case a 201 status should be used. If a requests asks for information about data that does not exist (e.g. retrieving a Doctor with an id that isn’t present in the data), a 404 code should be used.
The “Database”
We will be using an actual database in HW2. For now, all the data needed to create the API can be found in data.js and can be accessed via the data variable. Your job is to implement all the routes in routes.js, using the available data to send, update, and store any relevant information.
A list of objects representing the Doctors is stored at data.doctors, where each object contains the following fields:
_id: A unique identifier for the object.name: The name of the actor/actress who played The Doctor.seasons: A list of the seasons for which this actor played The Doctor.
A list of objects representing the Doctor’s companions is stored at data.companions, where each object contains the following fields:
_id: A unique identifier for the object.name: The name of the actor/actress who played the character.character: The name of the character.doctors: A list of the_ids of the doctors with whom the companion travelled.seasons: A list of the seasons during which this character appearsalive: A boolean representing whether the character is alive or dead.
Part 3: Writing the API (13 Points)
Your job is to replace the res.status(501).send() statement in each route with your own code that sends back a response alongside an appropriate status (described earlier).
1. Implement the following GET routes (8 Points)
| Method/Route | Response data Value |
Response data Type |
Points |
|---|---|---|---|
| GET /doctors | A list of all Doctor objects. Demo: | Array<Object> | 0.5 |
| GET /doctors/:id |
The Doctor object with the specified id. Demo:
|
Object | 1 |
| GET /doctors/:id/companions | A list of the companions that travelled with the doctor with the specified id. Demo: | Array<Object> | 1 |
| GET /doctors/:id/goodparent | true if every companion who travelled with this doctor is alive; Otherwise, false. Demo: | boolean | 1 |
| GET /companions | A list of all companion objects. Demo: | Array<Object> | 0.5 |
| GET /companions/:id | The companion object with the specified id. Demo: | Object | 1 |
| GET /companions/:id/doctors | A list of the Doctors with whom this companion travelled. Demo: | Array<Object> | 1 |
| GET /companions/:id/friends | A list of the companions who appeared on at least one of the same seasons as this companion. Demo: | Array<Object> | 1 |
| GET /companions/crossover | A list of the companions who travelled with multiple doctors. Demo: | Array<Object> | 1 |
2. Implement POST, PATCH, and DELETE routes (5 Points)
The next set of routes involves storing and manipulating data. For now, you will accomplish this by adding and removing items from the data object. Since the server runs continually in the background, any changes you make to the data object will persist between requests, letting us simulate a database. However, the changes you make will not persist between server runs; if you restart the server, the data object will revert to its initial state.
Notice that the PATCH and DELETE methods detailed below can fail to find an object if it does not exist within data. In these cases, you should mark the status of the response as 404, indicating that the requested resource could not be found.
Note: Receiving two POST requests with identical bodies should create two different objects with distinct ids. It’s your job to figure out how to make sure that no two objects have the same _id. One way to do this might be to append Date.now() to a string identifier, since Date.now() will return a different value each time it is called (you could also generate a random number and use that instead).
| Method/Route | Effect | Request Body | Response data Value |
Response data Type |
Points |
|---|---|---|---|---|---|
| POST /doctors | Create a new Doctor object and store it. You must create a new unique identifier for the object, which you should send back to the client (as part of the Doctor object). | { name: string, seasons: Array<number> } | The new Doctor (including the _id) | Object | 1 |
| POST /companions | Create a new companion object and store it. You must create a new unique identifier for the object, which you should send back to the client (as part of the Companion object). | { name: string, character: string, doctors: Array<number>, seasons: Array<number>, alive: boolean } | The new Companion (including the _id) | Object | 1 |
| PATCH /doctors/:id | Update the fields of the Doctor object with the specified id to match the fields in the request body. If a field is not present in the request body, leave it untouched in the Doctor object. | { name: string, seasons: Array<number> } | The updated Doctor | Object | 1 |
| PATCH /companions/:id | Update the fields of the companion object with the specified id to match the fields in the request body. If a field is not present in the request body, leave it untouched in the companion object. | { name: string, character: string, doctors: Array<number>, seasons: Array<number>, alive: boolean } | The updated Companion | Object | 1 |
| DELETE /doctors/:id | Delete the entry for the Doctor with the specified id. | N/A | null | null | 0.5 |
| DELETE /companions/:id | Delete the entry for the companion with the specified id. | N/A | null | null | 0.5 |
Extra Credit (Up to 3 points)
If you have the time (or need to make up a missing lab or something), you can earn extra credit by setting up a favorites system in which a user can save their favorite Doctors and companions to find again later. Feel free to use whatever data structure(s) you feel appropriate to create your favorites “database”. Return 404 HTTP status codes for the POST and DELETE requests if the entry with the specified _id does not exist.
| Method/Route | Effect | Request Body | Response data Value |
Response data Type |
Points |
|---|---|---|---|---|---|
| GET /doctors/favorites | Return a list of saved Doctor objects. | N/A | A list of saved Doctor objects. | Array<Object> | 0.5 |
| GET /companions/favorites | Return a list of saved companion objects. | N/A | A list of saved companion objects. | Array<Object> | 0.5 |
| POST /doctors/favorites | Add the Doctor with the specified id to the user's favorites. | { id: Number } | The corresponding Doctor | Object | 0.5 |
| POST /companions/favorites | Add the companion with the specified id to the user's favorites. | { id: Number } | The Companion who was just added to favorites | Object | 0.5 |
| DELETE /doctors/favorites/:id | Delete the Doctor with the specified id from the user's favorites. | N/A | null | null | 0.5 |
| DELETE /companions/favorites/:id | Delete the companion with the specified id from the user's favorites. | N/A | null | null | 0.5 |
What to Turn In
Before you submit, please make sure you’ve completed the steps listed:
- [13 points] You have implemented all of the required API endpoints listed in Part 3.
- You have created a private repository and checked in all of your code to main.
- [2 points] You have deployed your code to Heroku.
- You have verified that all of the tests pass with the Heroku instance of your code (recommended). To verify this:
- Open the
test/util/testUtil.jsfolder - Edit the endpoint so that instead of pointing to
http://localhost:8081it points to your Heroku instance. - run the Mocha tests:
npm test
- Open the
When you’re done, you should submit the following to Canvas:
- A zip file that contains only your completed routes.js file (since Canvas does not allow users to upload a raw .js file). Please name it
routes.js.zip - A link to your live Heroku web server (just paste the link in as a comment on Canvas).
- A list of your collaborators, if applicable (just list them in the comments section of Canvas).