Assignments > HW2. PhotoApp: Server-Side Templates with Flask
Due on Thu, 04/21 @ 11:59PM. 20 Points.
A few quick notes and guidelines:
- The collaboration and code sharing policy is the same as HW1.
- Feel free to use the Lab 2 solutions and lecture files as a guide.
1. Introduction
In this assignment, you will be doing two things:
- Converting the static HTML file that you made in HW1 into a data-driven, server-side template.
- Doing a few more design checks to ensure your site is accessible.
As we saw in Lab 2, the Jinja templates (used by flask) allow python logic to be evaluated from within the HTML template, using a set of template variables and expressions (see Jinja documentation). This allows you to create custom, server-generated HTML files that merge with relevant data. For this lab, we will be working with fake data, generated using the faker python module. In HW3, we will be connecting to a database.
- Pro Tip: For those of you who plan to take more prototyping courses after this one,
fakeris a great way to create fake data for testing and prototyping.
2. Background Readings & Resources
3. Setup
1. Organize files
- Download the
hw02.zipfile, unzip it, and copy the contents of the hw02 folder into your existingphoto-appfolder (from HW1). - Move the
index.htmlfile that you created in HW1 into thetemplatesdirectory. - Move the
style.cssfile that you created in HW1 into thestaticdirectory. - Inside of the
headsection of yourindex.htmlfile, update the address of yourstyle.cssas follows:href="/static/style.css".
When you’re done, your file system should look like this:
photo-app
├── .git                        # your local git repo (that you created for HW1)
├── Procfile
├── README.md
├── app.py
├── fake_data.py
├── requirements.txt
├── static
│   ├── starter_style.css
│   └── style.css               # your CSS file from HW1
└── templates
    ├── index.html              # your HTML file from HW1
    └── starter_template.html
2. Set Up Your Virtual Environment
Open the terminal and navigate to your lab02 folder. Then, set up a virtual environment and install the dependencies as follows (depending on your operating system):
For Mac, Unix, Linux, or GitBash
python3 -m venv env
source env/bin/activate
python -m pip install -r requirements.txt    # install dependencies
For Windows Powershell or Command Prompt
# create the virtual environment
py -m venv env

# run the activate.bat script as follows:
env\Scripts\activate

# and finally, install the Python dependencies
py -m pip install -r requirements.txt
Run Your Flask Web Server
When you’re done, try running your flask app from your command line:
Mac or Linux
# set environment variables (you just have to do this once per session)
export FLASK_APP=app.py
export FLASK_ENV=development

# then run flask (type Ctrl+C to quit)
flask run
Windows Command Prompt
# set environment variables (you just have to do this once per session)
set FLASK_APP=app.py
set FLASK_ENV=development

# then run flask (type Ctrl+C to quit)
flask run
# alternative commands to try if "flask run" doesn't work:
# py -m flask run
# python3 -m flask run
# python -m flask run
Powershell
$env:FLASK_APP="app.py"
$env:FLASK_ENV="development"

flask run
You should see the following output:
 * Serving Flask app "app.py" (lazy loading)
 * Environment: development
 * Debug mode: on
 * Running on http://127.0.0.1:5000/ (Press CTRL+C to quit)
 * Restarting with stat
 * Debugger is active!
 * Debugger PIN: 273-580-071
3. Get oriented with the files
With your flask server running, navigate to http://127.0.0.1:5000/ in your web browser and take a look at the web page. Currently, there is very little HTML formatting on the page (pictured below), but it displays each of the 4 context variables: user, suggestions, stories, and posts. Each time you refresh your page, this data will change (as it is generated on-the-fly using faker).
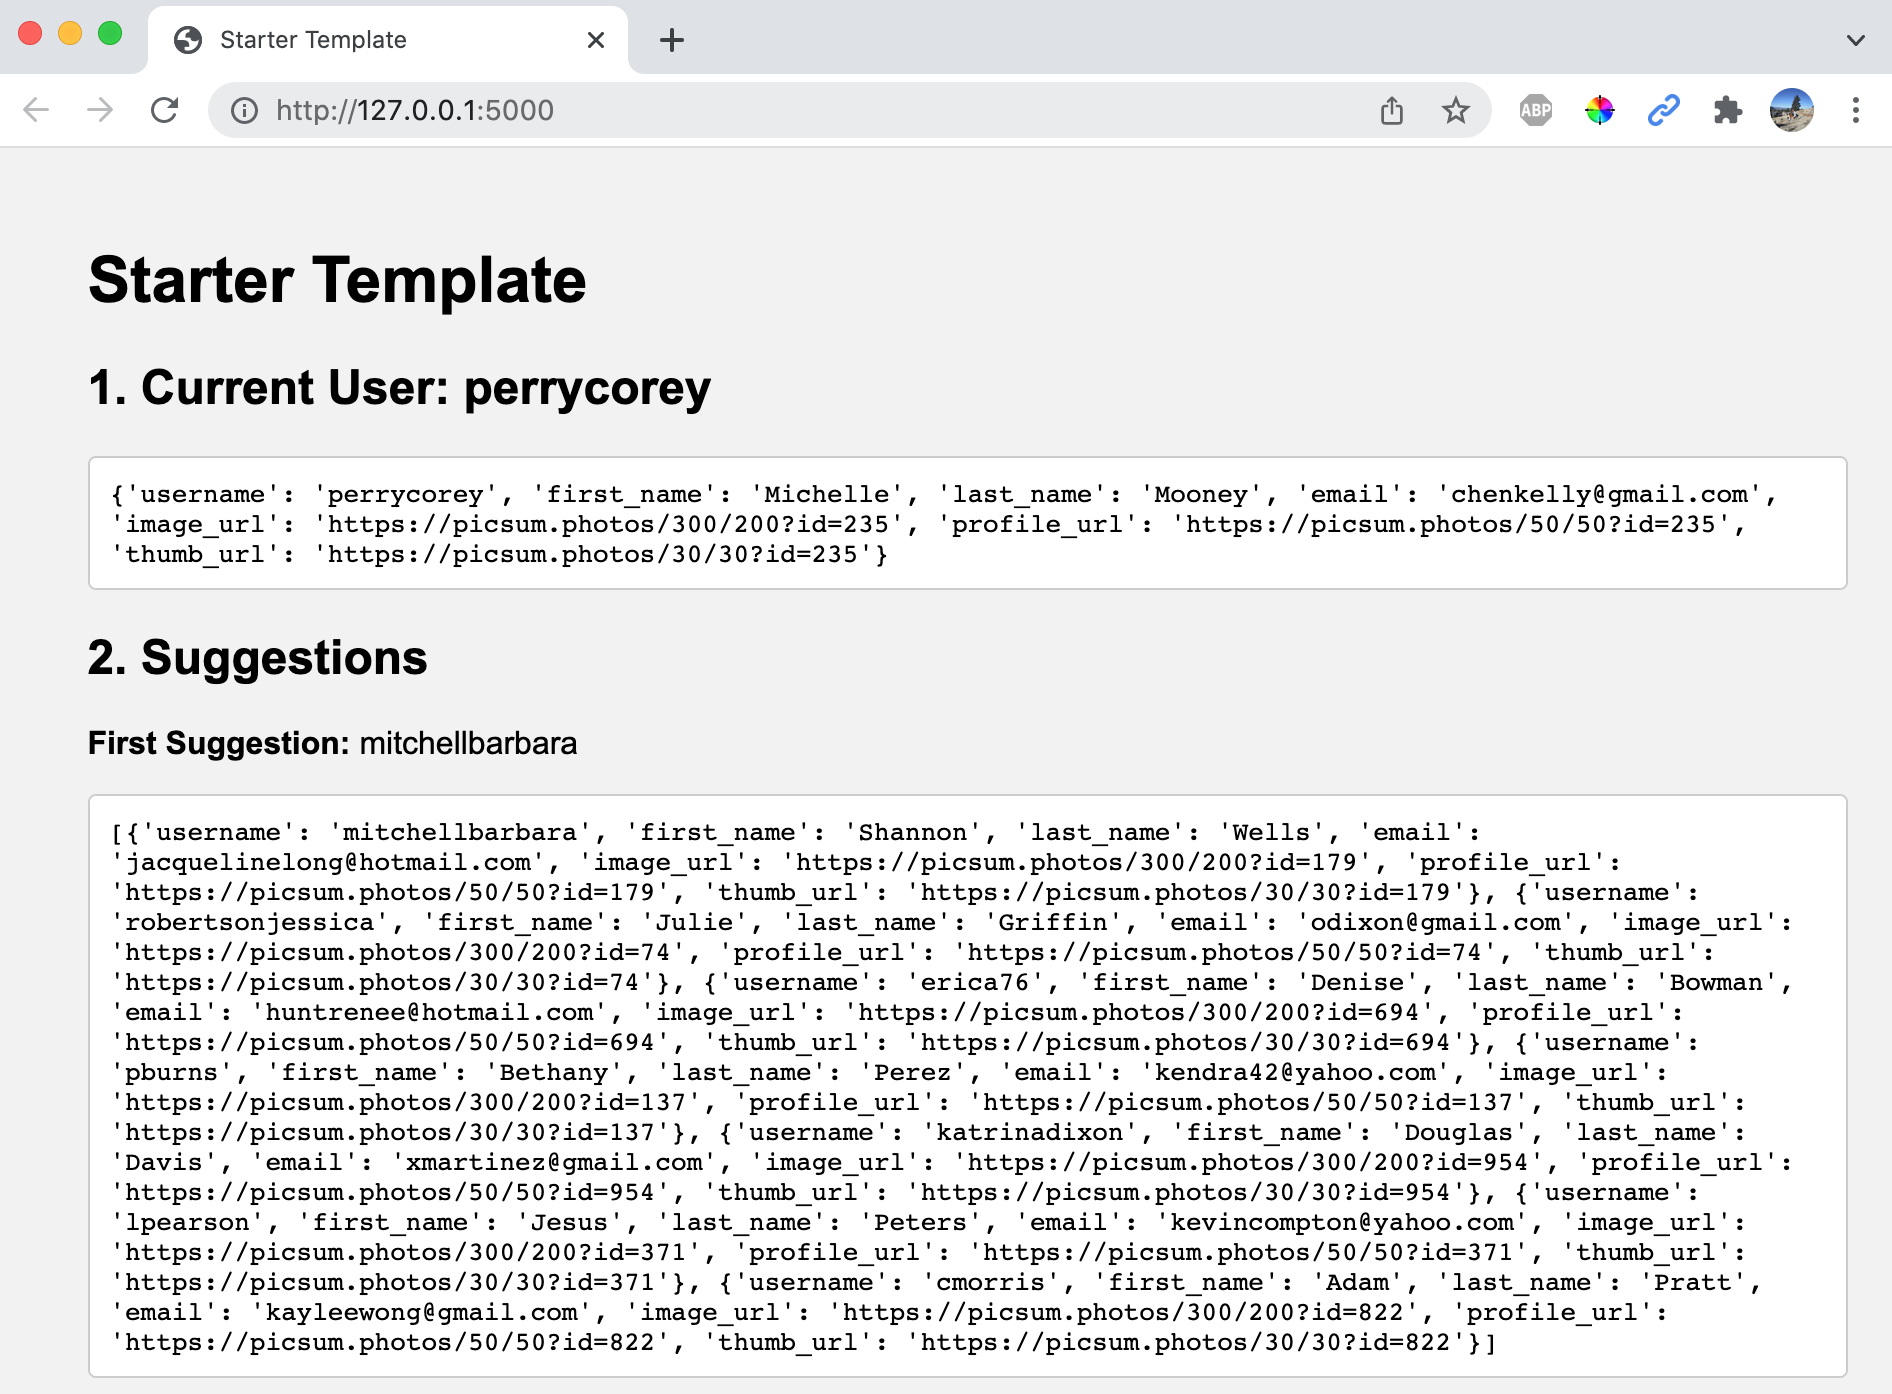
Open your templates/starter_template.html and app.py files in your code editor and take a look at them. See if you can figure out how the data are generated, and how the template is able to access this data.
Then, modify the home() function in your app.py file so that it merges with the templates/index.html file instead of templates/starter_template.html. Now, when you access http://127.0.0.1:5000/ (the root of your website), you should see the same file you submitted in HW1.
3. Your Tasks
Please complete the following tasks. You are welcome to use starter_template.html and the lab 2 solutions as a guide.
1. Navigation Bar (2 points)
- Convert your navbar to an include file. To do this:
- Create a new folder inside the
templatesfolder calledincludes - Inside
includes, create a file callednavbar.html - Paste the HTML responsible for the navbar into
navbar.html - In
index.htmlfile, replace the navbar HTML code with an include tag that referencesincludes/navbar.html. See Lab2 for an example.
- Create a new folder inside the
- Modify your
navbar.htmlfile so that “gibsonjack” (highlighted in pink below) is replaced by the user’s username (using theuserdata from the template’s context).

2. Suggestions Panel (4 points)
- Convert the suggestions panel into an include file called
suggestions.html(just like you did with the navigation bar) - Within
suggestions.html, ensure that all of the hardcoded content (outlined in pink) is replaced by data stored in thesuggestionsandusercontext variables. This includes:- The current user’s username and profile pic, which should come from
user - Each of the suggested user accounts, which should come from
suggestions.
- The current user’s username and profile pic, which should come from
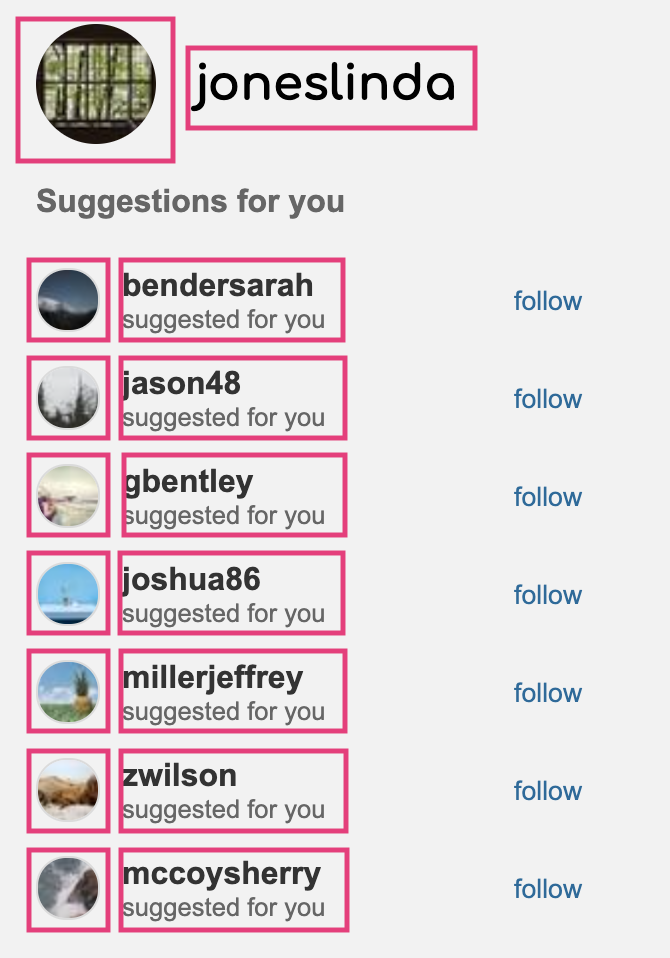
See the Jinja documentation for some examples of how to loop through data. There’s also a sample in the lab02 solutions.
3. Stories Panel (2 points)
- Convert the stories panel into an include file called
stories.html - Within
stories.html, ensure that all of the hardcoded images and usernames (outlined in pink) are replaced by data stored in thestoriescontext variable. You will need to use a loop.

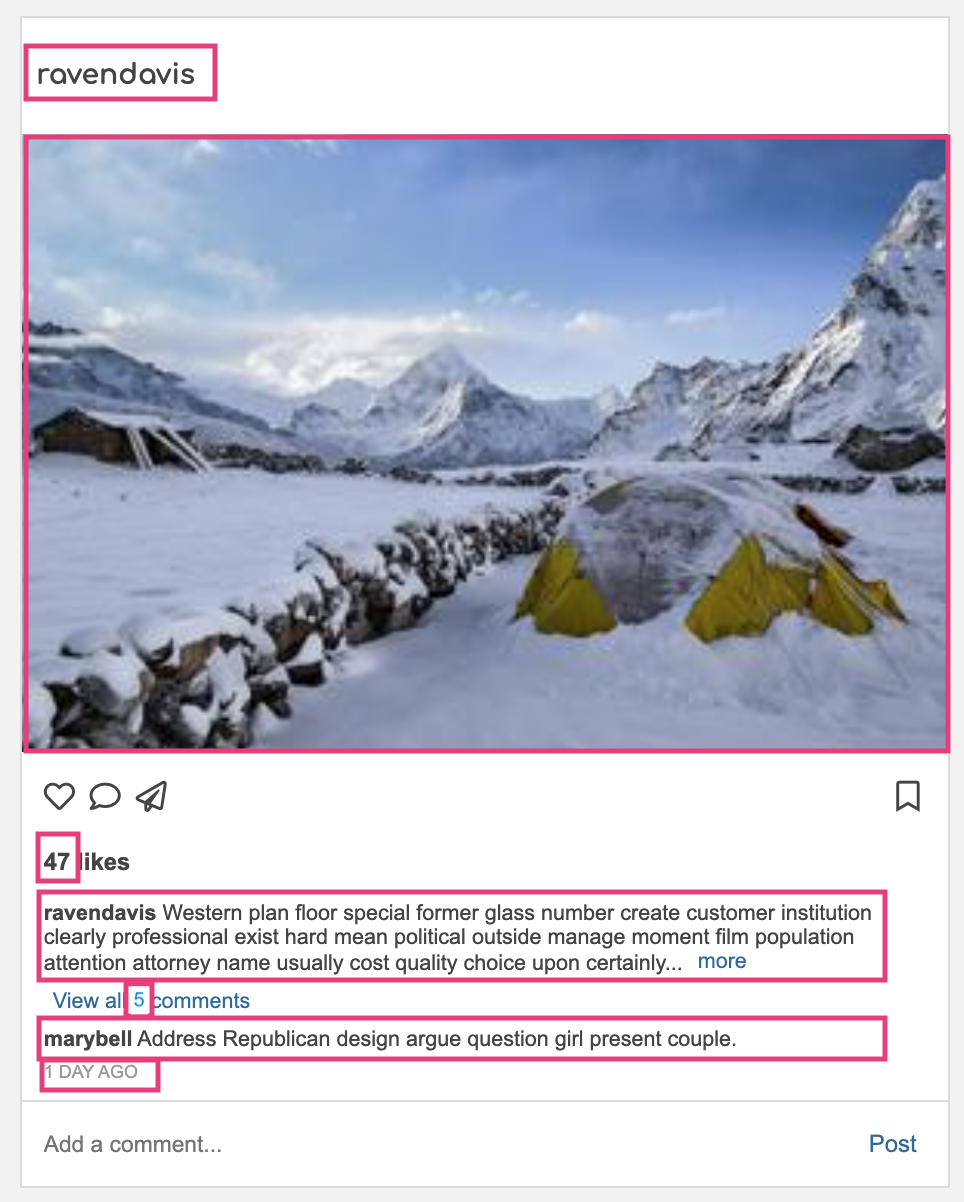
4. Cards Panel (6 points)
- Convert the cards panel into an include file called
cards.html - Within
cards.html, ensure that all of the hardcoded posts, comments, images, etc. are replaced by the data stored in thepostscontext variable (outlined in pink). - When outputting the comments:
- If there is more than one comment associated with the post:
- Display a “view all comments” button
- Display only the first comment below the button
- Otherwise, just display the single comment below the title of the post (no view all button)
- If there is more than one comment associated with the post:
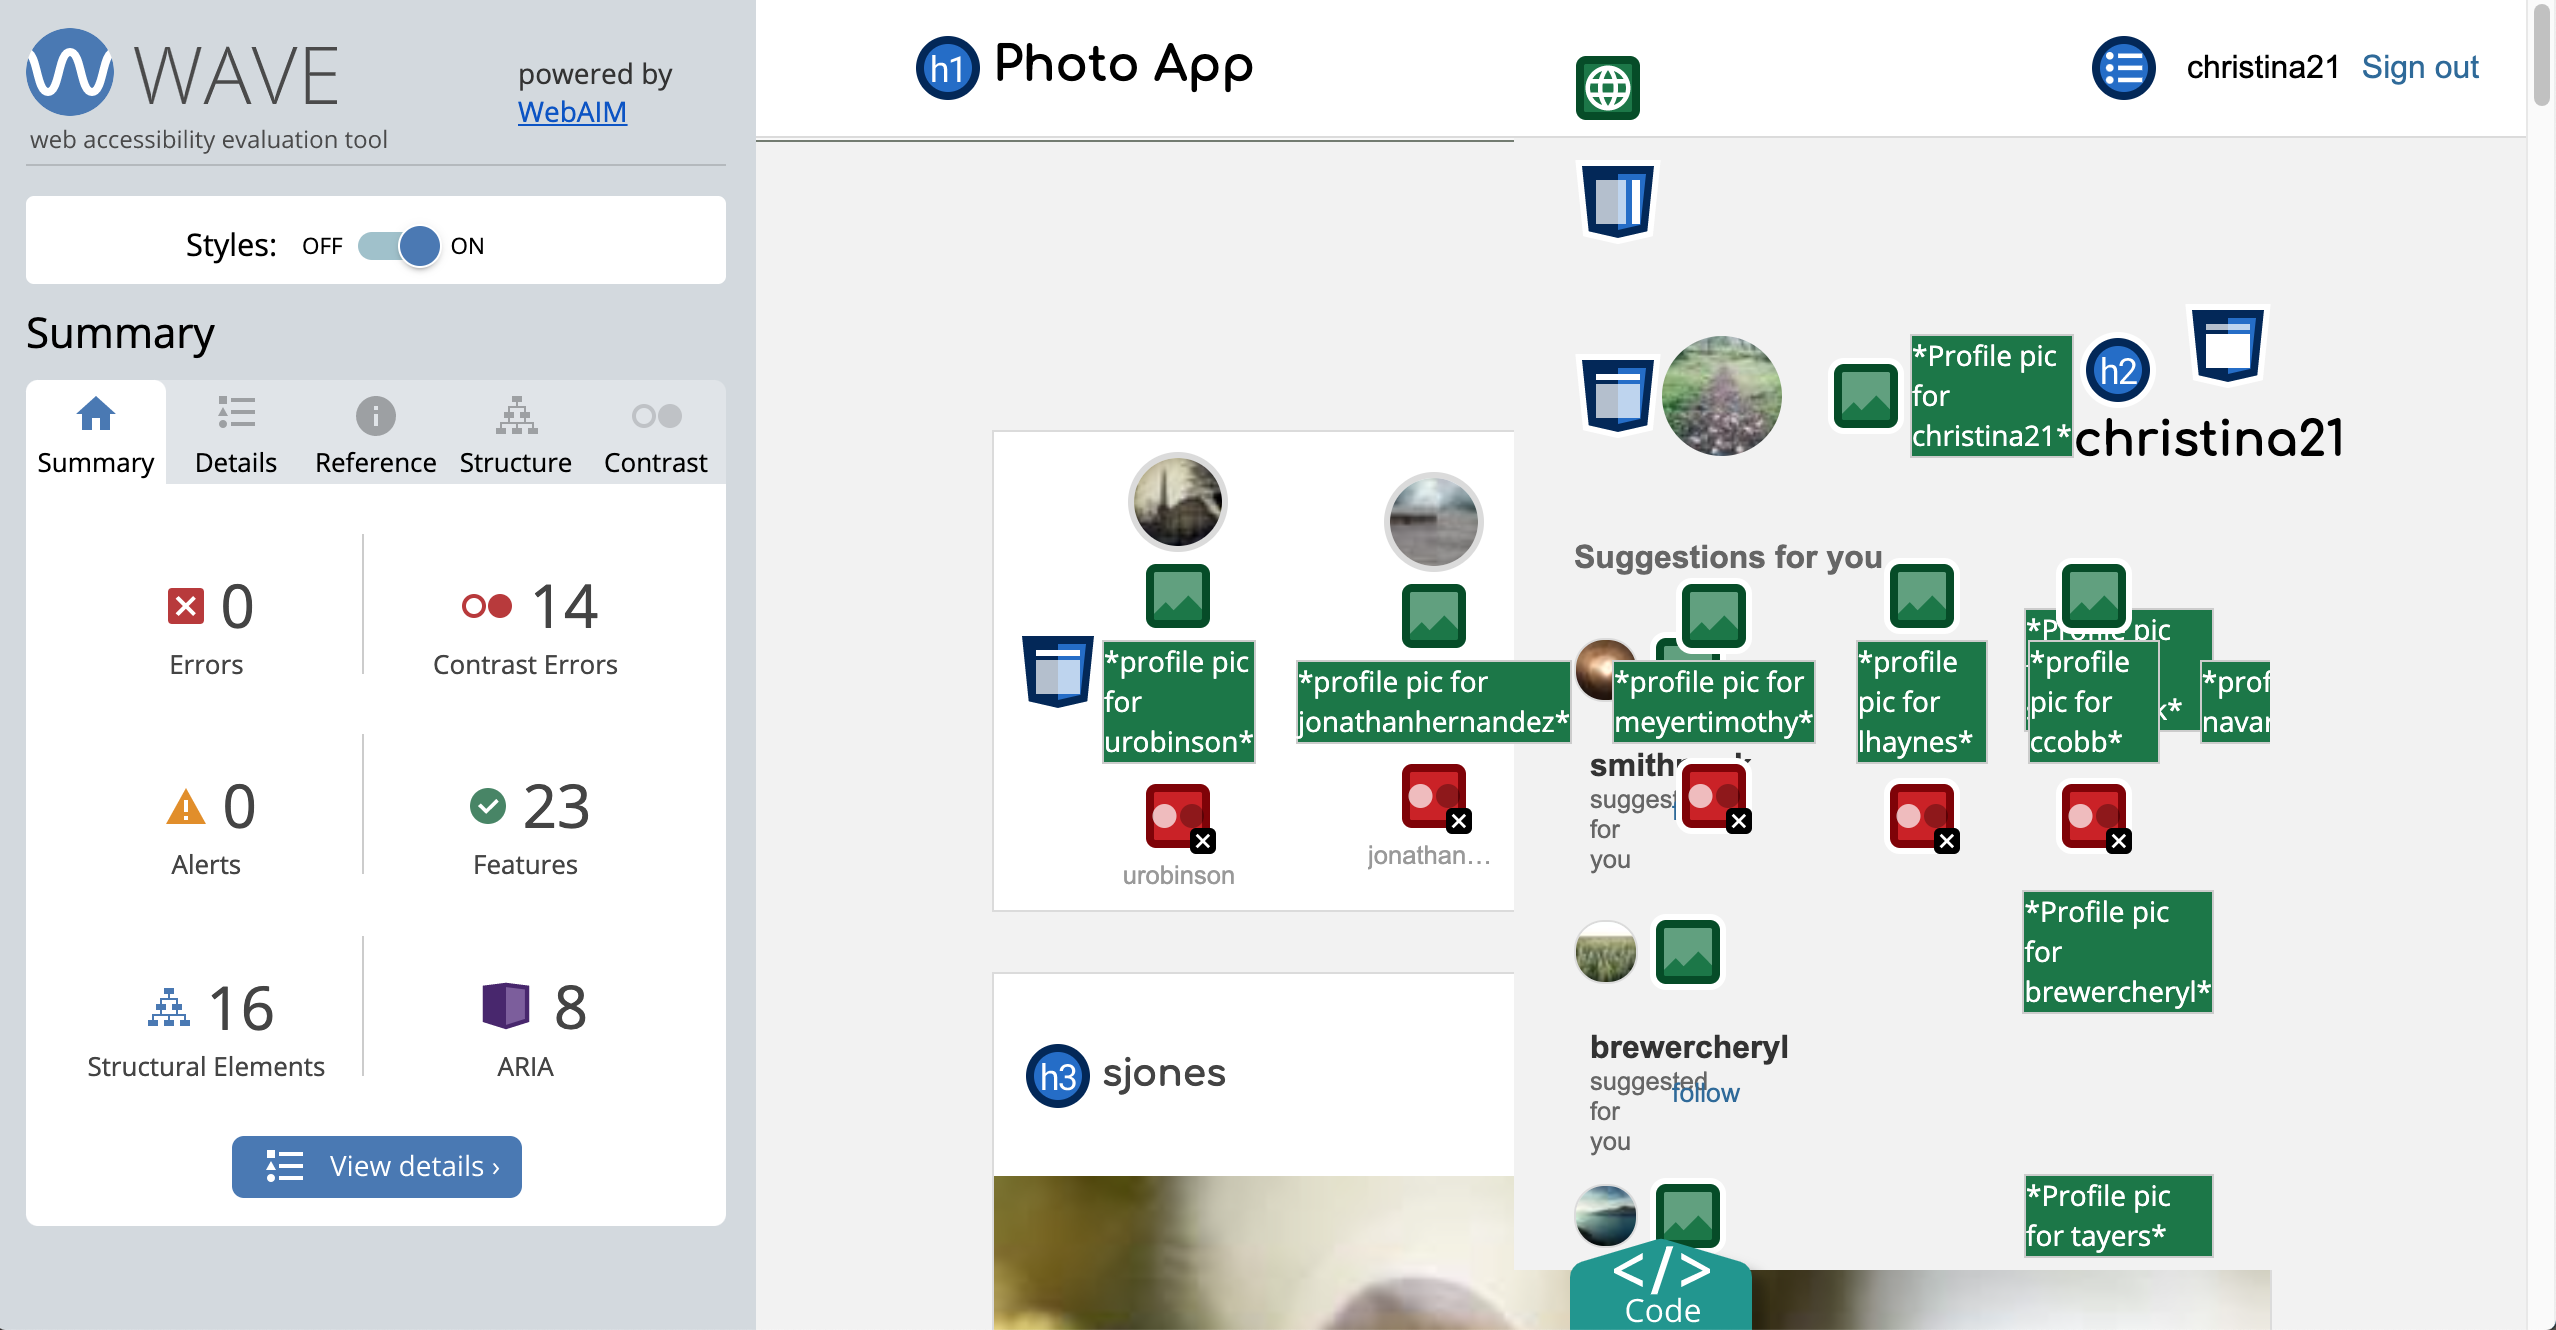
5. Accessibility Analysis (5 points)
Download the WAVE Extension using either Firefox or Chrome, and use it to generate an accessibility report. Correct as many accessibility errors as you can. Then take a screenshot of your final accessibility report (Sarah’s report is shown below), and answer the following questions in a text file (Word, Notepad, or PDF are all fine):
- What corrections did you have to make?
- Given that the photos and captions rely on user-generated content, do you think that the accessibility problems are all solvable? Why or why not?
- Do you think your website is usable if you turn off the CSS? Why or why not?
- Do you think your website is usable if you turn off the images? Why or why not?
- Submit a screenshot of your Wave report
6. GitHub (1 point)
When you’re done, please commit all of your changes and push them to your photo-app GitHub repo.
4. What to Turn In
Please consult the rubric below to ensure you have met the requirements for this assignment (all of the tasks with checkmarks next to them):
Rubric
| Component / Task | Subtasks | Points |
|---|---|---|
| Nav Bar | 2 requirements | 2 |
| Suggestions Panel | 2 requirements | 4 |
| Stories Panel | 2 requirements | 2 |
| Cards Panel | 3 requirements | 6 |
| Accessibility | 5 requirements | 5 |
| GitHub | 1 requirement | 1 |
| Total | 20 |
Submission format
- Please submit a zipped folder (on Canvas) called
hw02.zipthat contains all of the files used to complete your project. - Within the zip file, please also include a folder called
other-filesthat contains a screenshot of your private GiHub repo, a screenshot of your accessibility report, and your accessibility write-up. - Your zip file structure should look something like this (though you are welcome to include additional files if you wish):
photo-app
├── Procfile
├── README.md
├── app.py
├── fake_data.py
├── other-files                 # create an other-files folder for your submission
|   ├── writeup.txt             # accessibility write-up
|   ├── GitHub-Screenshot.png   # screenshot of your git repo
│   └── Wave-Screenshot.png     # screenshot of your accessibility report
├── requirements.txt
├── static
|   ├── starter_style.css
│   └── style.css
└── templates
    ├── includes
    │   ├── navbar.html
    │   ├── cards.html
    │   ├── stories.html
    │   └── suggestions.html
    ├── index.html
    └── starter_template.html
If you collaborated with a partner, please name your partner as a comment on Canvas. To to this, after you submitted, please click the “Submission Details” link and add a note in the “Add a Comment” section.