Assignments > HW3. PhotoApp: Make a REST API
Due on Fri, 02/11 @ 11:59PM. 40 Points.
Updates as of Sunday, 1/30 @ 9PM
- Tests are now included in the hw03.zip file. To run them:
- Copy the
testsdirectory into the root of yourphoto-app.- From the command line, navigate into the
testsdirectory.- Run the tests by typing:
python3 run_tests.py --verbose- You can also run individual test files
(e.g.python3 test_profile.py)- There was a logic error in the
can_view_postfunction ofviews/__init__.py. Please see the updated query (which now uses SqlAlchemy’s built-inand_operator).- We will practice using these tests and building endpoints in class on Monday.
1. Introduction
For homework 3, you are going to create a REST API using Flask and PostgreSQL. To do this, you will:
- Create and populate a local database
- Configure your python code to interact with the database using SQL Alchemy
- Use Flask RESTful to implement a few API endpoints
- Run the tests to see that your API requirements have been met
- Deploy your code to Heroku
Some Encouragement :)
Configuring your laptop and getting all of the pieces to work together can be frustrating and time consuming. We’re here to help, and want to ensure that everyone is successful. This homework is not meant to trip you up, but rather to just get you familiar with some libraries, tools, and techniques that are widely used in industry (especially in early-stage startups). If there’s anything that you don’t understand, the course staff can explain it to you and/or point you towards more resources.
2. Setting Everything Up
Before you get into the concepts and code, let’s first download and configure the HW03 files. Please complete the following steps:
1. Configure your local git repo
Before making any changes to your photo-app folder, let’s create a snapshot of your current work (for HW02) by creating a hw02 branch using git:
- On your terminal or command line, navigate to your photo-app folder from HW2.
- Using git, create a branch called hw02 as follows:
git checkout -b hw02 - Now type
git branchand you should see that there are 2 branches:mainandhw02. Also note that you are currently on thehw02branch (it should be green with an asterik next to it). - Push your hw02 branch to GitHub as follows:
git push -u origin hw02 - Open GitHub repo in your web browser and verify that you have 2 branches.
- Finally, on your local computer, switch back to your
mainbranch (i.e., makemainthe active branch you’re working on) by typinggit checkout main. - Verify that you are on your
mainbranch by typinggit branch(you should see an asterik next to it).
2. Integrate the HW3 files into your photo-app
Download hw03.zip and unzip it.
You should see a directory structure that looks like this:
hw03
├── .env
├── .gitignore
├── Procfile
├── app.py
├── models
│   ├── __init__.py
│   ├── bookmark.py
│   ├── comment.py
│   ├── following.py
│   ├── like_comment.py
│   ├── like_post.py
│   ├── post.py
│   ├── story.py
│   └── user.py
├── populate.py
├── requirements.txt
└── views
    ├── __init__.py
    ├── bookmarks.py
    ├── comments.py
    ├── followers.py
    ├── following.py
    ├── post_likes.py
    ├── posts.py
    ├── profile.py
    ├── stories.py
    └── suggestions.py
- Copy the
modelsandviewsfolders fromhw03intophoto-app - Copy the
.env,Procfile,app.py,.gitignore,requirements.txt,populate.py, andapp.pyfiles intophoto-app.- You can read more about the
.envfile here.
- You can read more about the
- Note that your
.gitignorefile is excluding the .env file from your git repository. This is so you don’t inadvertently check in your database passwords to GitHub.
3. Install the dependencies
Run the following command on the command line (from within the photo-app directory):
pip3 install -r requirements.txt
4. Create a new database and populate it
1. Create a new database
Create a new database called photo-app. In my opinion, the easiest way to do this is via the command line:
- Type:
psql -U postgres - From within the psql shell, type:
CREATE DATABASE "photo-app"; - Type:
\qto exit the shell
2. Add DB_URL to your .env file
Create an environment variable called DB_URL in your .env file. This variable will store the path to your database in a format that SQLAlchemy can understand. Your database connection information is represented as follows…
postgresql://{user}:{password}@{host}/{database}
Each parameter of the connection string is described in the table below:
| user | The database user (postgres for now) |
| password | The password associated with the database user (which you set in Lab 3) |
| host | The address of the computer where your database is stored. For now, it will be localhost (since it’s stored on your local computer). When we set up your database using Heroku Postgres, your host will be in the cloud. |
| database | The name of the database to which you want ot connect (photo-app) |
Here is Sarah’s .env file (your postgres password will be different):
# Development
DEBUG=True
FLASK_ENV=development
FLASK_APP=app.py
#      postgresql://{user}:{password}@{host}/{database}
DB_URL=postgresql://postgres:12345@localhost/photo-app
NOTE: If you configured your postgres to work on a port other than 5432 (only a few students have had to do this), you will also have to specify the alternative port in your connection string as follows:
postgresql://{user}:{password}@{host}:{port}/{database}- Example:
postgresql://postgres:12345@localhost:5433/photo-app
3. Populate your database
When you’re done, populate your database by running the following command on the command line (from the photo-app directory):
# run from within the photo-app directory on the command line:
python3 populate.py
4. Install Postman
If you haven’t already, please install Postman. You will be using it to test your HW3 and Lab4 code.
3. Background Readings and Concepts
Before you start coding, let’s spend a few minutes reviewing some of the libraries and principles that we’ll be using for this assignment. Specifically:
- SQL Alchemy
- Flask RESTful
- Heroku
1. SQL Alchemy
As stated on the SQL Alchemy project page: “SQLAlchemy is the Python SQL toolkit and Object Relational Mapper that gives application developers the full power and flexibility of SQL.” In other words, SQL Alchemy is a python abstraction that makes communication with databases easier. It is database agnostic, meaning that you use the same commands, regardless of whether you’re interacting with PostgreSQL, SQLite, MySQL, or some other relational database.
What is an Object Relational Mapping (ORM)?
ORMs allow a programmer to associate user-defined Python classes with database tables, and instances of those classes (objects) with rows in their corresponding tables (more on ORM here). In other words, rather than writing SQL directly, you interact with SQL Alchemy “models” that issue SQL queries under-the-hood.
I have already created all of the data models for you in the models directory inside your photo-app. Let’s take a look at the Post model, located in models/posts.py to see what it looks like…
class Post(db.Model):

    # name of table I want to connect to:
    __tablename__ = 'posts'

    # reference to the columns with which I want the application
    # to interact:
    id = db.Column(db.Integer, primary_key=True)
    image_url = db.Column(db.String(200), nullable=False)
    caption = db.Column(db.Text, nullable=True)
    alt_text = db.Column(db.Text, nullable=True)
    pub_date = db.Column(db.DateTime, nullable=False,
        default=datetime.utcnow)
    user_id = db.Column(db.Integer, db.ForeignKey('users.id', ondelete='cascade'),
        nullable=False)

    # convenience methods that allow me to join to other tables:
    user = db.relationship(
        'User',
        backref="posts",
        lazy=False
    )
    comments = db.relationship(
        'Comment',
        cascade="all,delete-orphan",
        lazy='select',
        backref=db.backref('posts', lazy='joined')
    )

    # constructor function for creating new "post" records in the DB
    def __init__(self, image_url, user_id, caption=None, alt_text=None, pub_date=None):
        self.image_url = image_url
        self.user_id = user_id
        self.caption = caption
        self.alt_text = alt_text
        self.pub_date = pub_date
With this Post model definition, I am able to create, read, update, and delete records from the posts table. Some examples of how you would perform each of these operations are listed below:
Tips for following along
Please read the SQL Alchemy section carefully, and try executing some of the sample commands using the flask shell. To access the flask shell:
- Open your Terminal / command prompt,
- Navigate to your hw03 files, and
- Type
flask shell
Within the flask shell, you can interact with any of the data models (described in more detail below).
Create new Post
In SQL Alchemy, you create a record just like you would create any object. The only difference is that you have to add and commit the object to the database:
from models import Post, db

# 1. Create:
new_post = Post(
    image_url='https://picsum.photos/600/430?id=668',
    user_id=3, # must be a valid user_id or will throw an error
    caption='Some caption text',
    alt_text='Some alt text'
)
db.session.add(new_post)    # issues the insert statement
db.session.commit()         # commits the change to the database
Try running this command using the flask shell (and don’t forget the import statement).
Simple Queries with FLASK SQL Alchemy
Just like in SQL, querying operations can be the most complex, as you often want to filter, join, and aggregate data. You will be using the Flask SQL Alchemy library for simple queries (Flask SQL Alchemy documentation here). Please try issuing the commands below using the flask shell:
from models import Post, db

# get all of the posts:
posts = Post.query.all()

# limit the # of posts:
posts = Post.query.limit(10).all()

# filter the posts (simple):
posts = Post.query.filter_by(user_id=5).all()

# filter the posts (by attribute of a joined table):
posts = Post.query.filter(Post.user.has(username='chad_marks')).all()

# get single post:
post = Post.query.get(5)

# get the user of a post (from the users table)
post.user

# get all of the comments on a post (from the comments table)
post.comments
Advanced Queries with REGULAR SQL Alchemy
“Flask SQL Alchemy” also inherits from “SQL Alchemy,” so if you’re looking to execute more complex queries, consult the regular SQL Alchemy documentation (SQL Alchemy documentation here). Some samples of some more complex queries are shown below. Again, you are encouraged to run these commands for yourself using the flask shell:
from models import db, Post, User, Comment, Following
from sqlalchemy import func

engine = db.engine
session = db.session

# 1. query for substring matches using a "like" function:
posts = Post.query.filter(Post.caption.ilike('%tree%')).all()

# 2. "in" clause:
# give me all the posts that created by users 3, 4, or 5.
posts = Post.query.filter(Post.user_id.in_([3, 4, 5])).all()

# 3. "not in" clause:
# give me all the posts that were NOT created by users 3, 4, or 5.
posts = Post.query.filter(~Post.user_id.in_([3, 4, 5])).all()

# 4. Join: two tables:
posts = (
    session
        .query(Post, User)
        .join(User, User.id==Post.user_id)
        .filter(User.username.ilike('%ere%')).all()
)

# 5. Join (three tables) to select particular columns and the comment count:
# Note that an "outer join" is needed on the comments table in the
# event that a post has no comments.
posts = (
    session
        .query(Post.id, User.username, func.count(Comment.id))
        .join(User, User.id==Post.user_id)
        .outerjoin(Comment, Post.id==Comment.post_id)
        .group_by(Post.id, User.username)
        .all()
)

# 6. Get ids of all the users I'm following:
user_ids_tuples = (
    session
        .query(Following.following_id)
        .filter(Following.user_id == 5)
        .order_by(Following.following_id)
        .all()
)
user_ids = [id for (id,) in user_ids_tuples]

# 7. Raw SQL query example for more complex queries...
# The query below returns the post_id, username, # of comments, # of likes for every post:
sql = '''
SELECT posts.id AS post_id, users.username AS username,
    count(distinct comments.id) AS comment_count,
    count(distinct likes_posts.id) AS likes_count
FROM posts
JOIN users ON
    users.id = posts.user_id
LEFT OUTER JOIN comments ON
    posts.id = comments.post_id
LEFT OUTER JOIN likes_posts ON
    posts.id = likes_posts.post_id
GROUP BY posts.id, users.username;
'''
with engine.connect() as con:
    posts = list(con.execute(sql))
Update Post
Here is an example of how you might update a post:
from models import Post, db

post = Post.query.get(5)

post.image_url = 'https://picsum.photos/600/430?id=443'
post.caption = 'Updated caption'
post.alt_text = 'Updated alt text'

# commit changes:
db.session.commit()
Delete Post
And here is an example of how you might delete a post:
from models import Post, db

Post.query.filter_by(id=5).delete()
db.session.commit()

post = Post.query.get(5) # should return None
Nice job issuing those SQL Alchemy queries! It just takes some practice to get the hang of interacting with your database using the ORM syntax.
2. Flask RESTful
Now that you’ve had some practice interacting with your database using SQL Alchemy, you’re ready to create some REST API endpoints. As a reminder, REST is an architectural style that allows other clients to interact with some subset of your database over the web (using HTTP). To help us build these endpoints and keep them organized, we’re going to use a convenience library called Flask RESTful. You can learn more about this library by reading the documentation.
You will be using the Resource class from Flask RESTful to build our various endpoints. I have already created a bunch of starter endpoints for you in the views directory that you will be editing for this assignment. Note that each file in the views directory has a List and Detail resource defined:
- The
Listresource is for returning lists of resources and creating new resources. - The
Detailresource is for reading, updating, and deleting individual resources.
Examine the views/posts.py file
Open the views/posts.py file so that you can take a look at the code for creating, reading, updating, and deleting Post models.
- The
PostListEndpointclass inviews/posts.pyis in charge of getting a list of posts (GET) and creating a new posts (POST). It is accessible with this endpoint: http://localhost:5000/api/posts/. - The
PostDetailEndpointclass inviews/posts.pyis in charge of getting individual posts (GET), updating a post (PATCH), and deleting a post (DELETE). It is accessible with this endpoint: http://localhost:5000/api/posts/<id> (but replace <id> with a valid Post id).
Use Postman to test the “Post” endpoints
When you’re done inspecting this file, please open Postman to test the various Post endpoints.
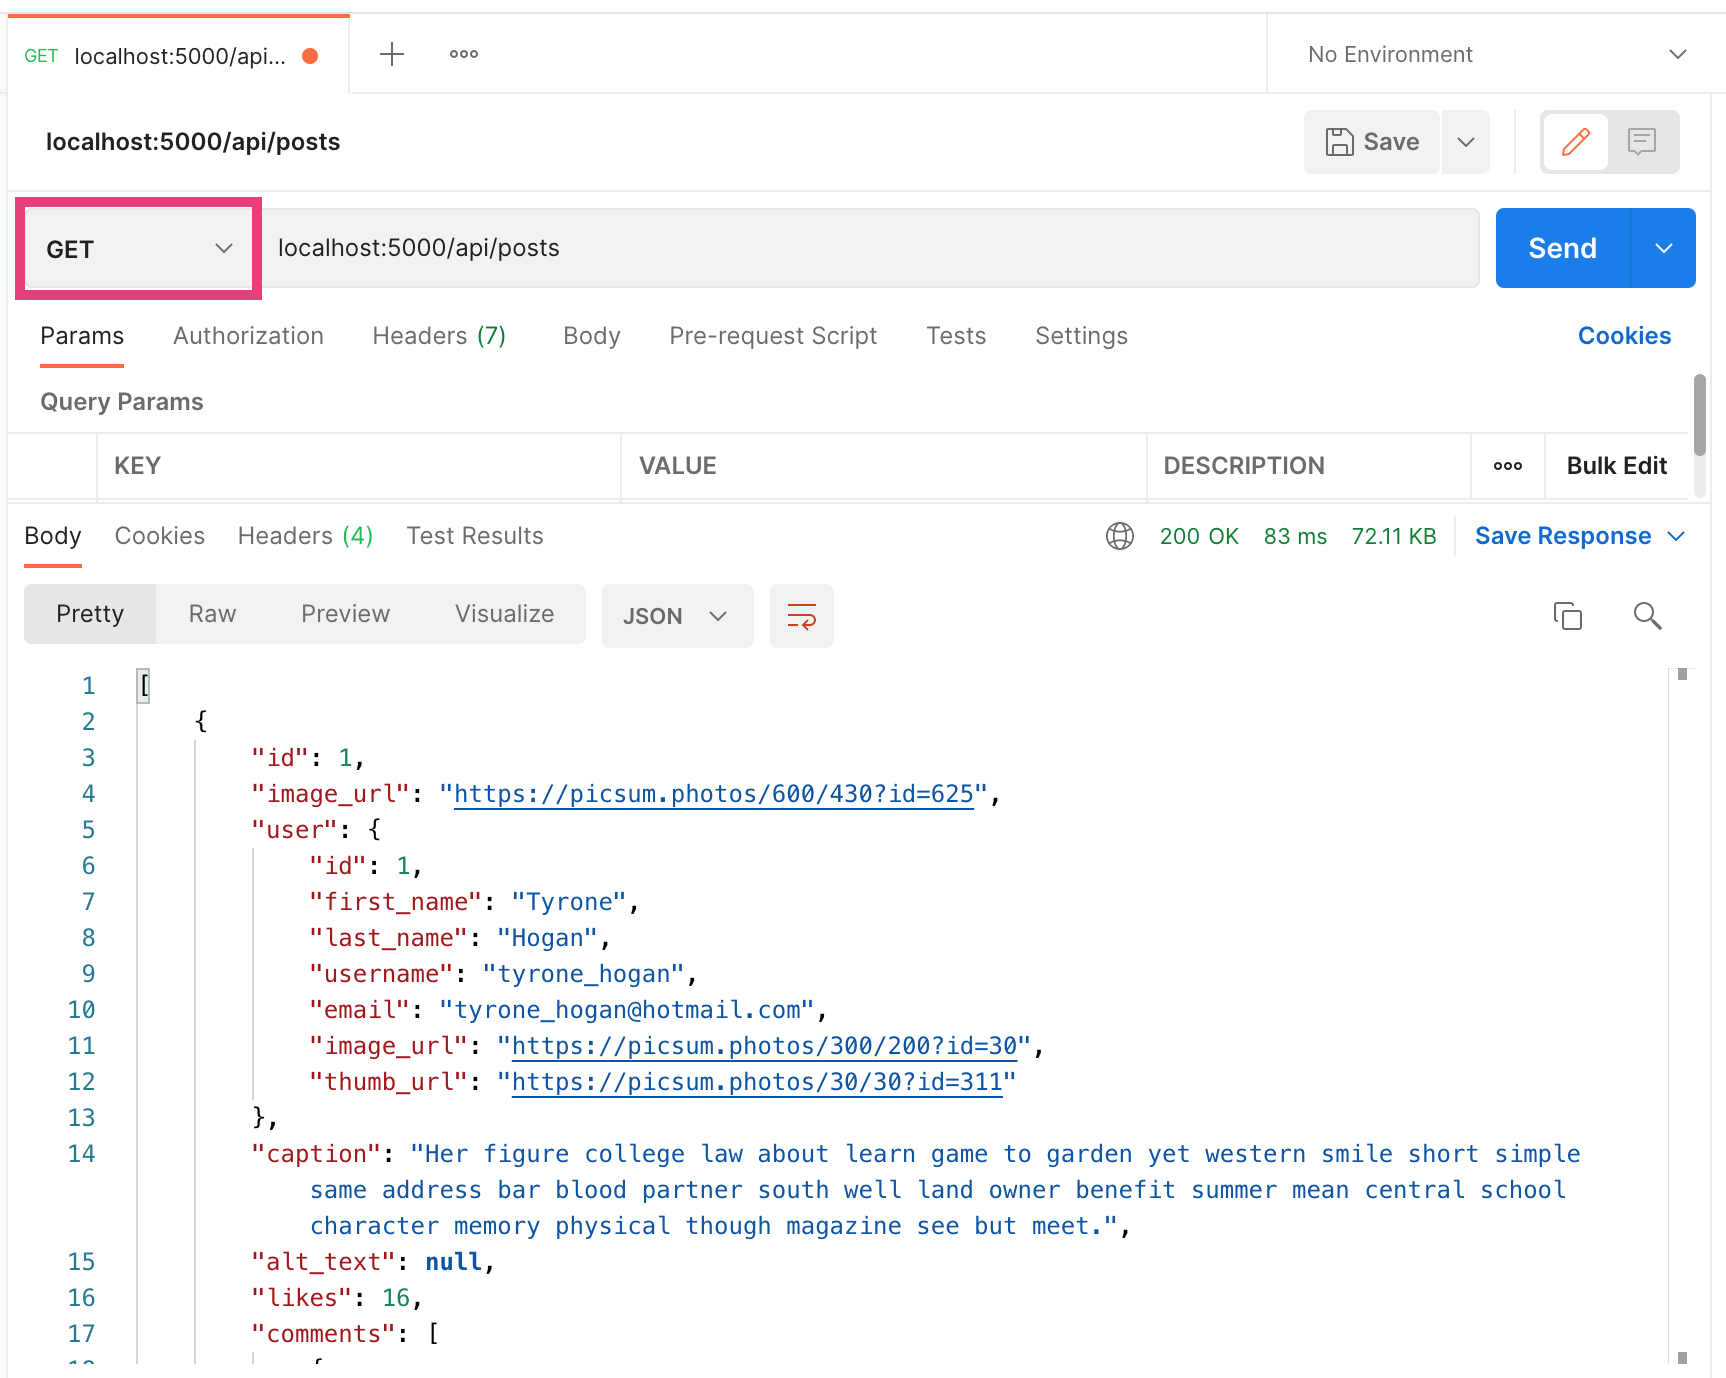
GET (List Version)
- Paste http://localhost:5000/api/posts/ into the address bar
- Ensure that the GET method is selected
- Click the “Send” button.
If it worked, you will see data output in the panel below.
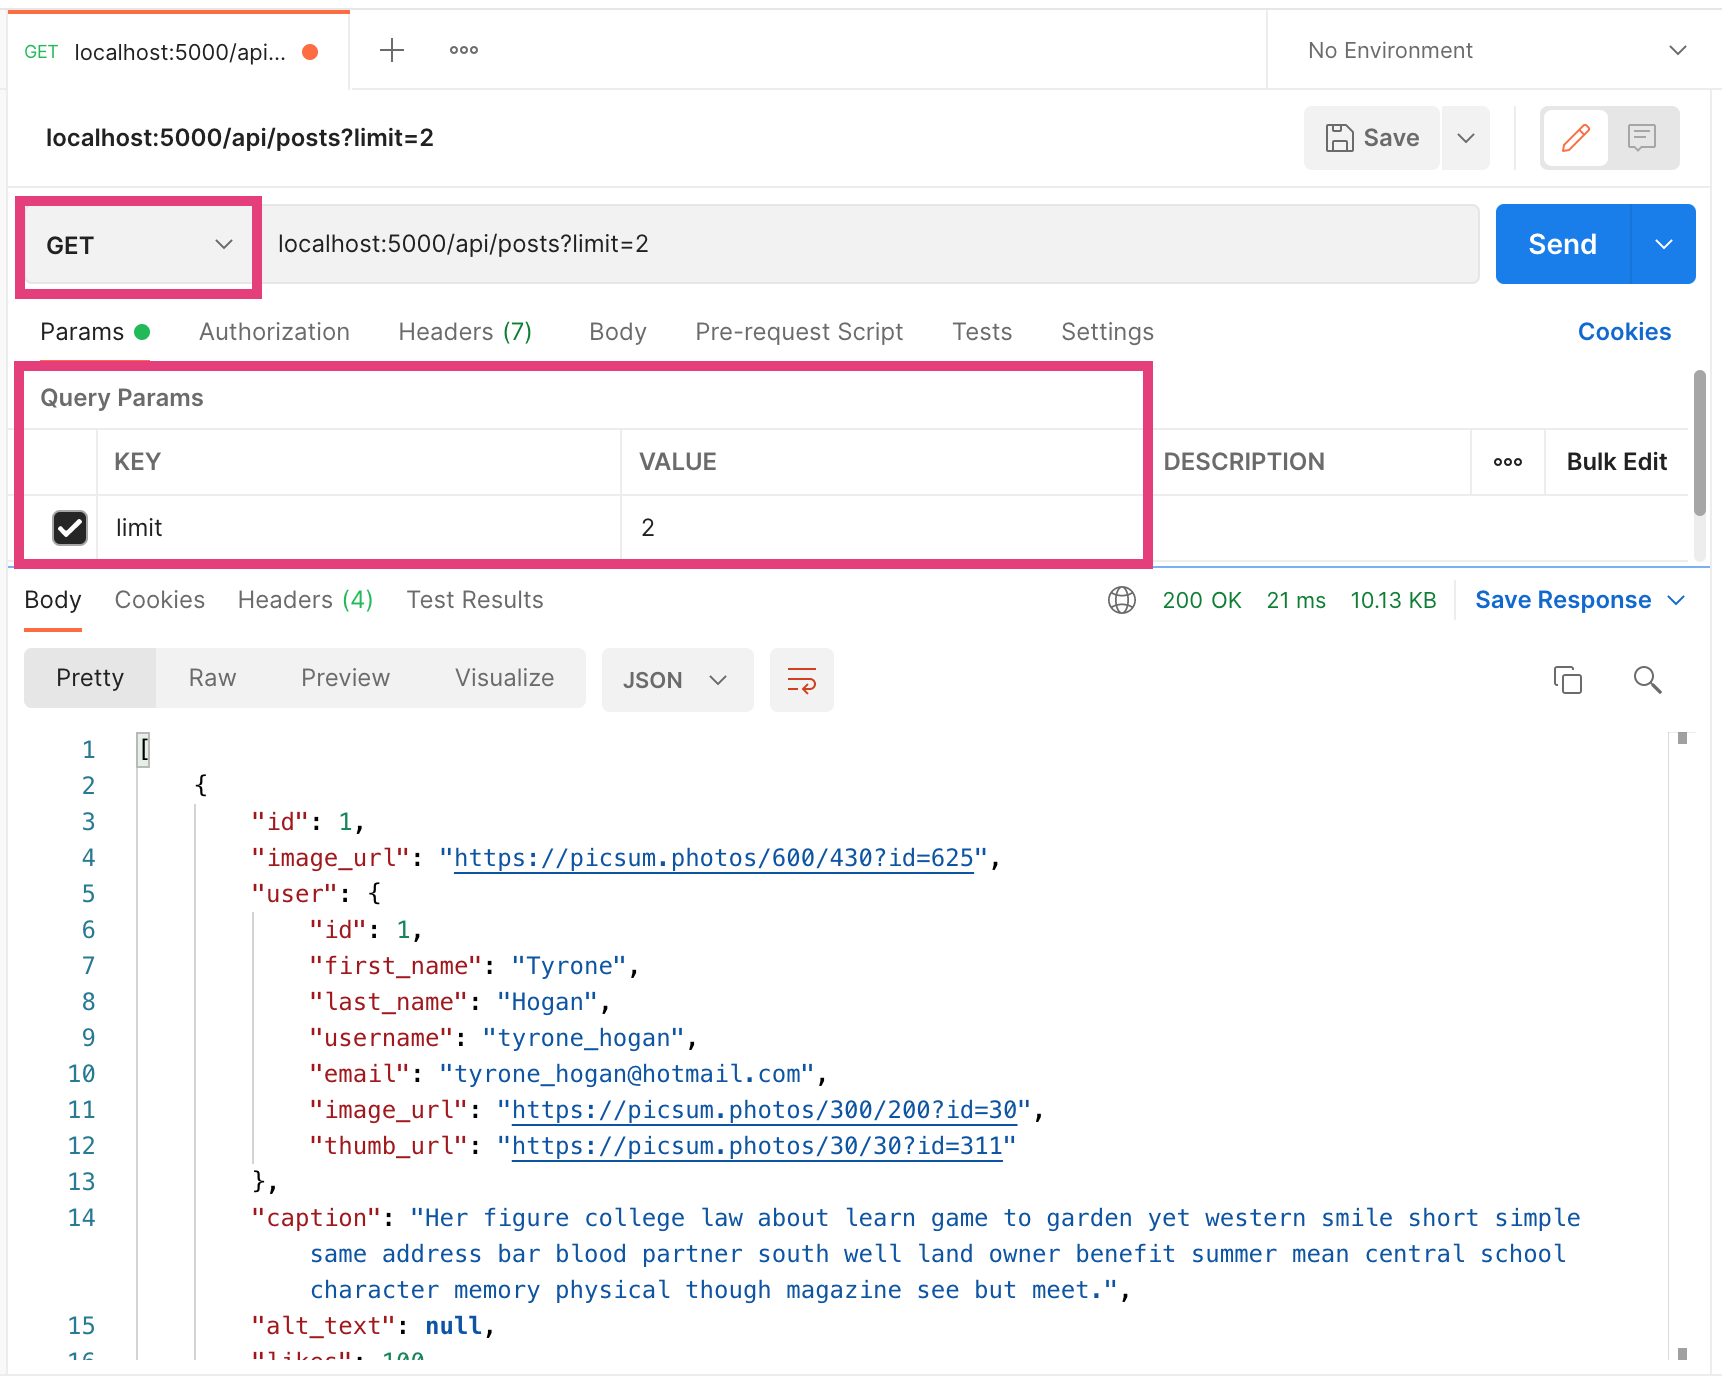
To filter by keyword, click the “params” tab and add a parameter named “limit” with a corresponding number indicating the number of records you would like returned:
POST
You can also create new Post resources using the http://localhost:5000/api/posts/ endpoints. To do this:
- Open a new Postman Tab (similar to a browser tab)
- Select the POST method
- Click on the “body” tab and select the “raw” option
- Make sure the data type selected is JSON (application/json)
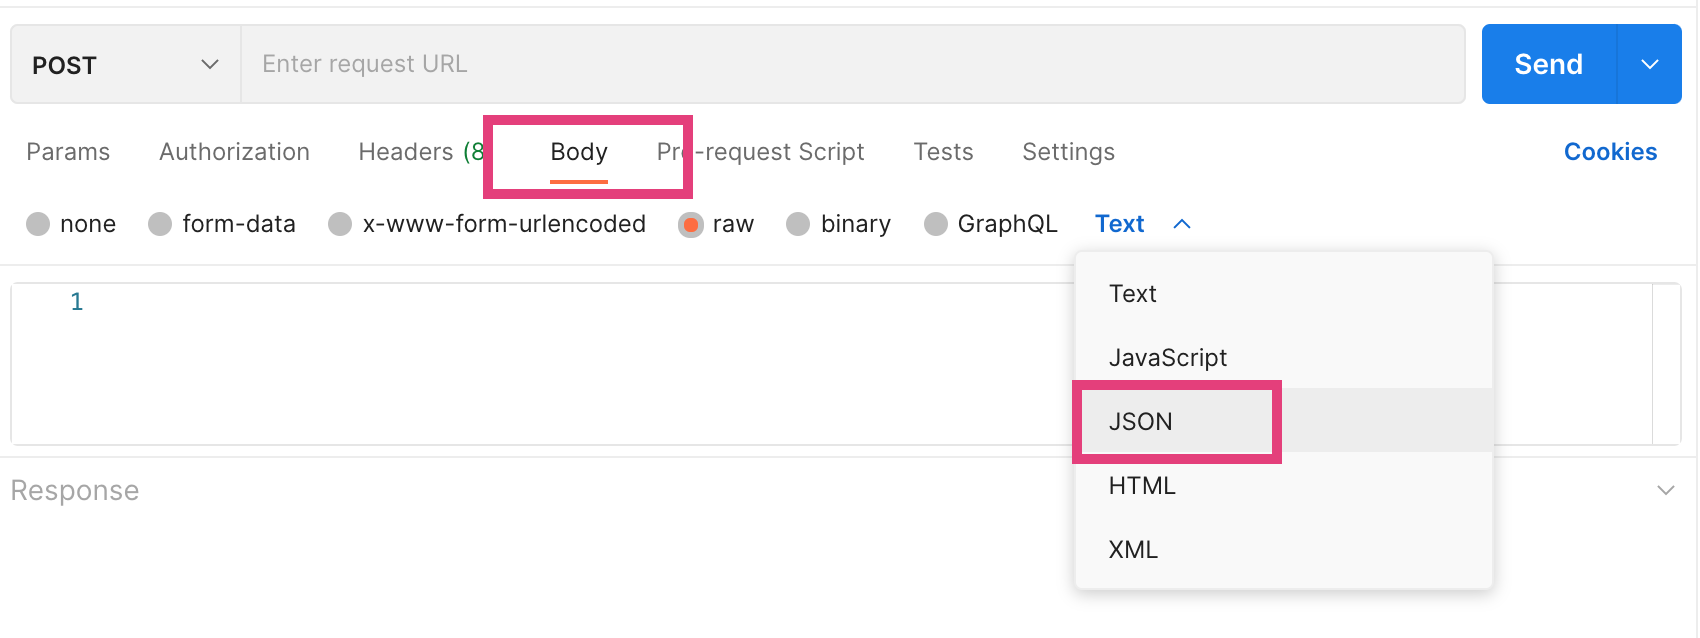
Then, paste a JSON representation of a Post into the text box and click “Send”. Sample JSON (note that JSON needs double quotes):
{
    "image_url": "https://picsum.photos/600/430?id=668",
    "caption": "Some caption",
    "alt_text": "Some alt text"
}
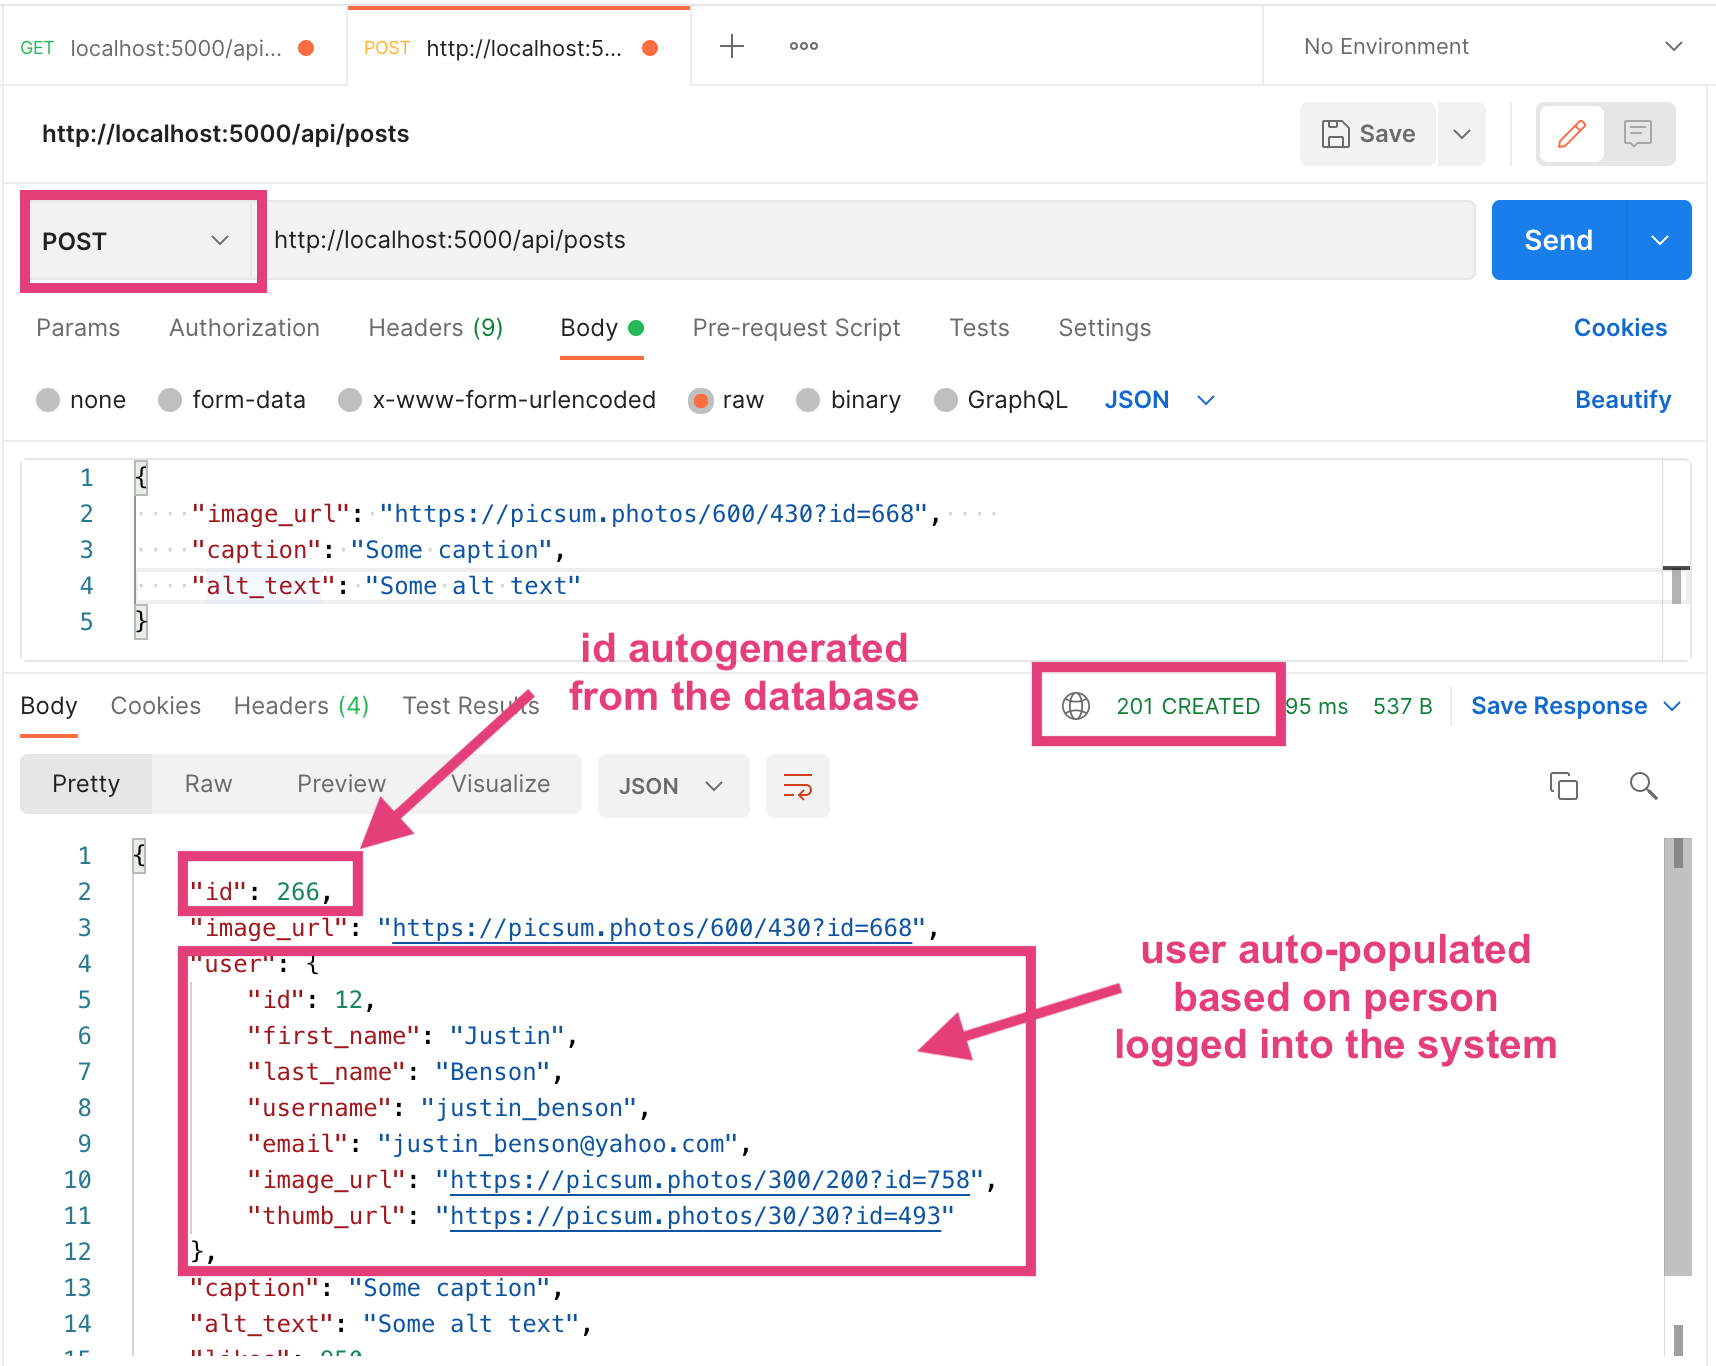
If it worked, you should get a HTTP 201 status code and a JSON object (as pictured below):
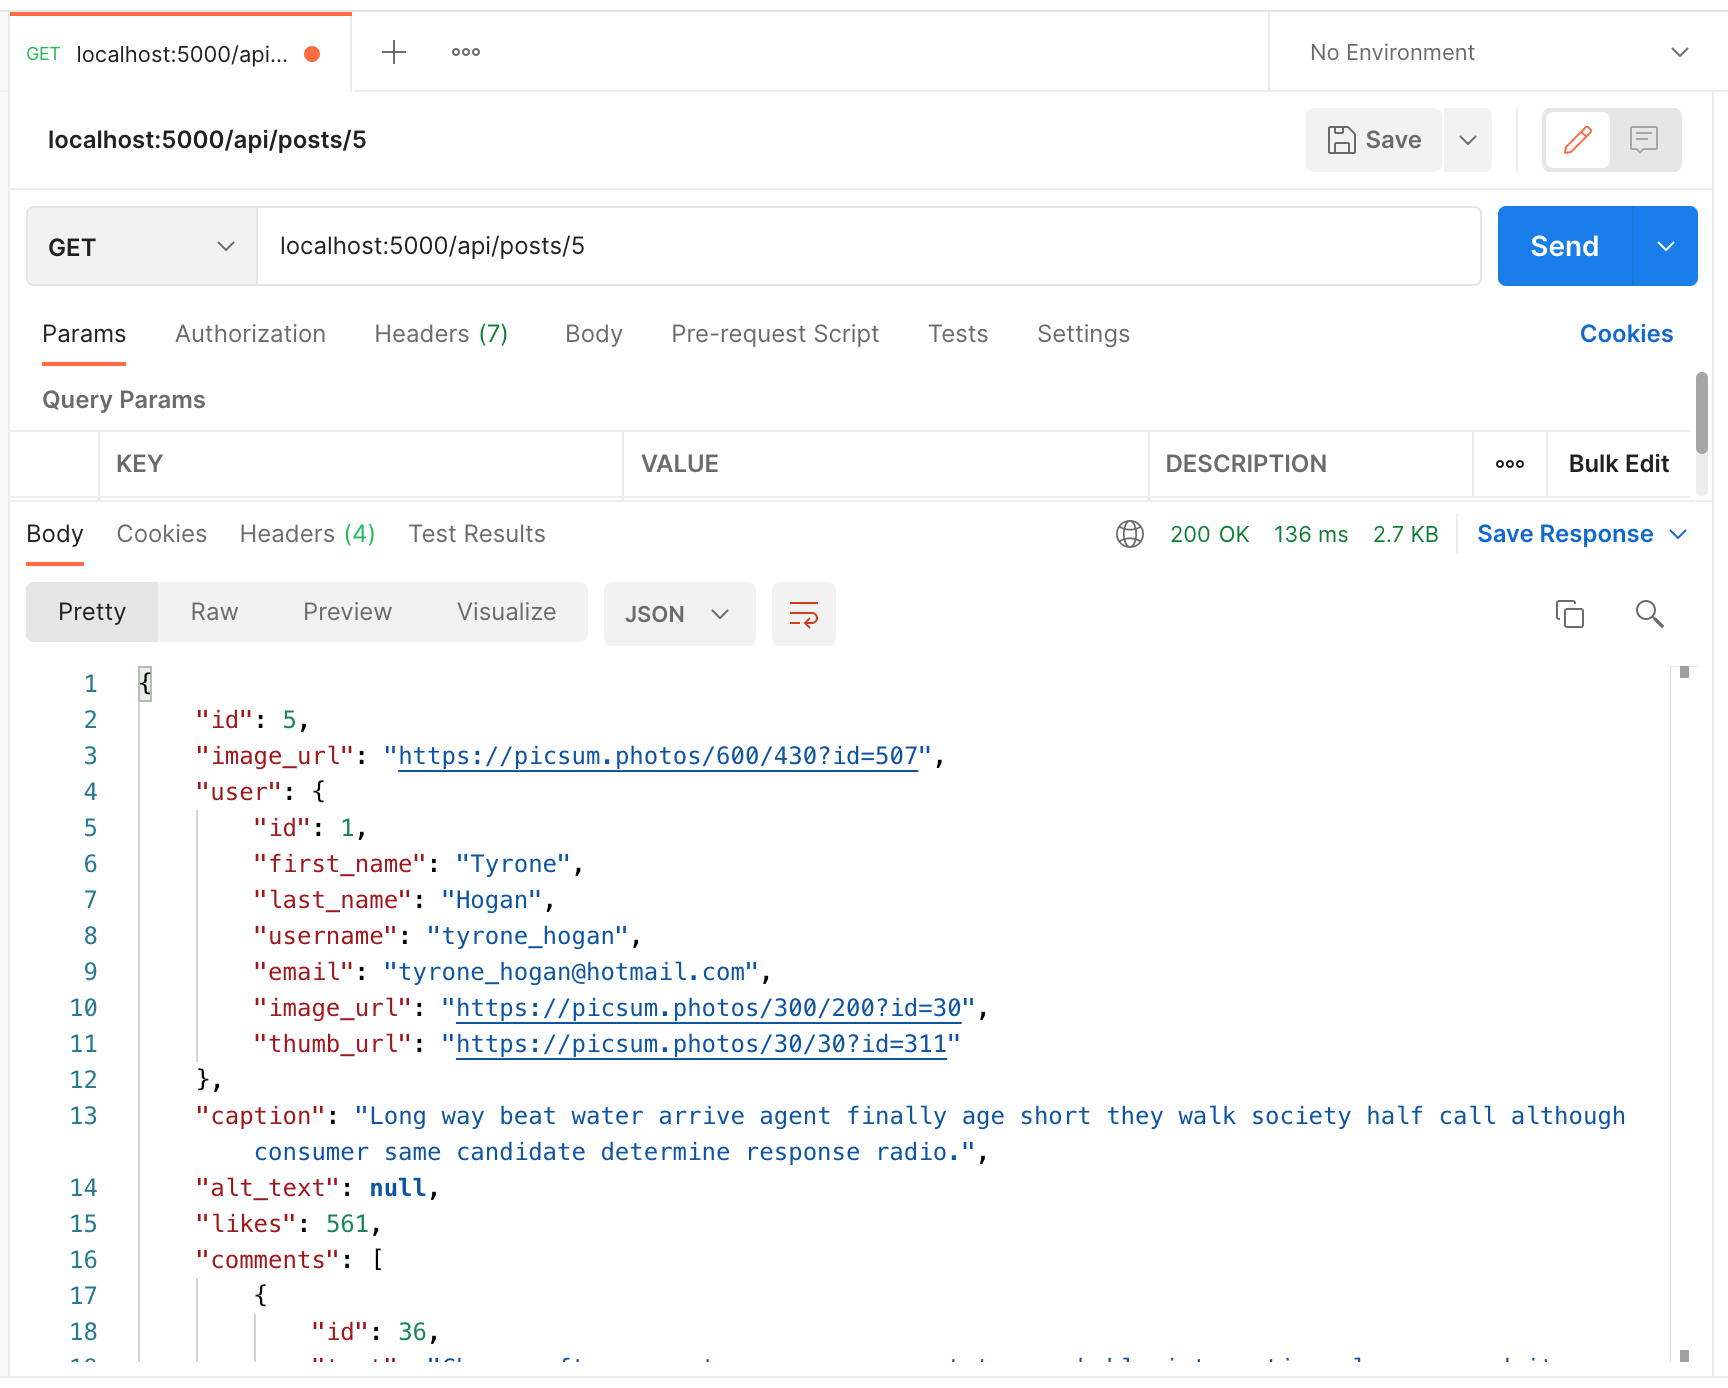
GET (Detail Version)
To get a single Post resource…
- Open a new tab
- Paste in an endpoint for a specific Post (e.g., http://localhost:5000/api/posts/3) into the address bar
- Ensure that the GET method is selected.
- Click “Send”
If it worked, you will see the resource output in the panel below (see screenshot).
PATCH
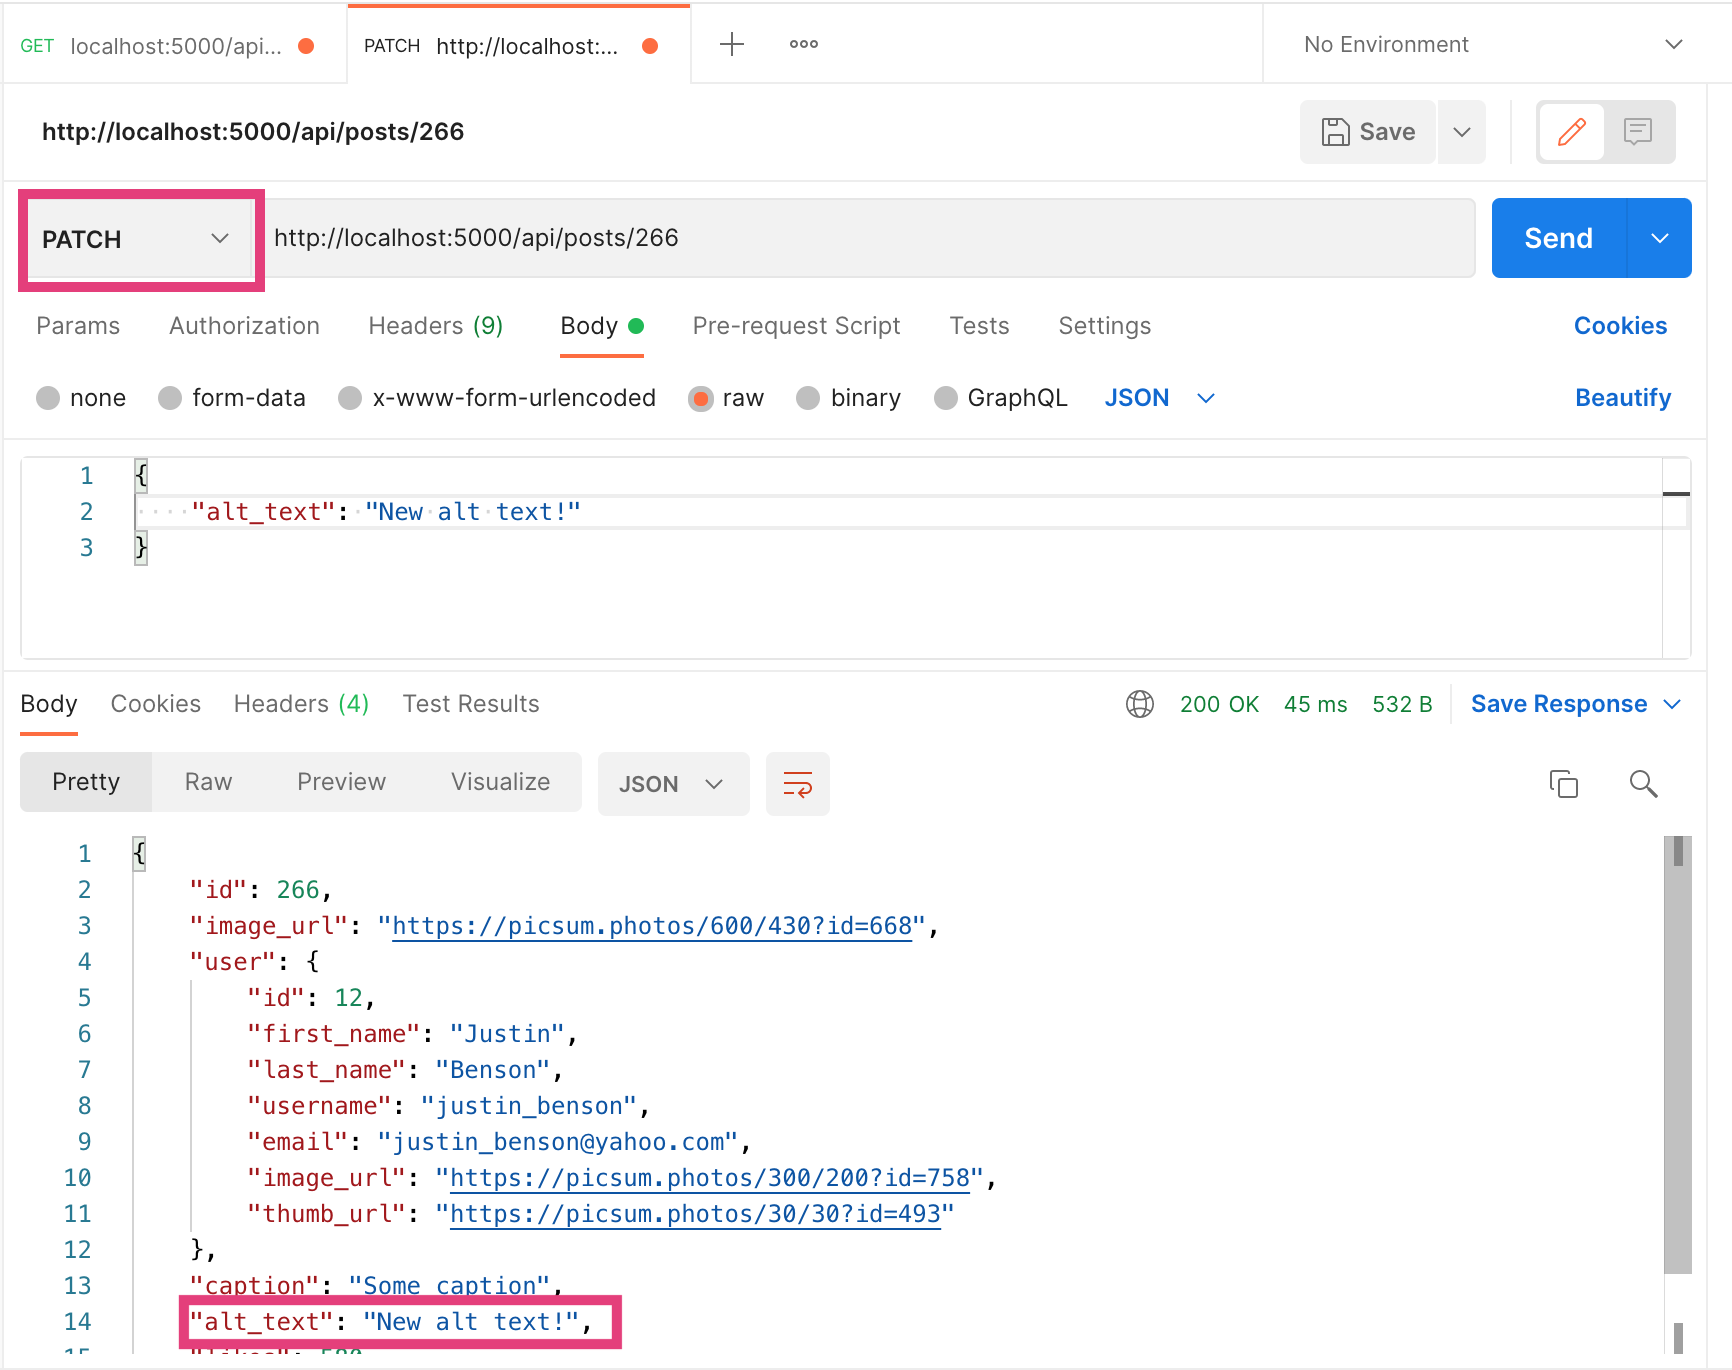
To update your post…
- Open a new tab
- Paste in an endpoint for a specific Post (e.g., http://localhost:5000/api/posts/266) into the address bar
- Ensure that the PATCH method is selected.
- Paste a valid JSON object into the “body” tab (make sure you select the “raw” -> JSON option like you did for the POST method).
- Click “Send”
DELETE
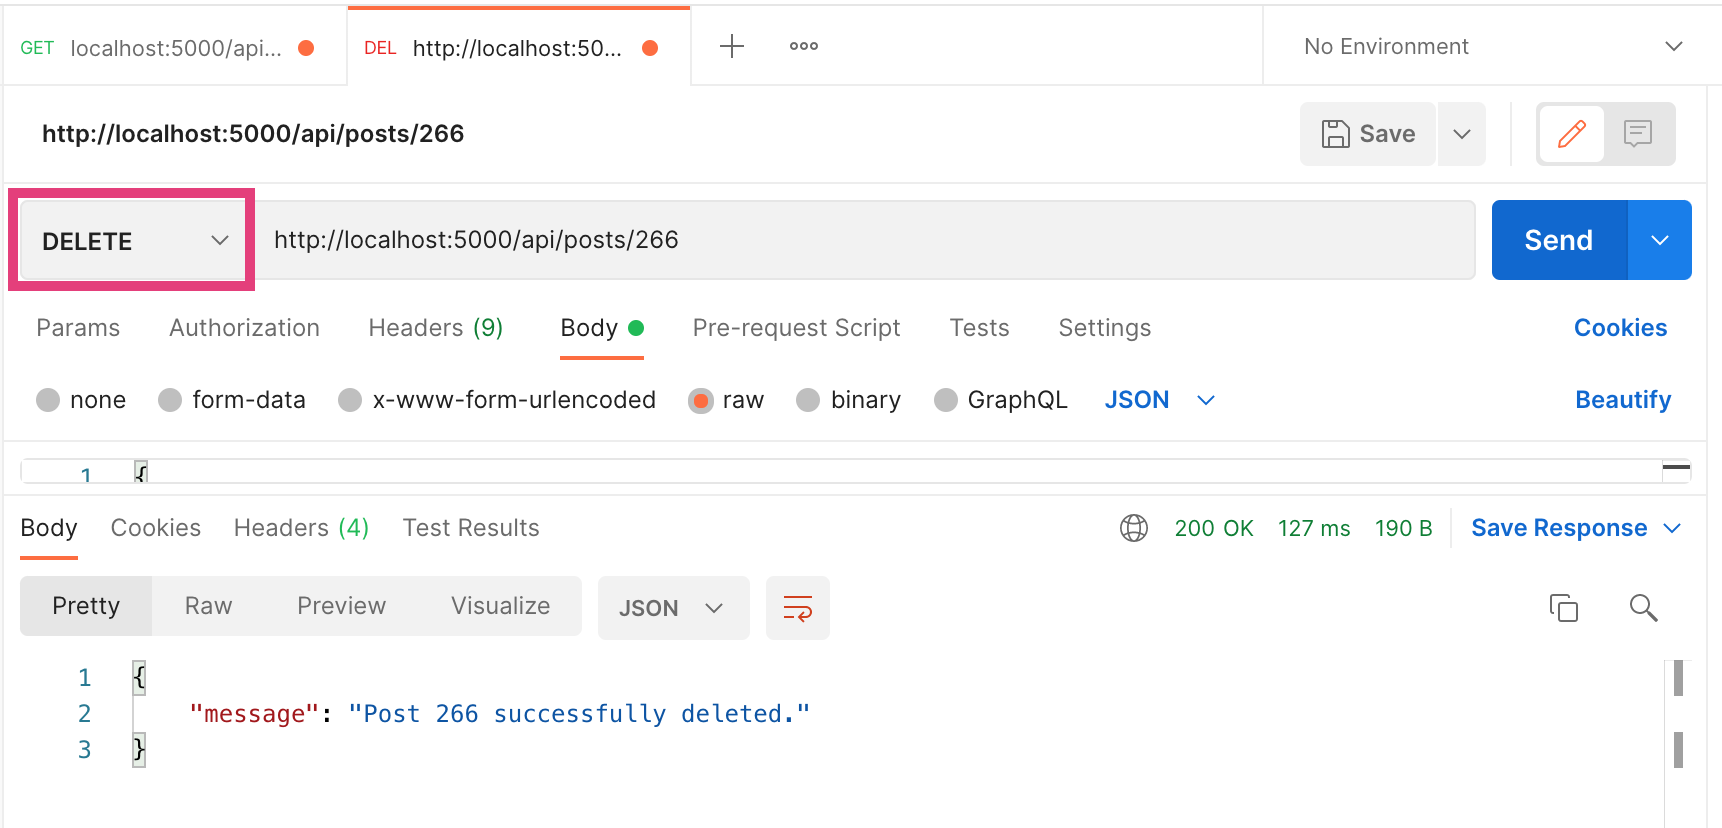
To delete your post…
- Open a new tab
- Paste in an endpoint for a specific Post (e.g., http://localhost:5000/api/posts/266) into the address bar
- Ensure that the DELETE method is selected.
- Click “Send”
You have now tested all of the REST API endpoints for the “Post” resource. Good job!
3. Heroku
You will be using Heroku to deploy your photo-app to a live server. Heroku “is a container-based cloud Platform as a Service (PaaS). Developers use Heroku to deploy, manage, and scale modern apps.” What does that mean? Well, at a high level, it means that you can save and run your files on somebody else’s computer. The basic process is as follows:
- You create a new app (i.e. container)
- You create a few different configuration files that tell your Heroku instance what software packages to install (e.g. Flask, SQL Alchemy, etc.). Specifically, we’ve created:
requirements.txtto install python packages- A
Procfileto tell Heroku that we want to run a Flask web server using Gunicorn
- You set some environment variables that tell Heroku how to access your database.
- You connect your Heroku to your GitHub repo (though there are other strategies for deploying)
- And finally, you deploy.
Heroku also has support for hosting PostgreSQL databases (more in section 5 of this assignment).
Also, one thing to note about Heroku is that if you have the free version, it goes to sleep if it hasn’t been used for a while. So the first time you access your Heroku website, it’s a little slow.
4. Your Tasks
Now that you’ve set up your files and read about some of the libraries and approaches that we’re using for HW3, you will be creating some REST API endpoints of your own.
1. General Guidelines
When building your API Endpoints, please ensure that you follow the guidelines below:
Data Structures
Please format each of the resources as displayed below:
Post
Post resources should contain data about the post, the user, and any associated comments (order within the json object doesn’t matter). The to_dict() method in each of the models already has a way to do this, so you will invoke the model’s to_dict() method when returning resources.
{
    "id": 1,
    "image_url": "https://picsum.photos/600/430?id=625",
    "caption": "Many down a reveal woman key center technology citizen truth glass data food arm continue head cup career fear life write talk strong build hospital painting city rest wrong thought give light marriage something trial produce whom total cut third series same personal stage ahead move face personal gas tend religious wish.",
    "alt_text": "Some alt text",
    "user": {
        "id": 1,
        "first_name": "Roger",
        "last_name": "Graves",
        "username": "roger_graves",
        "email": "roger_graves@gmail.com",
        "image_url": "https://picsum.photos/300/200?id=994",
        "thumb_url": "https://picsum.photos/30/30?id=953"
    },
    "comments": [
        {
            "id": 1,
            "text": "No watch speech send current only beyond writer purpose boy leg clear remain well road magazine coach walk people standard realize new minute.",
            "post_id": 1,
            "user": {
                "id": 29,
                "first_name": "Ashley",
                "last_name": "Smith",
                "username": "ashley_smith",
                "email": "ashley_smith@hotmail.com",
                "image_url": "https://picsum.photos/300/200?id=988",
                "thumb_url": "https://picsum.photos/30/30?id=572"
            }
        },
        {
            "id": 2,
            "text": "Than join finish special force according heart beautiful actually him candidate down site when or threat much commercial own suddenly food investment finally class into base friend still understand.",
            "post_id": 1,
            "user": {
                "id": 24,
                "first_name": "Joseph",
                "last_name": "Mclaughlin",
                "username": "joseph_mclaughlin",
                "email": "joseph_mclaughlin@yahoo.com",
                "image_url": "https://picsum.photos/300/200?id=474",
                "thumb_url": "https://picsum.photos/30/30?id=987"
            }
        }
    ]
}
User
The User resource should be structured like this:
{
    "id": 1,
    "first_name": "Roger",
    "last_name": "Graves",
    "username": "roger_graves",
    "email": "roger_graves@gmail.com",
    "image_url": "https://picsum.photos/300/200?id=994",
    "thumb_url": "https://picsum.photos/30/30?id=953"
}
Comment
The Comment resource should be structured like this:
{
    "id": 2,
    "text": "Than join finish special force according heart beautiful actually him candidate down site when or threat much commercial own suddenly food investment finally class into base friend still understand.",
    "post_id": 1,
    "user": {
        "id": 24,
        "first_name": "Joseph",
        "last_name": "Mclaughlin",
        "username": "joseph_mclaughlin",
        "email": "joseph_mclaughlin@yahoo.com",
        "image_url": "https://picsum.photos/300/200?id=474",
        "thumb_url": "https://picsum.photos/30/30?id=987"
    }
}
Bookmark
The Bookmark resource should just be an id and a post object without the comments:
{
    "id:": 20,
    "post": {
        "id": 1,
        "image_url": "https://picsum.photos/600/430?id=625",
        "caption": "Many down a reveal woman key center technology citizen truth glass data food arm continue head cup career fear life write talk strong build hospital painting city rest wrong thought give light marriage something trial produce whom total cut third series same personal stage ahead move face personal gas tend religious wish.",
        "alt_text": "Some alt text",
        "user": {
            "id": 1,
            "first_name": "Roger",
            "last_name": "Graves",
            "username": "roger_graves",
            "email": "roger_graves@gmail.com",
            "image_url": "https://picsum.photos/300/200?id=994",
            "thumb_url": "https://picsum.photos/30/30?id=953"
        }
    }
}
LikePost
The LikePost resource should be structured like this:
{
    "id": 662,
    "user_id": 12,
    "post_id": 3
}
Following
The Following resource should just be an id and a user object structured like this:
{
    "id": 302,
    "following": {
        "id": 11,
        "first_name": "Ashley",
        "last_name": "Thornton",
        "username": "ashley_thornton",
        "email": "ashley_thornton@hotmail.com",
        "image_url": "https://picsum.photos/300/200?id=939",
        "thumb_url": "https://picsum.photos/30/30?id=465"
    }
}
Follower
The Follower resource (which is created using the “Following” model)resource should just be an id and a user object structured like this:
{
    "id": 302,
    "follower": {
        "id": 11,
        "first_name": "Ashley",
        "last_name": "Thornton",
        "username": "ashley_thornton",
        "email": "ashley_thornton@hotmail.com",
        "image_url": "https://picsum.photos/300/200?id=939",
        "thumb_url": "https://picsum.photos/30/30?id=465"
    }
}
Story
The Story resource should be structured like this (mostly just a placeholder for now):
{
    "id": 7,
    "text": "Produce Democrat what city professor young though since southern history deep mother.",
    "user": {
        "id": 11,
        "first_name": "Lindsey",
        "last_name": "Shepard",
        "username": "lindsey_shepard",
        "email": "lindsey_shepard@gmail.com",
        "image_url": "https://picsum.photos/300/200?id=159",
        "thumb_url": "https://picsum.photos/30/30?id=689"
    }
}
2. Security
Access to data is contextual, based on the user who is logged into the system. For now, the person logged into the system is represented by the current_user variable, which is set in app.py.
Who is currently logged in?
The current user is hardcoded as user_id=12
Read Permissions
Our photo sharing app is more private than Instagram, and the rules are simple:
- The user can only see their own posts and stories, and the posts and stories (and associated comments) of people they’re following.
- The user can only see their own bookmarks, followers, and who is following them (this is private information).
Write Permissions
- The user can only bookmark, like, and comment on their own posts and the posts of people they’re following.
- The user can only edit and delete comments, posts, and stories that they created themselves.
3. HTTP Status Codes
All HTTP responses have an attached status code, which represents additional information about the request. A list of all valid HTTP status codes can be found here. For this assignment:
- All routes should return a 200 status code for a valid request unless POST is used, in which case a 201 status should be used.
- If a requests asks for information about data that does not exist (e.g. retrieving a Post with an id that isn’t present in the data), a 404 code should be used.
- If the user sent a request that is invalid, a 400 code should be used.
2. Implement the following GET routes (15 Points)
The links included below point to a deployment of the hw03 solutions.
| Method/Route | Description and Examples | Parameters | Response Type | Points |
|---|---|---|---|---|
| GET /api/posts | All posts in the current users' feed. This includes the current user's posts, as well as the people that the current user is following. You will need to modify this endpoint to get it to work as specified. |
|
List of Post objects | 2 |
| GET /api/posts/<int:id> | The post associated with the id (already started for you). | Post object | 1 | |
| GET /api/followers | Users who are following the current user. Please use the Following data model to get this information. | List of User objects | 2 | |
| GET /api/following | Users who the current user is following. Please use the Following data model to get this information. | List of Following objects | 2 | |
| GET /api/profile | The current user's profile. Please use self.current_user (which is holding an instance of the User model) to get this information. | User object | 2 | |
| GET /api/suggestions | List of suggested users to follow. Please use the User data model to get this information. For now, just display any 7 users that the current user isn't already following | List of User objects | 2 | |
| GET /api/stories | List of stories of users you're following as well as your own story (if you have one). Please use the Story data model to get this information. | List of Story objects | 2 | |
| GET /api/bookmarks/ | Should display all of the current user's bookmarks (saved posts). Please use the Bookmark data model to get this information. | List of Bookmark objects | 2 |
3. Implement POST, PATCH, and DELETE routes (20 points)
The next set of routes involves storing and manipulating data in your PostgreSQL. A few notes:
- PATCH and DELETE methods can fail to find an object if it does not exist within data or if the current user does not have access to it. In these cases, you should mark the status of the response as 404, indicating that the requested resource could not be found.
- Receiving two POST requests with identical bodies should create two different objects with distinct ids.
- PostgreSQL will create ids for you automatically.
| Method/Route | Description and Examples | Parameters | Response Type | Points |
|---|---|---|---|---|
| POST /api/posts | Should create a new post (already started for you). |
|
Post Object | 2 |
| PATCH /api/posts/<int:id> | Should update the post (already started for you). |
|
User Object | 1 |
| DELETE /api/posts/<int:id> | Should delete the post (already started for you). Note that the delete is configured to cascade (all associated comments, likes, bookmarks, etc. will also be deleted). | User Object | 1 | |
| POST /api/comments | Should create a new comment associated with the specified post. |
|
Comment Object | 2 |
| DELETE /api/comments/<int:id> | Should delete a comment. Remember, you can only delete a comment that you created. | Some JSON message | 2 | |
| POST /api/bookmarks/ | Should create a bookmark (saves a post to bookmarks). |
|
Bookmark object | 2 |
| DELETE /api/bookmarks/<int:id> | Should delete a bookmark. Remember, you can only delete a bookmark that you created. | Some JSON message | 2 | |
| POST /api/posts/<int:post_id>/likes | Should create a like. |
|
LikePost object | 2 |
| DELETE /api/posts/<int:post_id>/likes/<int:id> | Should delete a like. Remember, you can only delete a "like" that you created. | Some JSON message | 2 | |
| POST /api/following | Should create a following record. |
|
Following object | 2 |
| DELETE /api/following/<int:id> | Should delete a following record. Remember, you can only delete a "following" that you created. | Some JSON message | 2 |
3. Publish your REST API (5 Points)
When you’re done, you will publish your website to Heroku. Even if you are collaborating with a partner, both of you will need to deploy your own website.
1. Create a Heroku App
Register for Heroku (if you don’t yet have an account): https://signup.heroku.com/.
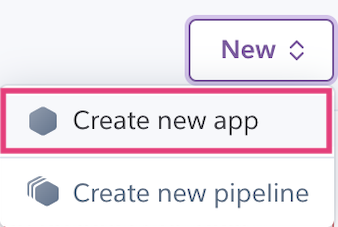
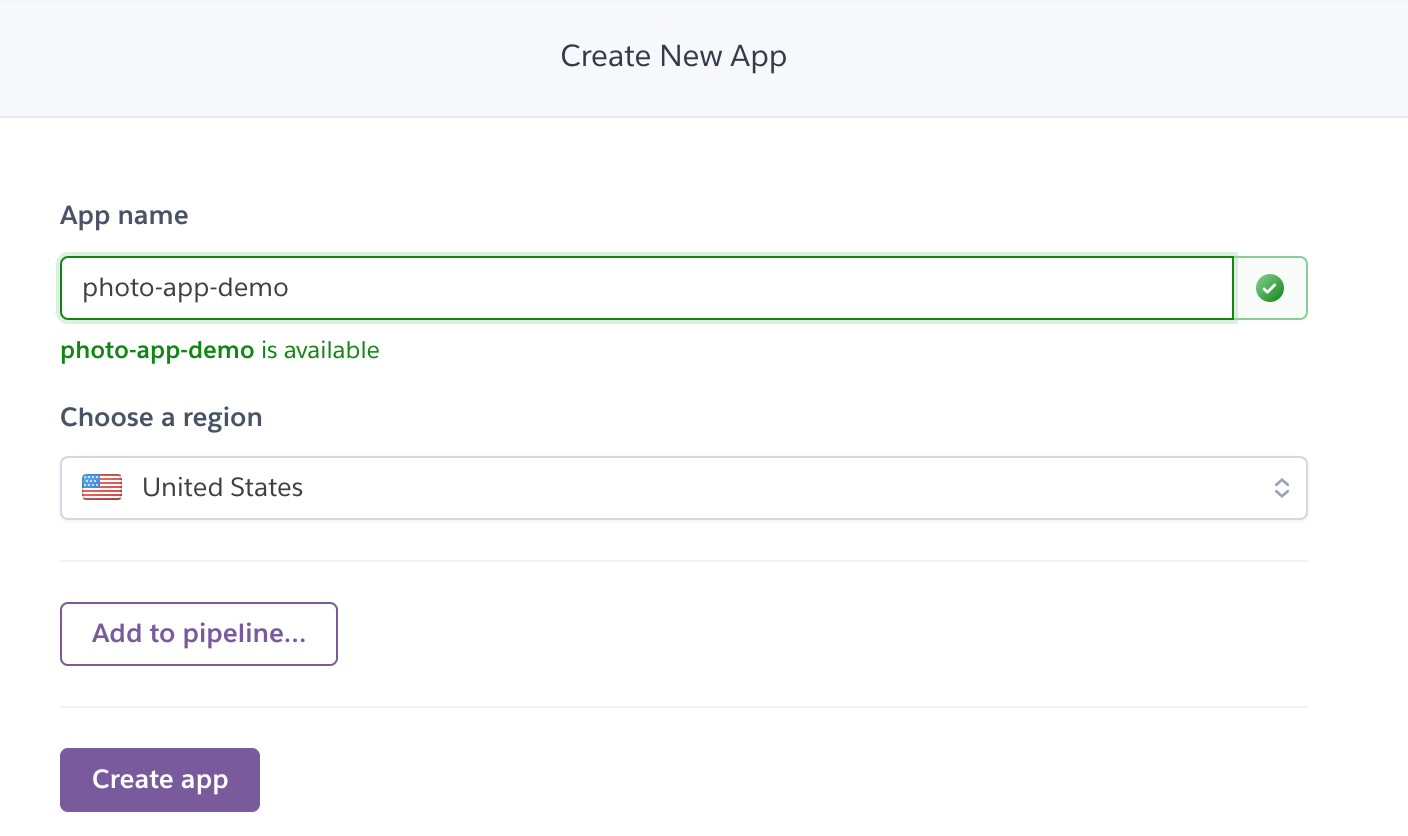
Create a new app on Heroku by logging into the Heroku website and using the Web UI. Name it anything you want!
2. Create a Hosted Database
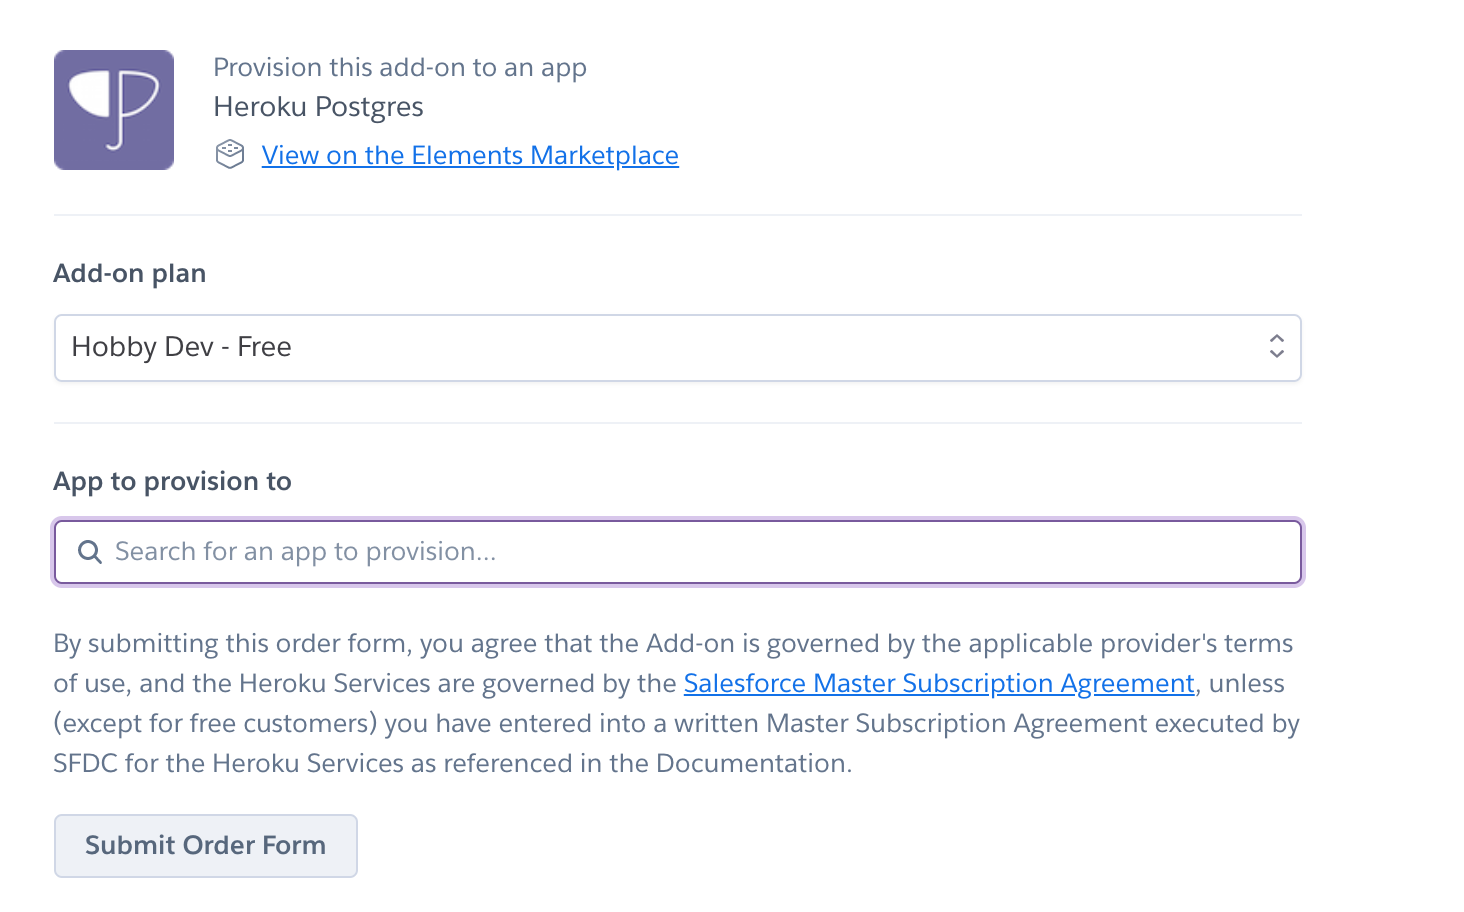
After creating your app, you will create a database using Heroku Postgres. Click the “Install Heroku Postgres” button (purple).

Next, search for the app you just made and then click “Submit Order Form”
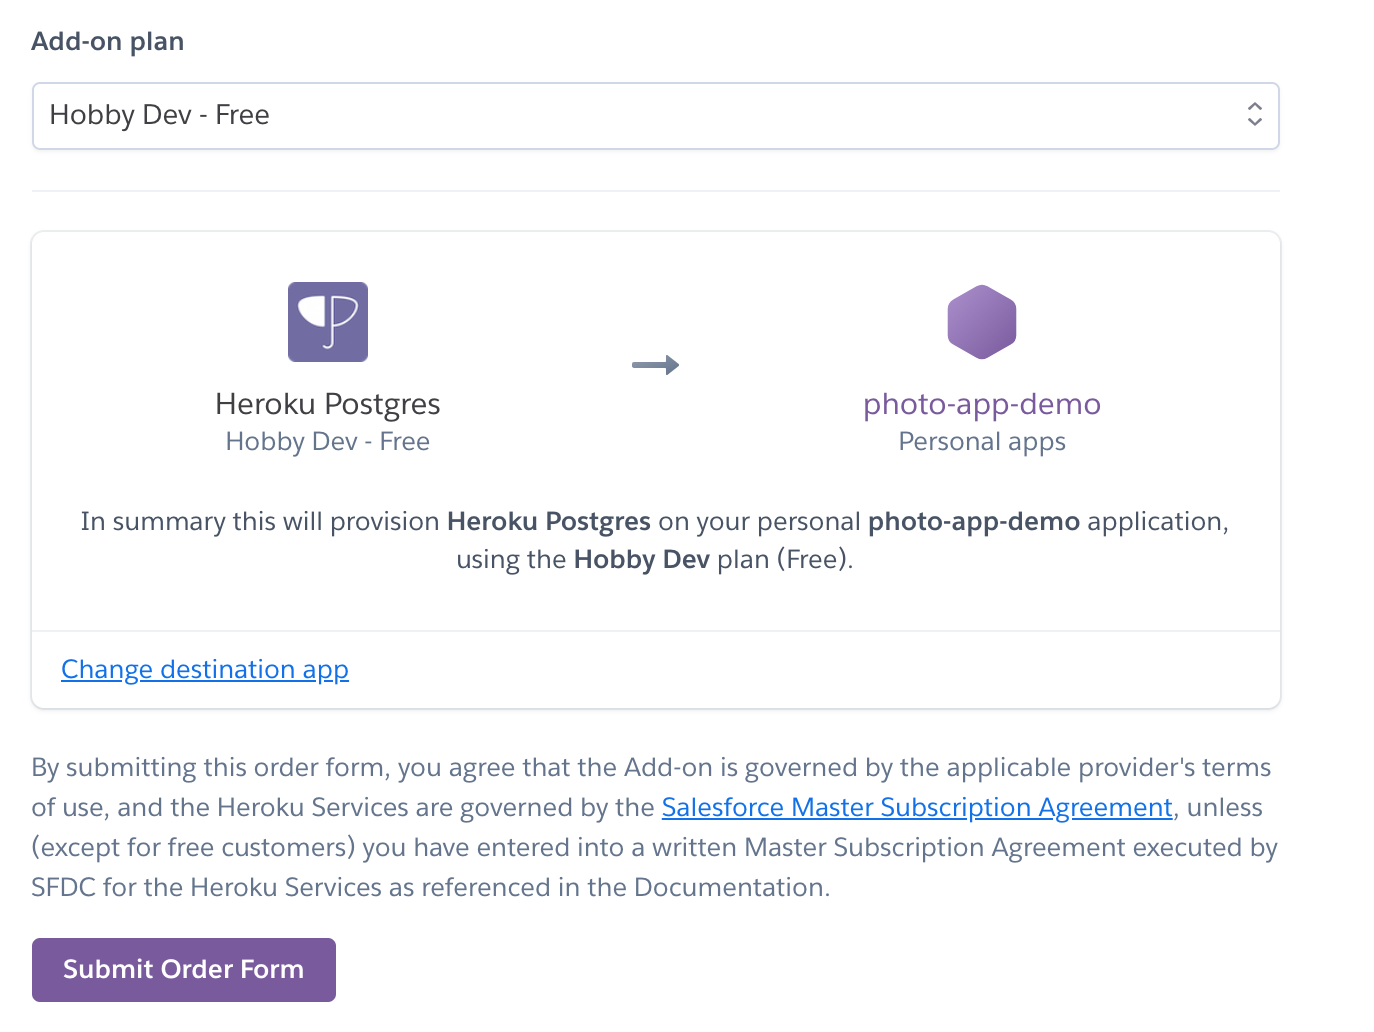
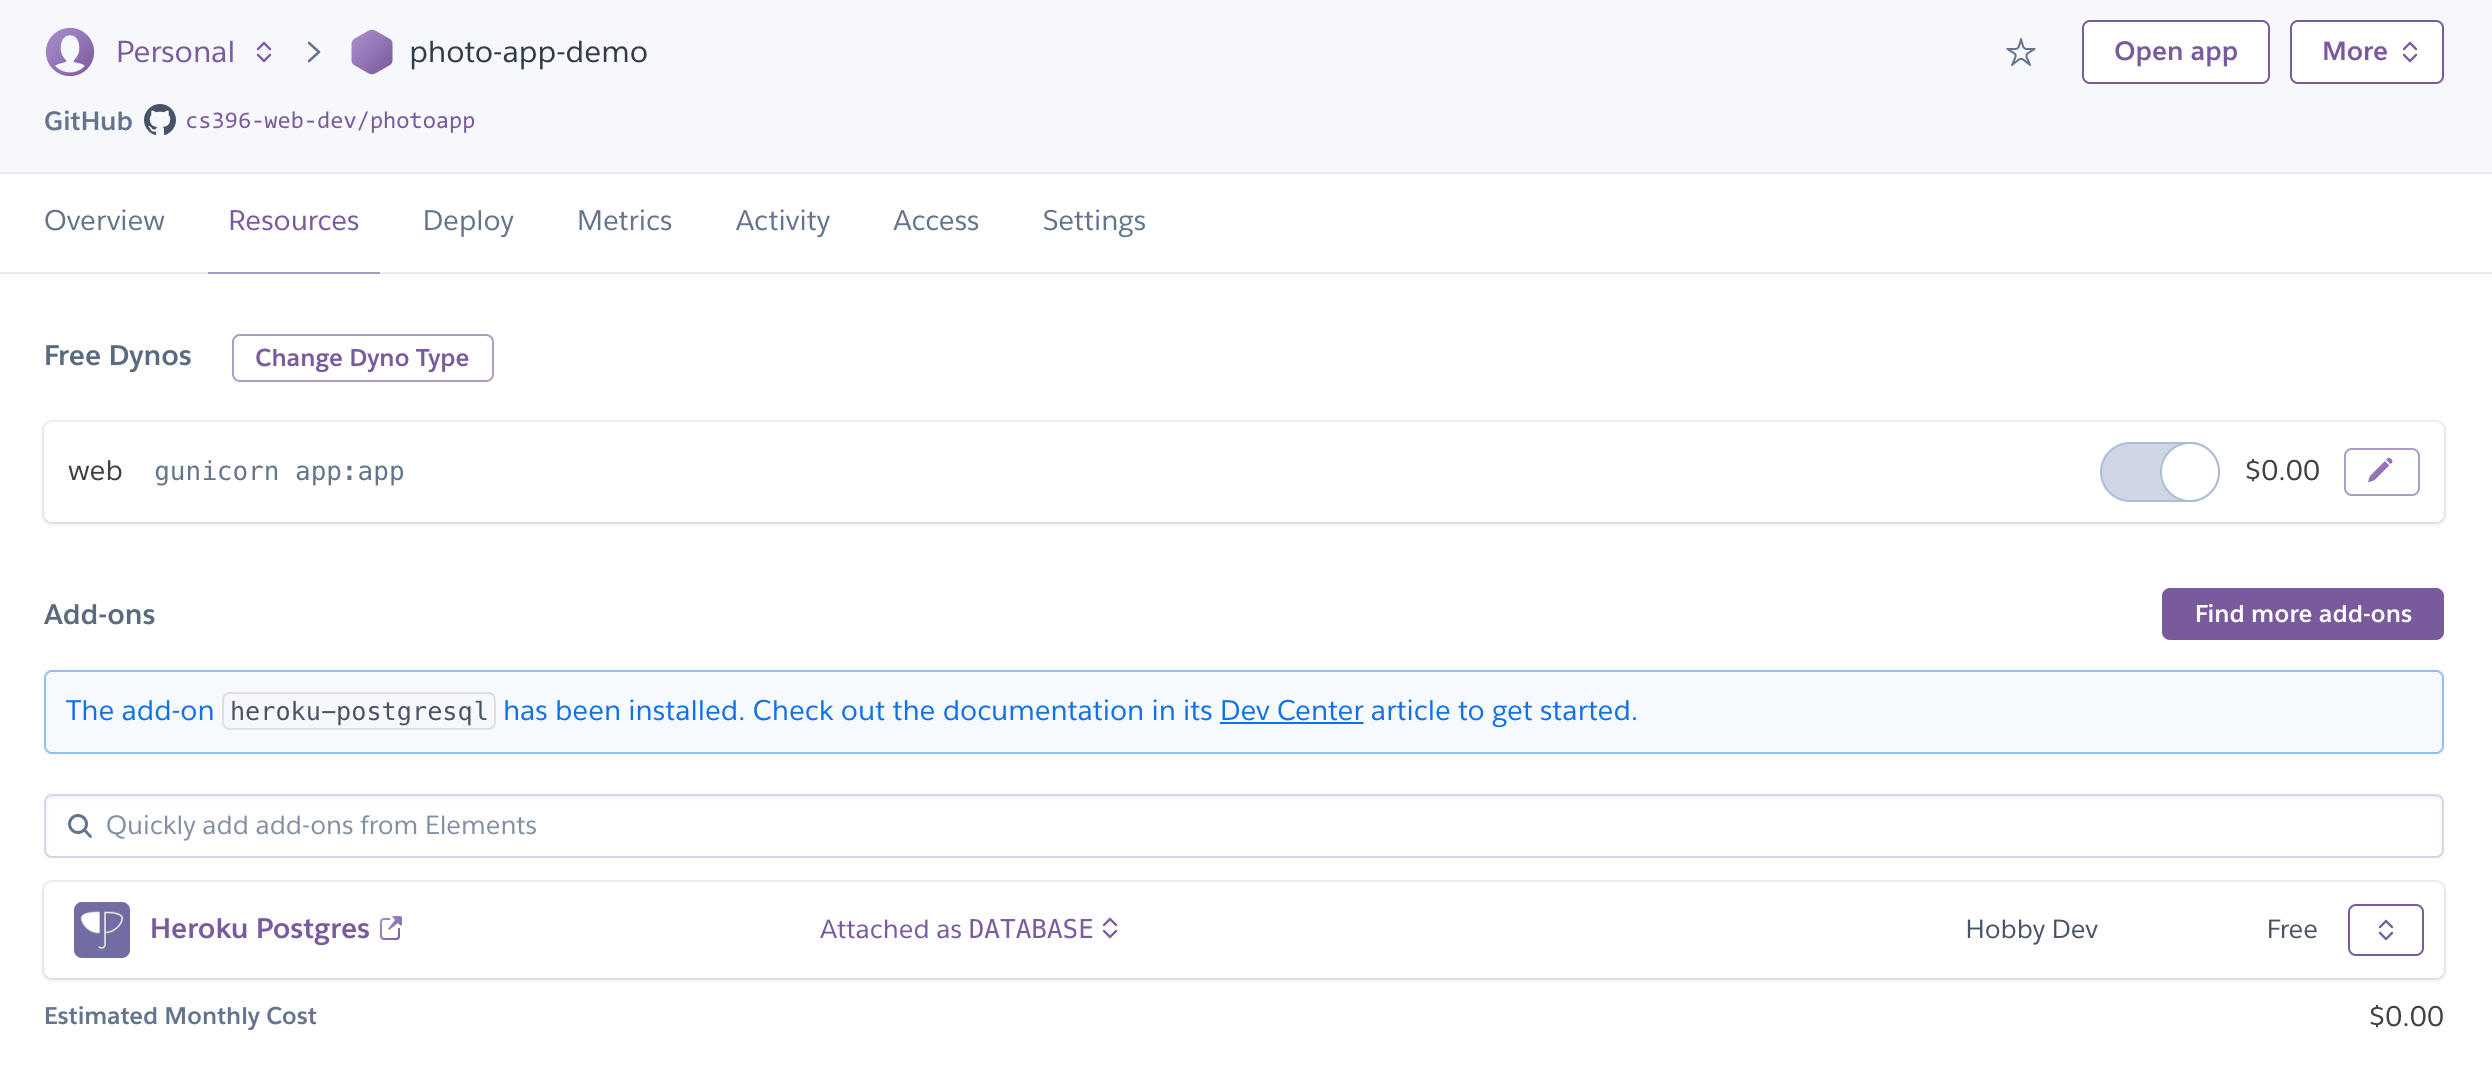
When you’re done, you should see a confirmation screen:
3. Add Database Environment Variables
Now navigate to the “Settings” tab:
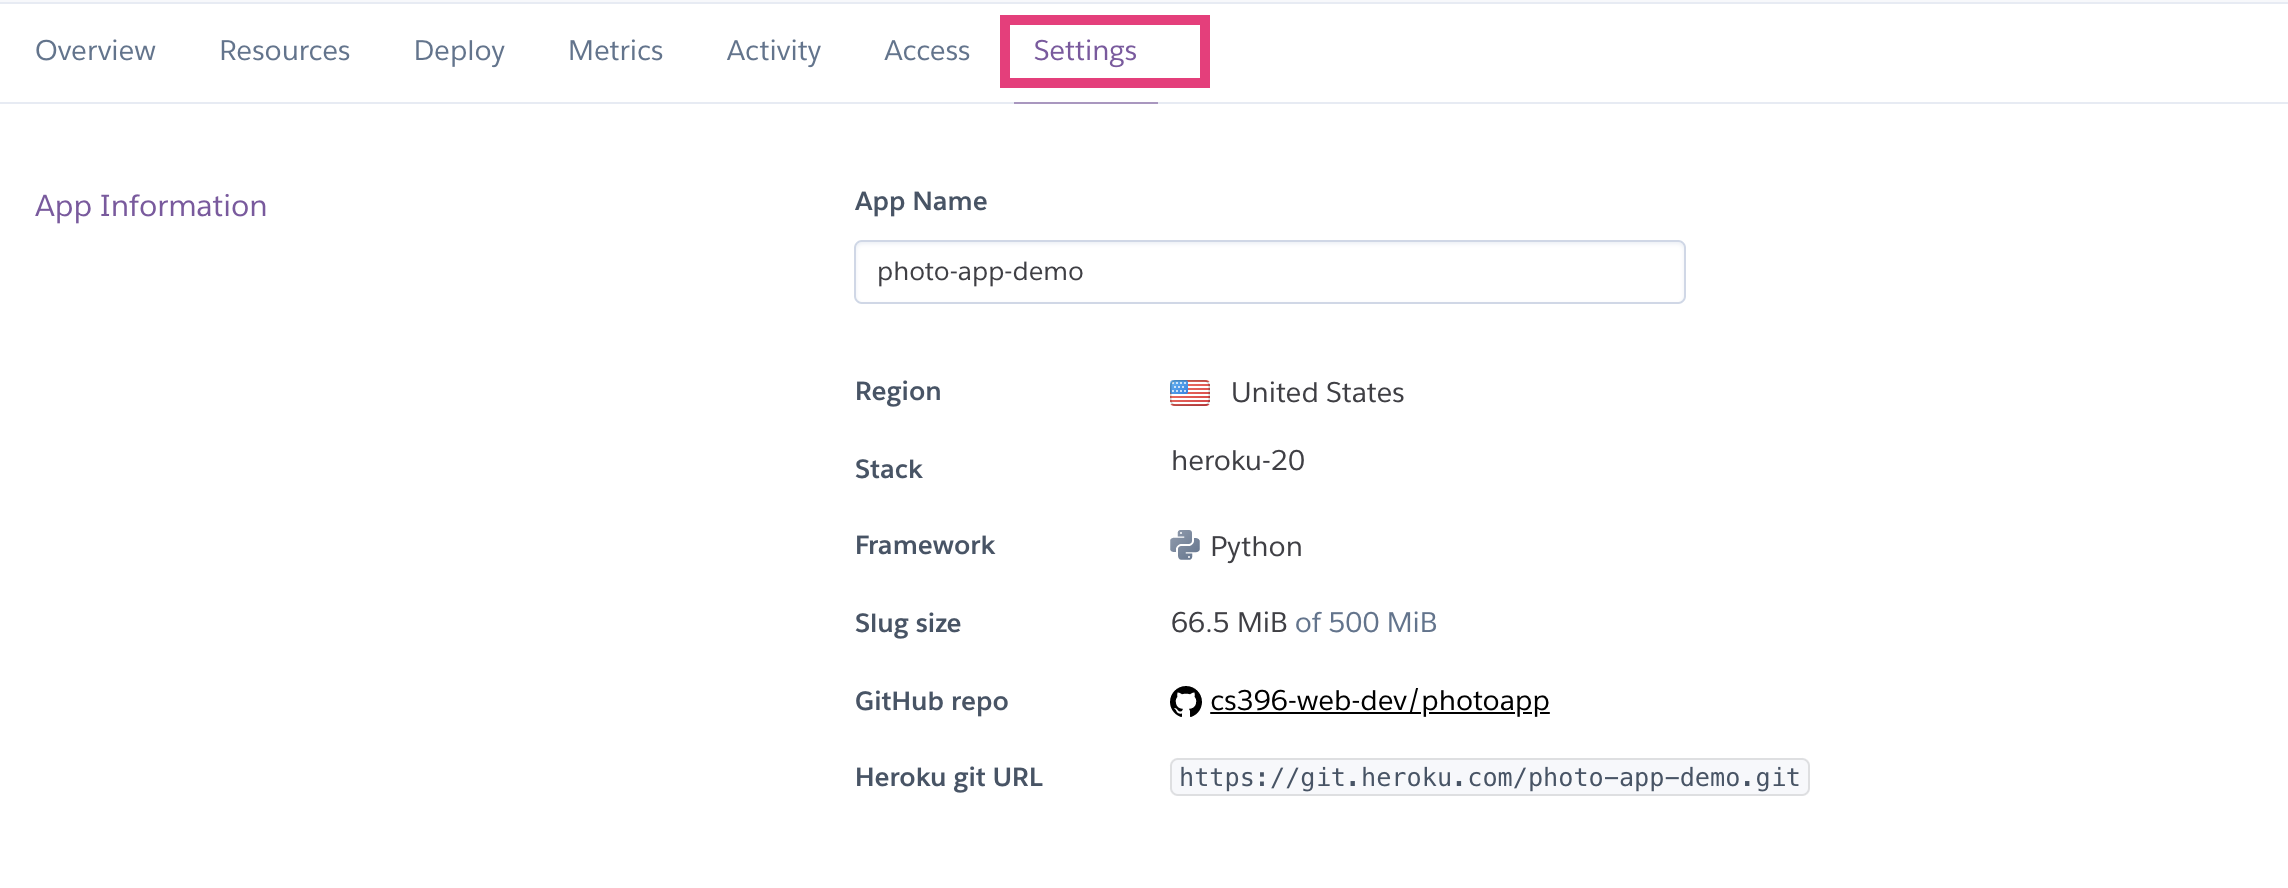
Scroll down and click the “Reveal Config Vars”

You should notice that Heroku Postgres has created a database connection string for you in the format:
postgres://<username>:<password>@<host>:5432/<database_name>

You are going to create a new environment variable called DB_URL that is identical to the DATABASE_URL string, but prefixed by postgresql:// instead of postgres:// (which is necessary to work with SQL Alchemy).

Copy that environment variable to your .env file and comment out the DB_URL environment variable pointing to your local database instance:
DEBUG=True
FLASK_ENV=development
FLASK_APP=app.py

# Comment out local database string:
# DB_URL=postgresql://postgres:12345@localhost/photo-app

# Add cloud database string:
DB_URL=postgresql://vqwckqdllbhfsj:<some_password>@ec2-34-205-209-14.compute-1.amazonaws.com:5432/dbintgo7m2v4vl
Then, on your command line from the root of your photo-app directory, run the populate.py command again:
python3 populate.py
This will load some fake data into your cloud database. Because you’re inserting ~800 records, this process may take a few minutes.
4. Deploy your app
Finally, you are ready to deploy your app to Heroku via GitHub. Navigate to the deploy tab and click the GitHub icon:
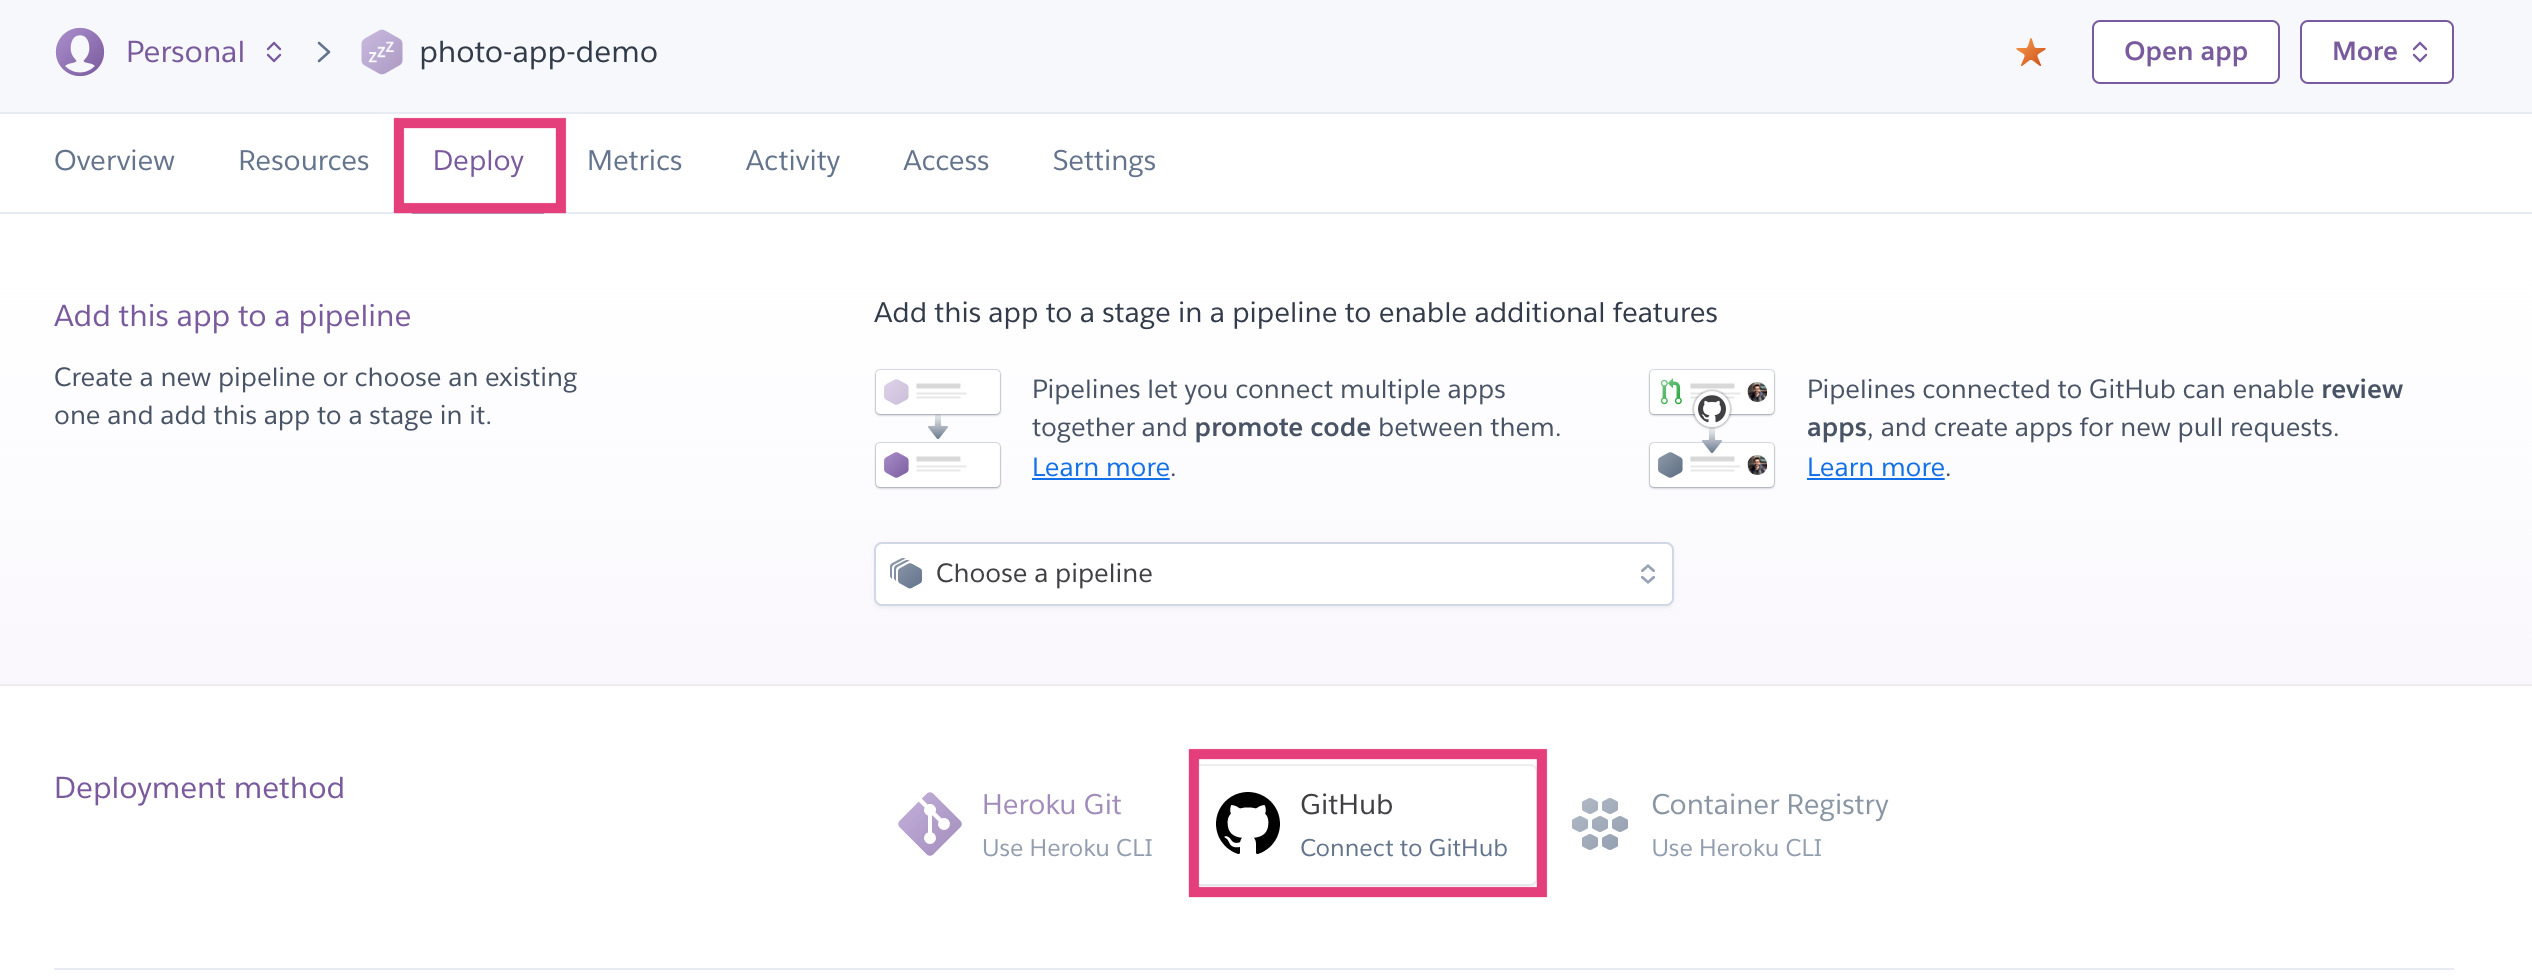
Search for your photoapp in the texbox, and when you find it, click the “connect” button.

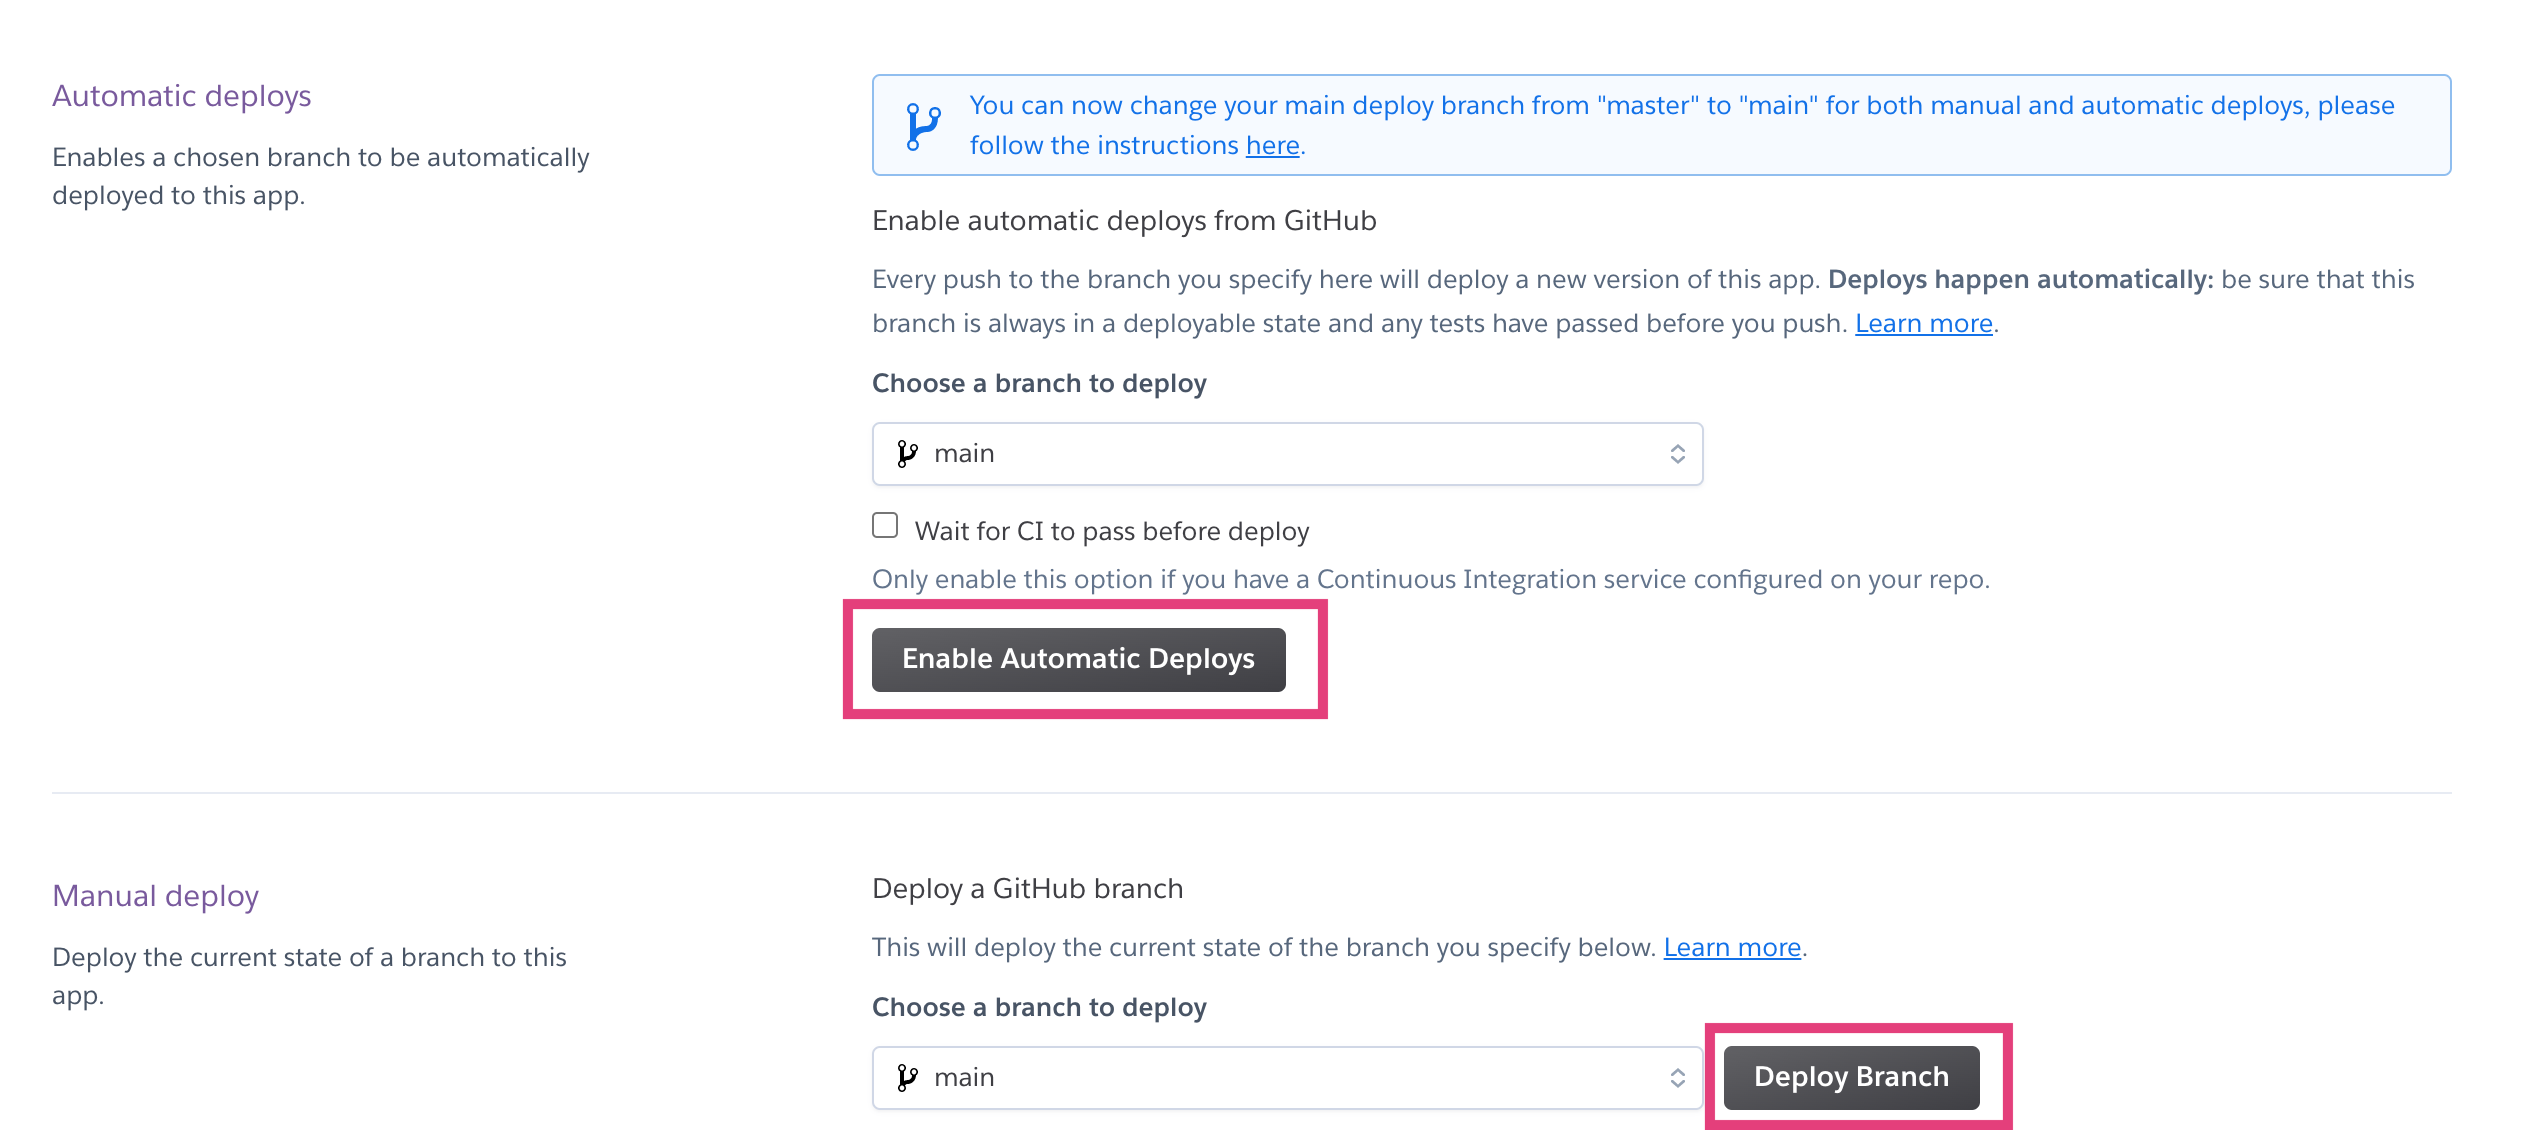
Next, click the “Deploy Branch” button. This will copy all of your application files from GitHub onto your Heroku container. And if you want Heroku to automatically rebuild and deploy your code everytime you push to GitHub, click the “Enable Automatic Deploys” button.
And finally, scroll to the top of the page and click the “Open App” button:

5. Extra credit opportunities (up to 3 points)
You may earn up to 3 points extra credit by pursuing one of the enhancements listed below. If you worked in a group, extra credit will be divided by 2. So if you want to earn 3 points each (the maximum), do 6 points of extra credit.
| 3 points | Modify the flask template from HW2 so that it uses data from your database (instead of using the random data from HW2) |
| 3 points | Modify the Posts API endpoint so that the JSON object also displays a count of the likes. |
| 3 points | Create a brand new endpoint that allows the user to like other people’s comments. |
| 3 points | Create a “smarter” suggestions endpoint that recommends users based on some set of principles. Then describe (in 1-2 paragraps) the principles you instantiated and why. |
| 3 points | Create a “smarter” posts endpoint (for retrieving lists of post) that sorts and displays a user’s posts (i.e. newsfeed) in a principled way. Then describe (in 1-2 paragraps) the principles you instantiated and why. |
5. What to Turn In
Please review the requirements above and ensure you have met them. Specifically:
- 15 points for GET requests
- 20 points for POST / PATCH / DELETE requests
- 5 points for deploying to Heroku
When you’re done, please submit the following to canvas:
- A link to your Heroku deployment
- Your DB_URL on Heroku Postgres (for our automated tests).
- A zip file of your code
- If you worked with a partner, please list your partner
- If you did extra credit, please list what extra credit you did as a comment (so that we can look out for it).