Assignments > Lab 6. JavaScript Practice
Due on Fri, 05/06 @ 11:59PM. 5 Points.
Introduction
The goal of today’s lab is to:
- Help you practice using JavaScript to target and modify HTML elements in your DOM Tree.
- Continue practicing your CSS skills.
- Encourage you to keep thinking about improving the accessibility of your website.
We have created a cheatsheet (below) with examples of different selector methods and approaches to updating the DOM.
Selector Methods
| Method | Example |
|---|---|
| getElementById() | document.getElementById(“my_element”) |
| querySelector() | document.querySelector(“#my_element”) document.querySelector(“p”) document.querySelector(“.my-announcements”) |
| querySelectorAll() | document.querySelectorAll(“p”) |
| getElementsByTagName() | document.getElementsByTagName(“div”) |
| getElementsByClassName() | document.getElementsByClassName(“.panel”) |
Some examples of HTML attributes you can modify
| Attribute | Example |
|---|---|
| className | document.querySelector(“div”).className = “panel”; |
| innerHTML | document.querySelector(“div”).innerHTML = “<p>hi</p>”; |
| src (for images) | document.querySelector(“.my_image”).src = “sponge_bob.png”; |
| href (for links) | document.querySelector(“.my_link”).href = ‘https://www.wikipedia.org’; |
Some examples of style properties you can modify
| Property | Example |
|---|---|
| width | document.querySelector(“div”).style.width = “200px”; |
| height | document.querySelector(“div”).style.width = “200px”; |
| background-color | document.querySelector(“div”).style.backgroundColor = “hotpink”; |
| border-width | document.querySelector(“div”).style.borderWidth = “5px”; |
| padding | document.querySelector(“div”).style.padding = “10px”; |
| display | document.querySelector(“div”).style.display = “none”; |
Your Tasks
Please download the lab05.zip file, unzip it, and move the lab06 folder inside of your webdev-labs folder. Your directory structure should look something like this:
webdev-labs
├── .git
├── lab01
│   ├── exercise01
│   └── exercise02
├── lab02
│   ├── .gitignore
│   ├── Procfile
│   ├── app.py
│   ├── helpers
│   ├── requirements.txt
│   ├── static
│   └── templates
├── lab03
│   ├── answers.sql
│   └── photo_app_lab03.tar
└── lab06
    ├── 01-font-switcher
    ├── 02-theme-switcher
    ├── 03-dyslexia-mode
    └── style.css
Then complete the tasks below.
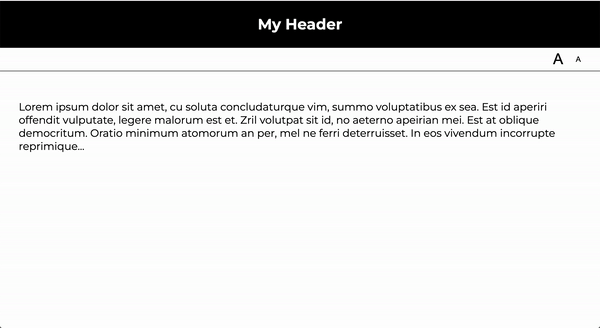
1. Font Size Adjuster
Open font-switcher/index.html in VS Code, and note the HTML tags. Also note that within the header tag there is a script tag that links to your JavaScript file:
<script src="index.js" defer></script>
The keyword defer means that the script won’t run until your entire web page is loaded.
Open 01-font-switcher/index.js in Atom, and uncomment the section at the bottom by deleting the /* and */ symbols:
/*
document.querySelector(???).addEventListener('click', makeBigger);
document.querySelector(???).addEventListener('click', makeSmaller);
*/
Replace the ??? with the correct selector, so that your makeBigger function and makeSmaller function get attached to the correct DOM elements.
Finally, modify the makeBigger and makeSmaller functions so that they modify the font size of the div.content element and the h1 element. When you’re done, your web page should look like this:
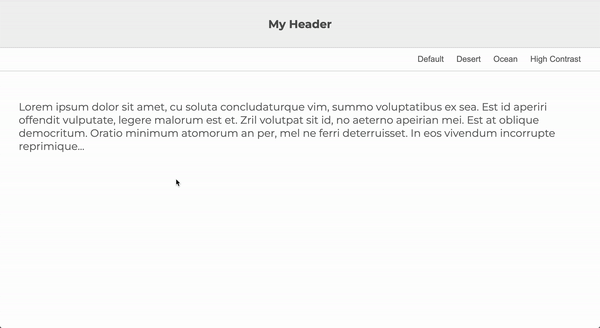
2. Theme Switcher
Another way to make your site more accessible is to create a “high-contrast” stylesheet or CSS class. For this exercise, please do the following:
- Open
02-theme-switcher/index.jsand attach a click event handler to each of the four of the buttons in the nav bar. - Each event handler should modify the class of the
bodytag to match the theme of the button that was clicked.- The available theme classes are:
ocean,desertandhigh-contrast. To see the themes, open thestyle.cssfile and scroll to the bottom.
- The available theme classes are:
- If the
defaultbutton is clicked, just unset the class on the body tag.
When you’re done, your web page should look like this:
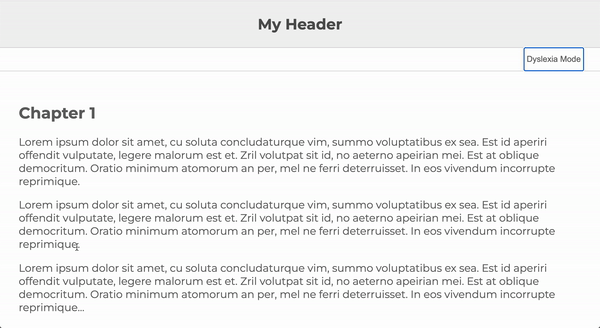
3. Dyslexia Mode
In part 3, you will use JavaScript to create a method for people with dyslexia to more easily read your web page. This technique is based on this artice: Adding A Dyslexia-Friendly Mode To A Website. Please complete the following tasks:
- In
style.css, create a new class called.dyslexia-mode. - Following the recommendations from the Smashing Magazine article above, ensure that your class does the following:
- Adjust the letter and word spacing to the recommended settings
- Disables ligatures
- Modify the line spacing
- Modify either the font weight (to be bolder) or the color (to be darker)
- Make the font-size bigger
- Narrow the line width (lines that are too long in the horizontal direction are hard to read)
- When you’re done, create a button and add the needed functionality to enabled the user to toggle the “Dyslexia Mode” on and off.
- Note that the Smashing Magazine also makes use of localStorage so that the site “remembers” the users’ preferences for the next time.
When you’re done, your web page should look like this:
What to Turn In
To submit Lab 6:
1. Push all of your files to GitHub
Please copy the latest version of your files to GitHub by issuing the following commands: Please commit and push the latest version of your files to GitHub by issuing the following commands:
git add .    # stages all of your old and new files
git commit -m 'Commiting my completed lab06 files'
git status   # to make sure that all of your files are being tracked
git push     # sends your files to GitHub
2. Paste a link to your repo on Canvas
Paste a link to your webdev-labs GitHub repository into the Canvas textbox for Lab 6.