Assignments > Lab 7. Mini Chat App
Due on Fri, 05/14 @ 11:59PM. 5 Points.
Background Readings
- WebSockets for fun and profit (a nice, concise overview)
- A conceptual overview of WebSockets (a longer, more detailed overview)
- The ws library
- Demo using ws and node.js
Until now, we’ve been using the HTTP protocol to send messages between a user’s client at the server. Using HTTP, clients must initiate individual connections to the server in order to request and receive data.
However, there are examples in which it may be useful for the server to send data to the client without the client explicitly requesting it. WebSockets are useful for these cases, since each client establishes a persistent connection to the server over which the server can send messages.
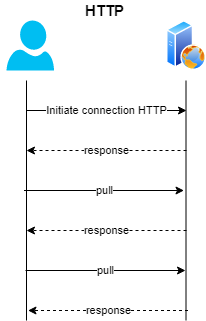
HTTP Protocol (http:// or https://) |
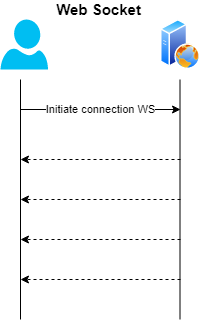
Web Socket Protocol (ws:// or wss://) |
Today, you will building a messaging app using WebSockets. This requires two components:
- A WebSocket server that handles incoming messages from each client
- A client that establishes a connection to the server and sends messages to the server whenever a user chats.
Note that the server and the client don’t have to be on the same machine (and furthermore the client doesn’t even have to be hosted in the cloud)!
1. Implement the Server Functionality
Download lab07.zip, unzip it, and open the folder in VSCode.
From your command line, navigate to the lab07/server directory and install the required packages with npm install and run the server locally using npm start.
Open chat-server.js in VS Code and take a look at it. Note how the server is listening for messages via the “message” event, and then naively relaying the received message to all of the connected clients (without any validation or processing):
socket.on("message", message => {

    const data = JSON.parse(message);

    // this loop sends the message that was just received to all the connected clients:
    wss.clients.forEach(client => {
        if (client.readyState === ws.OPEN) {

            // replace this line of code in order to implement
            // the logic outlined above.
            sendJSON(data, client);
        }
    });
});
Your job is to edit the chat-server.js code to handle the three different types of JSON messages shown below. These data formats are abitrary – we just made them up as reasonable ways to send login, disconnect, and chat information. You could set these messages up however you want, but we just made some decisions here about how to do things:
- Login:
{ type: "login", username: "my_username" } - Disconnect:
{ type: "disconnect", username: "my_username" } - Chat:
{ type: "chat", text: "is this working?", username: "my_username" }
You will handle each of these messages according to the specifications outlined below:
1. Login
If the data.type is “login”, add the logged in user to the loggedInUsers set. Then, send the following message back to each client:
{
    "type": "login",
    "users": Array.from(loggedInUsers)
}
You can test this by opening lab07/client/index.html in your web browser, clicking the “Connect” and “Set Name” buttons (and also providing a username), and seeing if you get the correct JSON output in the browser console.
2. Disconnect
If the data.type is “disconnect”, removed the user from the loggedInUsers set. Then, send the following message back to each client:
{
    "type": "disconnect",
    "users": Array.from(loggedInUsers)
}
You can test this by opening lab07/client/index.html in a second browser tab and clicking the “Connect” and “Set Name” buttons (and also providing a username). Then, close the browser tab you just opened. Now go back to your first browser tab and look at the console. You should see a messages in the console indicating that a user both connected and then disconnected from the chat server.
3. Chat
If the data.type is “chat”, just send the data object to each client (no processing needed). You can test this by sending a chat message in the client and then seeing if you get the correct JSON output in the browser console.
If the data.type isn’t “login,” “disconnect,” or “message”, ignore the message (don’t pass it on), and log it to the console: console.log('Unrecognized message type:', data);
Note
If we were building this into a full application, we would (probably) store each user, conversation, and message in a database to load the appropriate chat history whenever the user opens the application. For now, messages will just be stored on the client and not be persisted between sessions (perhaps a privacy feature?).
2. Implement the Client Functionality
Open index.html in your browser. The interface is a simple chat interface that allows the user to select a chatroom (just localhost for now), set their name, and send messages to other users in the chatroom.
Now open client.js in VS Code and take a look at it. Much of this (simple) client has already been implemented for you, including:
- Initializing the connection when the user clicks the “Connect” button
- Logging the user in when the user clicks the “Set Name” button
- Sending messages to the server when the user clicks the “Send” button
Your job will be to implement the connection.onmessage event handler, which will update the UI whenever the client receives a message from the server. You will handle server messages according to the specifications outlined below:
1. Login or Disconnect
If the data.type is “login” or “disconnent”, display the list of logged in users in the #users-list div (right-hand panel).
2. Chat
If data.type is “chat”, append the chat message to the #chat div (main panel) with the sender’s name and message.
If your client and server are both working, you should be able to open index.html in two separate browser tabs, log in to the same server on each, and send messages between them (se video below)!
3. (Optional) Deploy with ngrok
Ngrok is a command line tool for creating a secure URL that points to server that is running on your local computer. Using this url, others can access your server securely without you having to host it online.
You should sign up for ngrok using your Northwestern email and download/extract the version for your preferred OS.
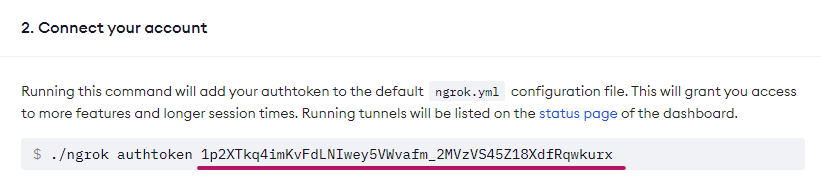
Run ngrok help; if the command fails, find the location where the ngrok executable was downloaded to and add the folder to your system PATH. Then, run ngrok authtoken <token> with the token listed in your ngrok dashboard.
With your server running in another terminal window, type ngrok http 8081 to open a tunnel to your server. You should now be able to add the forwarding url (minus the http://) to the list of servers on your client and use it as a separate chat room.
If you want, feel free to send the link to any open tunnels to your app in the Zoom chat so others can connect to it with their clients. Ideally, we’ll be able to create several open chatrooms that your classmates can use!
What to Turn In
When you’re done, zip the completed folder and submit it to Canvas.