Assignments > Lab 2. Setting Up MongoDB
Due on Fri, 04/09 @ 11:59PM. 5 Points.
I. Introduction
In today’s lab, we will be learning how to write code to interact with a database, using MongoDB. Lab02 and HW02 are based on a tutorial written by Linus Okoth (for the Winter 2021 React course he designed), and adapted by Cooper Barth to fit with our Doctor Who theme.
Background Readings
These are for your reference, if you want to read more about the technologies we’re using:
- Background reading on RESTful architectures:
- MongoDB Introduction & Guide
- Mongoose (Node.js Package for connecting to MongoDB)
Some Encouragement :)
Configuring your laptop and getting all of the pieces to work together can be frustrating and time consuming. We’re here to help, and want to ensure that everyone is successful. This lab is not meant to be evaluative – it’s meant to help you get familiar with a tool that is widely used in industry (especially in early-stage startups). If there’s anything that you don’t understand, we can explain it to you and/or point you towards more resources.
II. Your Tasks
A. Set Up MongoDB
MongoDB is a NoSQL database program that organizes collections of JSON-like documents with optional schemas. There are many different kinds of databases out there (relational systems like SQL are a very popular choice for more robust apps), but we’ve selected MongoDB because of its flexibility and usefulness for prototyping. Because you will eventually be building a cloud-hosted, publicly accessible system, we’re going to go ahead and create a cloud MongoDB instance on MongoDB Atlas. That said, you may also want to install MongoDB locally (optional).
1. Register w/MongoDB Website
Login or signup for a MongoDB account using your u.northwestern.edu email.
2. Create a Project
Click on the “create a new project” button. Type in the name of your project as “CS396” and click next. Ignore the “add teammates” prompt and finish the setup.
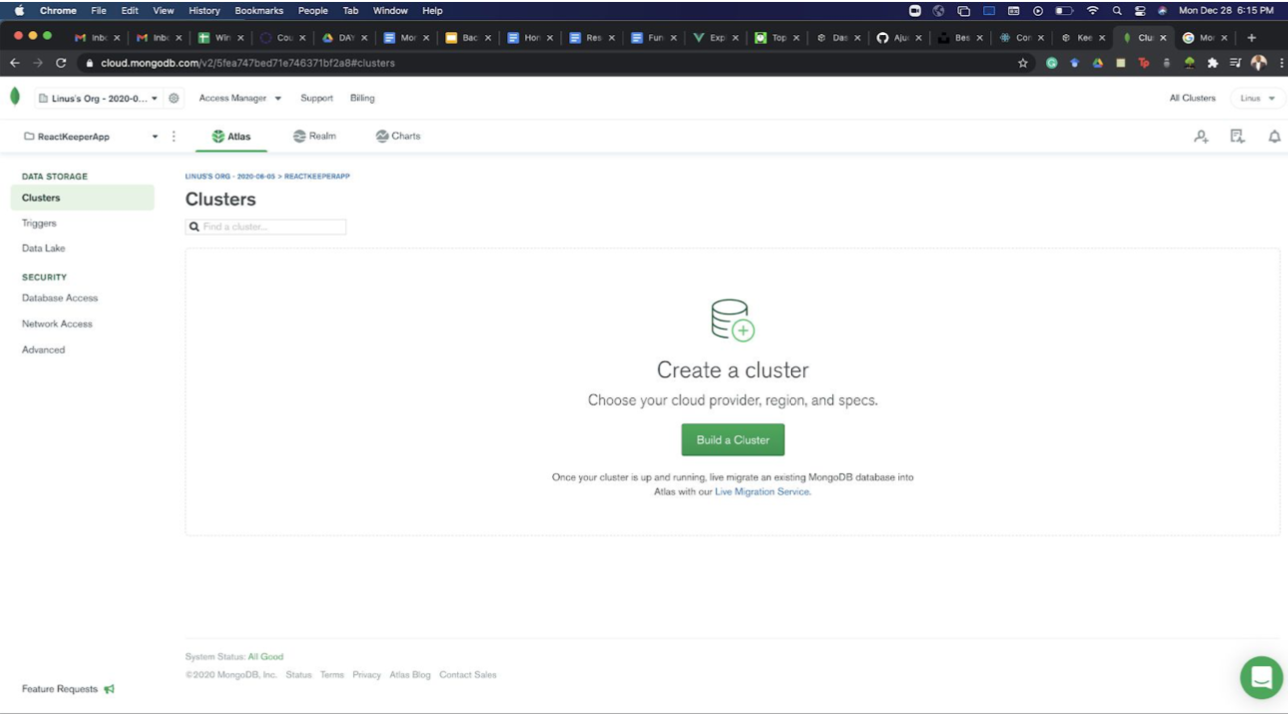
3. Build a Cluster
Click on “Build a Cluster”. Select the free options on the next page.
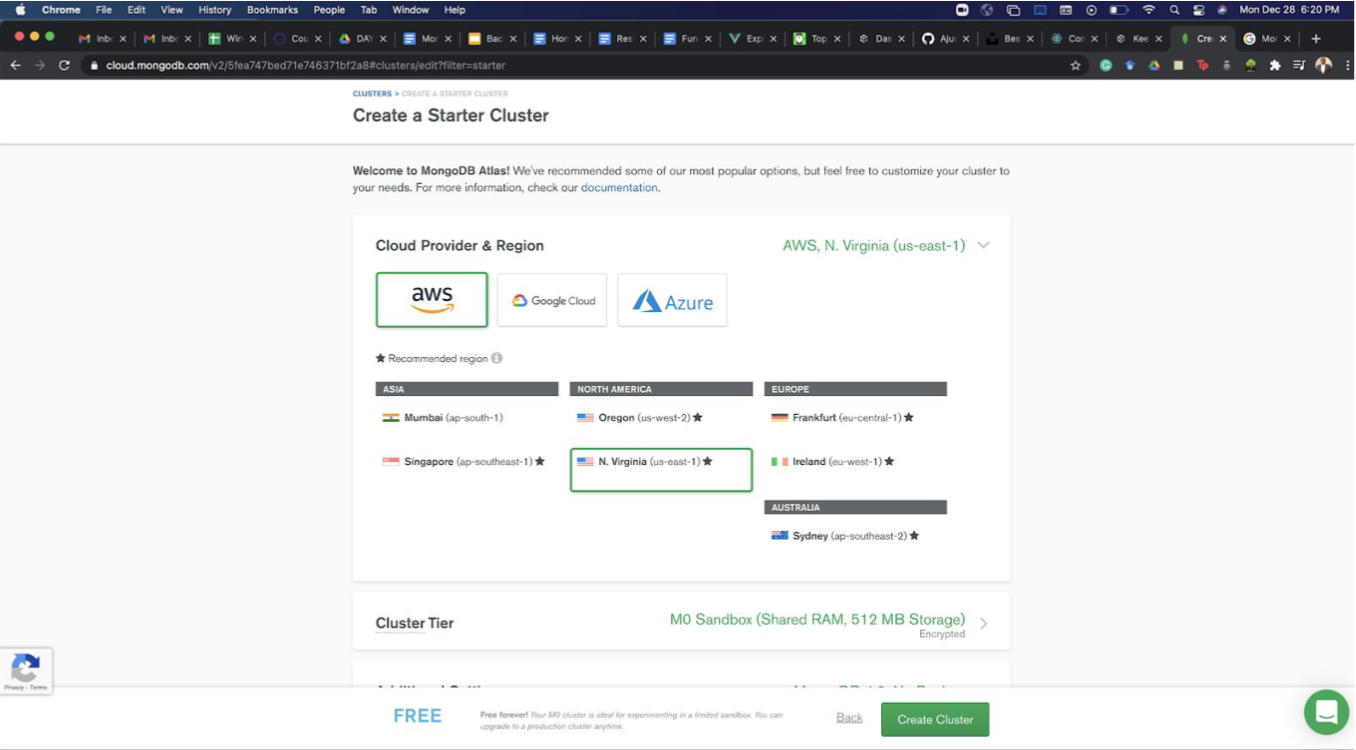
Do not change anything on this page and proceed to create a cluster. It might take several minutes so grab some coffee and relax.
4. Create a Database User
Next, set up a user and password that will be used by your web applications to access the database.
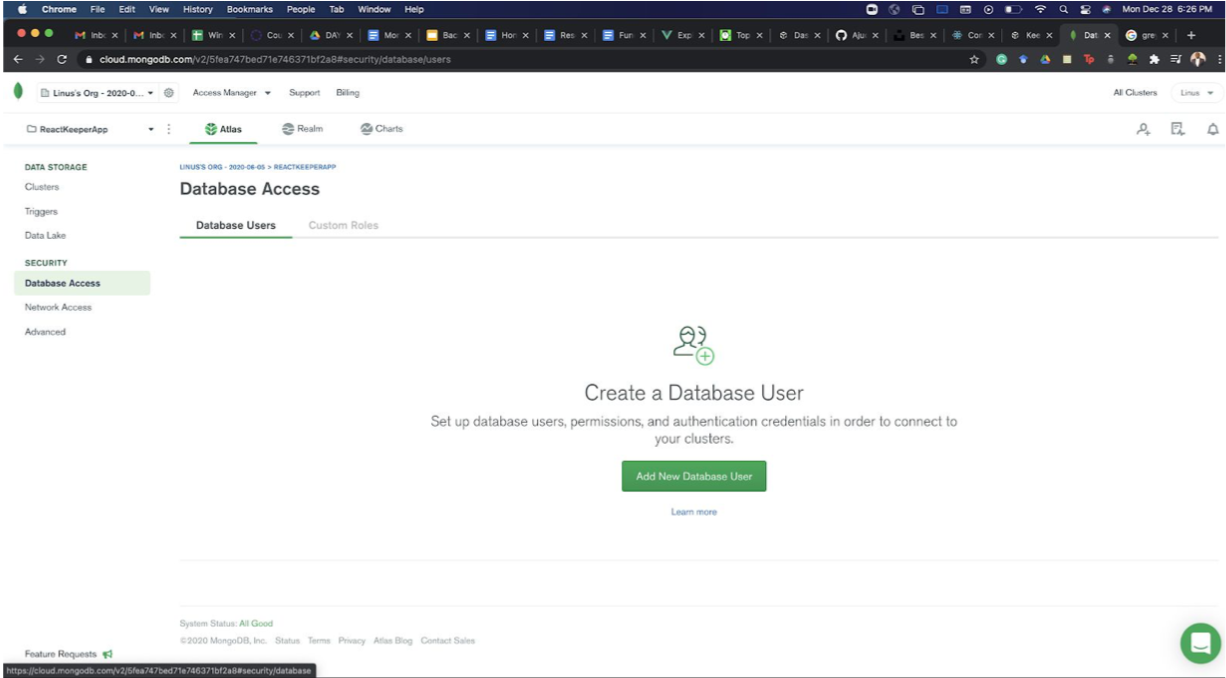
Click on “Database Access” under SECURITY. Then click “Add New Database User”.

Follow these configurations and use your unique username and password. Make sure to copy the password to somewhere safe, as you will not be able to view it once created.
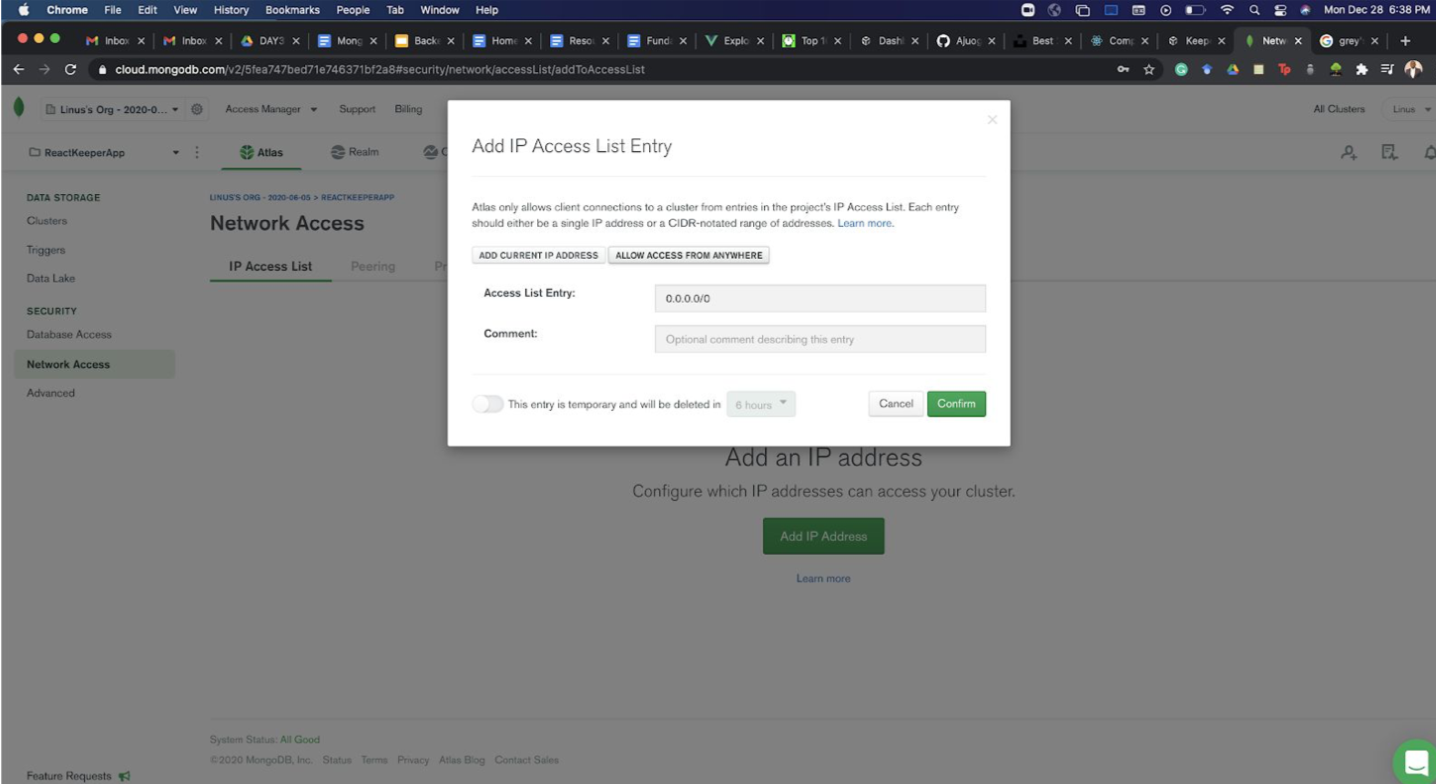
5. Grant Network Access
Finally, click “Network Access” just below the “Database Access” and click Add IP Address and then click “Allow access from Anywhere”. When deploying your backend to servers you will not have to reconfigure the IP address. Confirm to close and complete that step. This might take another few minutes.
We will use the database stored in this cluster in upcoming labs and homework assignments. Meanwhile, if you are curious about how to interact with MongoDB, take a look at their documentation on CRUD operations (CRUD = “Create, Read, Update, & Delete”).
B. Connect your Node.js web server to MongoDB
We will now be configuring your HW2 files to connect to MongoDB. To configure your web server, please complete the following steps:
1. Download the HW2 files
Download hw02-cs396.zip, unzip it, and move the resulting hw02-cs396 folder somewhere sensible (i.e. keep your files organized). Important: you will eventually be converting this folder to its own, new git repo. Given this, take care not to save this folder inside a folder that is already a git repo.
When you’re done, open the hw02-cs396 in VS Code and take a look at the files. Please also navigate to the hw02-cs396 on the command line and install the dependencies by typing: npm install
2. Find your MongoDB connection string
Go to MongoDB Atlas and find your connection string. To do this:
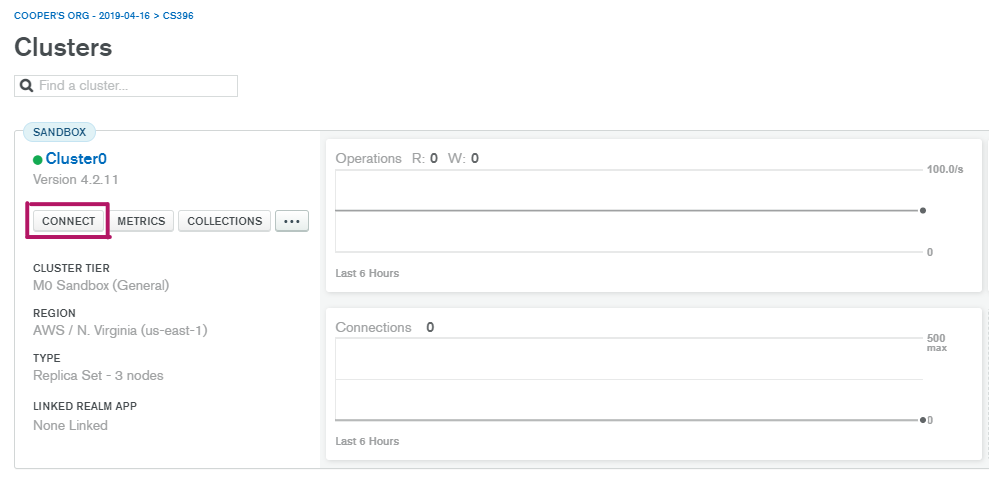
- Click on the “Clusters” link (left-hand navigation)
- Click on the project you just made (“CS396”)
- Scroll to the right until you see a button called “Connect”. Click the “Connect” button.
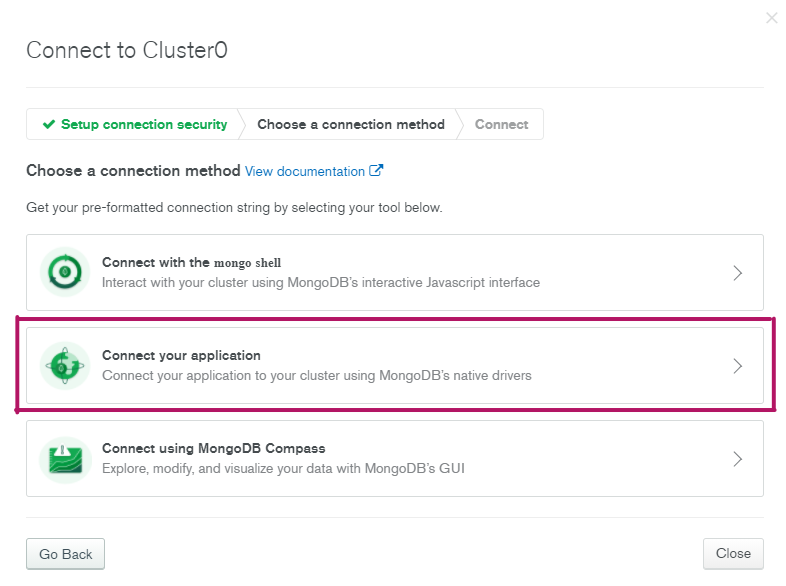
- Next, click the “Connect to Application” option:
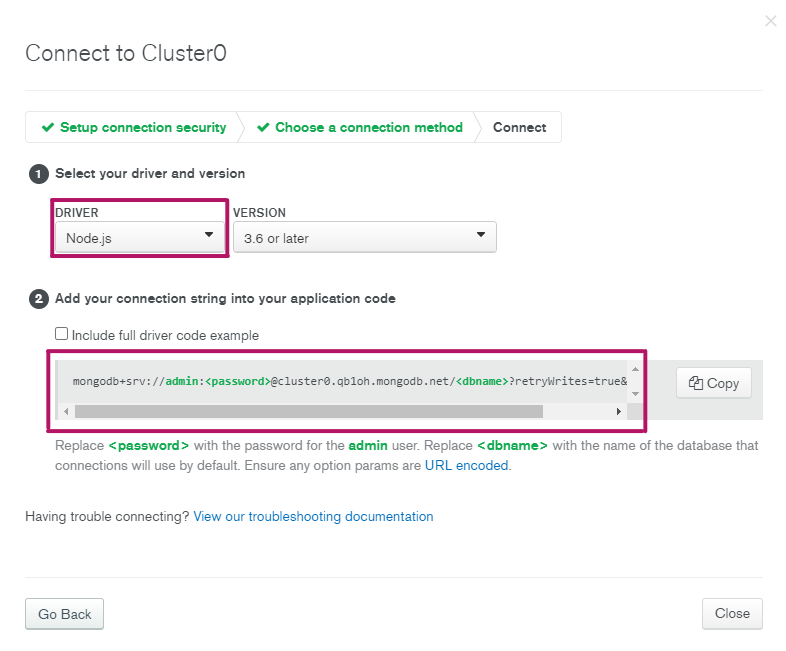
- Finally, select the Node.js options and copy your connection string:
3. Connect your application to your database
My connection string (copied from MongoDB Atlas) is this…
mongodb+srv://admin:<password>@cluster0.qb1oh.mongodb.net/<dbname>?retryWrites=true&w=majority
…and while I could copy this connection string directly into my web application, I don’t want to store my database connection information in my GitHub repository (a big No-No, since that would mean anyone could access it). As an alternative, we’re going to use environment variables to store our database credential information by making a .env file at the root of our web application. Inside your .env file, please add the following environment variables (but replace <your_password>, <your_database_username>, and <your_host_address> with the values that pertain to the DB connection string you just copied from MongoDB Atlas):
# Your environment variables (edit this), extracted from your DB connection string

# copied from MongoDB Atlas
DB_HOST=<your_host_address>
DB_USERNAME=<your_database_username>
DB_PASSWORD=<your_password>

# NOTE: you can name your database whatever you want
DB_NAME=cs396_db
Here is what Sarah’s .env file looks like:
# Example: Sarah's environment variables, extracted from:
# mongodb+srv://cs396_admin:<password>@cluster0.tdqgg.mongodb.net/<dbname>?retryWrites=true&w=majority

# copied from MongoDB Atlas
DB_HOST=cluster0.tdqgg.mongodb.net
DB_USERNAME=cs396_admin
DB_PASSWORD=my_secret_password

# NOTE: you can name your database whatever you want
DB_NAME=cs396_db
Note that in the .gitignore file, the .env file is excluded, which means that this file will not be checked into your repo. Feel free to take a look at hw02-cs396/config/config.js to see how your environment variables are used to dynamically build your connection string.
4. Test your web app’s database connection
Finally, you are ready to test that your server can connect to your new database. To do this, please navigate to the hw02-cs396 directory in your command line and type npm start. If successful, you will see an output similar to this:
Sarahs-MacBook-Pro-4:cs330-web-server vanwars$ npm start

> cs396@1.0.0 start
> cross-env NODE_ENV=development node index.js

ENV: development
Application listening on PORT: 8081
Trying to connect to database...
Connected to cs396_db.
If the message Could not connect to database appears instead, let your peer mentor know to debug.
5. Populate your database
To insert all of the doctors and companions into your database, run this line at the command line (from within the hw02-cs396 directory).
npm run populate
You should see the following output:
Sarahs-MacBook-Pro-4:hw02-cs396 vanwars$ npm run populate

> cs396@1.0.0 populate
> cross-env NODE_ENV=development node ./config/scripts/execPopulateDB.js

Trying to connect to database...
Connected to cs396_db.
Clearing database...
Database cleared.
Populating database...
Database populated successfully.
Done!
6. Check the /doctors and /companions endpoints
- Open http://localhost:8081/doctors
It should show you doctors (but with different_ids) - Open http://localhost:8081/companions
It should show you companions (but with different_ids) - Run the tests
npm test
You should see that two tests passed (see output below).
Sarahs-MacBook-Pro-4:hw02-cs396 vanwars$ npm test

> cs396@1.0.0 test
> mocha


  /doctors
    GET
      ✓ should return a list of all Doctors (72ms)

  /companions
    GET
      ✓ should return a list of all Companions (55ms)


  2 passing (138ms)
III. Review the Checklist & Submit
1. Verify that you’re done
- App Configuration
- You can run your server locally with
npm startand receive theConnected to cs396_dbmessage. - Two tests pass when you run the tests
npm test - http://localhost:8081/doctors displays doctors to the screen
- http://localhost:8081/companions displays companions to the screen
- You can run your server locally with
- GitHub Configuration
- Your files have been committed and pushed to GitHub
- You have taken care to not include your database password in your repo by creating a local, hidden file,
.envthat is excluded from your GitHub repo in the.gitignorefile. - Note: Do NOT remove the
node_modulesline from.gitignoreunder any circumstances.
2. Submit to Canvas
When you are sure you have completed everything, please submit the following 3 files in zip file called lab02.zip:
- Your .env file
- A screenshot of your passing tests
- A screenshot of your /companions output in your web browser (when you click http://localhost:8081/companions).